
There is a specific kind of frustration that comes from watching Lightroom do something technically perfect and visually wrong. I ran into this constantly when I first started pulling my wedding work into a retouching workflow. The tool selects exactly what you asked for, the edge is razor-clean, and somehow the result looks worse than before you started. Too crisp. Too obvious. Like the software forgot that real light doesn’t have hard cutoffs.
That’s the problem at the center of Watch the full tutorial on YouTube – a genuinely useful breakdown by landscape photographer Mark Denney. Even though he’s working with Iceland highlands rather than beauty portraits, the underlying masking logic translates directly. Hard edges kill believability whether you’re blending a sky or softening a jawline. The four tricks he walks through are built around that same idea: automated selections are a starting point, not a finished answer.
I’ve been folding these into my portrait workflow for the past few weeks and the difference in how natural the transitions feel is significant enough that I wanted to write it up properly. Here’s how each technique works.
Step 1: Let Lightroom Auto-Select the Sky (or Subject) First
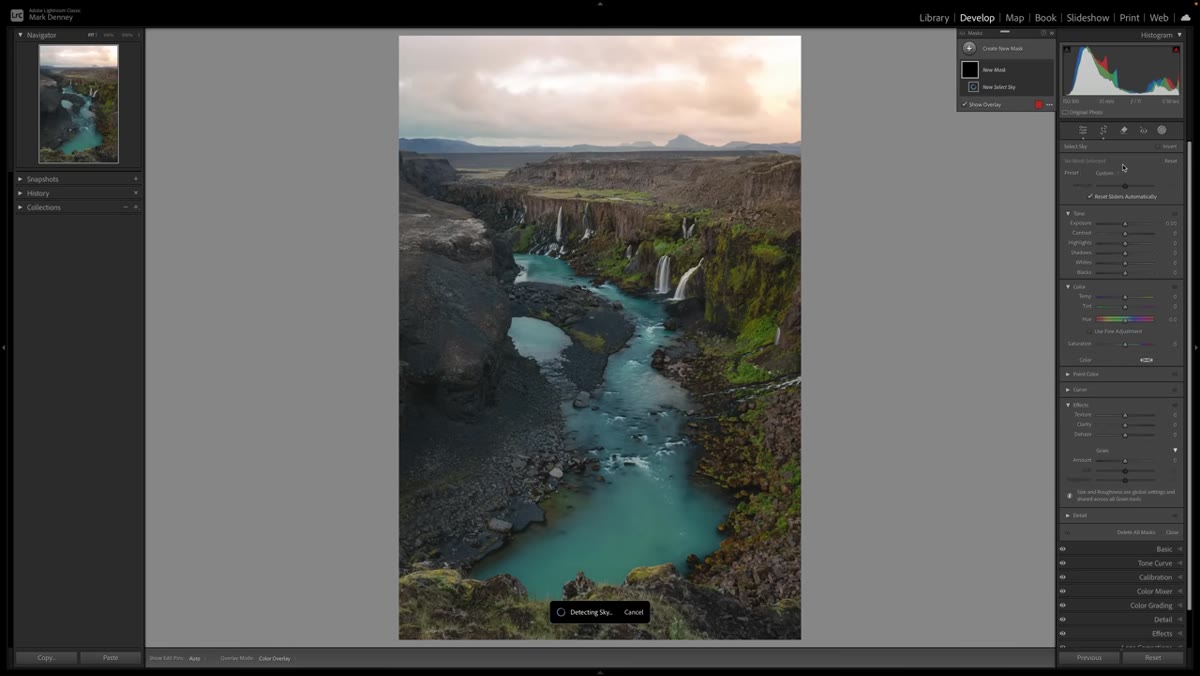 Lightroom masking panel with Sky option highlighted
Open the Masking panel in Lightroom’s Develop module. For portraits, this is where you’ll use “Select Subject” instead of “Select Sky” – but the principle Denney demonstrates applies to both. Click your selection type and let Lightroom build the mask automatically. It will do a genuinely impressive job. The edges will be clean and the coverage will be accurate.
Lightroom masking panel with Sky option highlighted
Open the Masking panel in Lightroom’s Develop module. For portraits, this is where you’ll use “Select Subject” instead of “Select Sky” – but the principle Denney demonstrates applies to both. Click your selection type and let Lightroom build the mask automatically. It will do a genuinely impressive job. The edges will be clean and the coverage will be accurate.
This is also exactly where the problem starts. Zoom in on the transition between your selected area and the background. That edge is precise in a way that real light never is. There’s no graduation, no soft falloff. Lightroom’s AI selection doesn’t add feathering by default, and there’s no slider in this panel to add it after the fact.
Step 2: Access the Intersection Tool from the Mask Options Menu
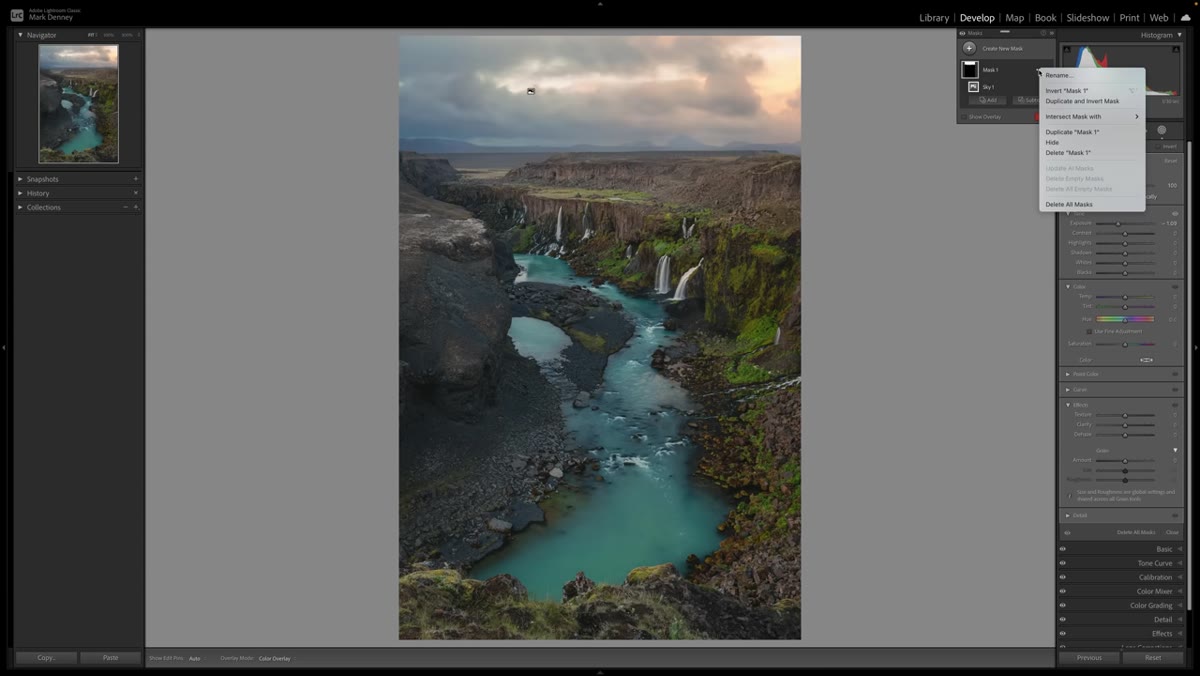 Three-dot menu open on active mask showing Intersect options
With your active mask created, look for the three-dot menu icon next to the mask name in the Masks panel. Click it. You’ll see a list of options including “Intersect Mask With” followed by several options. This is the move that unlocks everything else. Intersection means Lightroom will only keep the parts of your original mask that overlap with a second selection you’re about to draw. It doesn’t replace your mask – it refines it.
Three-dot menu open on active mask showing Intersect options
With your active mask created, look for the three-dot menu icon next to the mask name in the Masks panel. Click it. You’ll see a list of options including “Intersect Mask With” followed by several options. This is the move that unlocks everything else. Intersection means Lightroom will only keep the parts of your original mask that overlap with a second selection you’re about to draw. It doesn’t replace your mask – it refines it.
For portrait work, I use this most often when the subject selection bleeds into a bright background or when I want to constrain adjustments to just the lower half of a face. The intersection logic is the same regardless of what you’re masking.
Step 3: Draw a Linear Gradient Over the Mask to Add a Natural Falloff
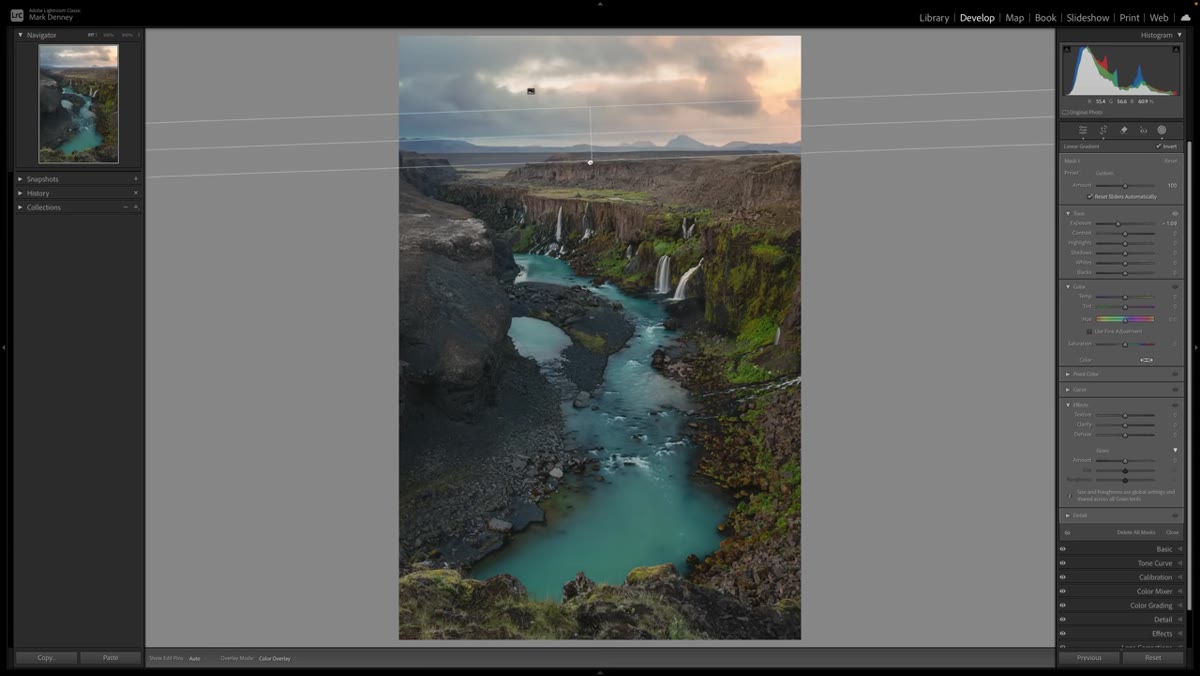 Linear gradient being dragged down over the sky mask
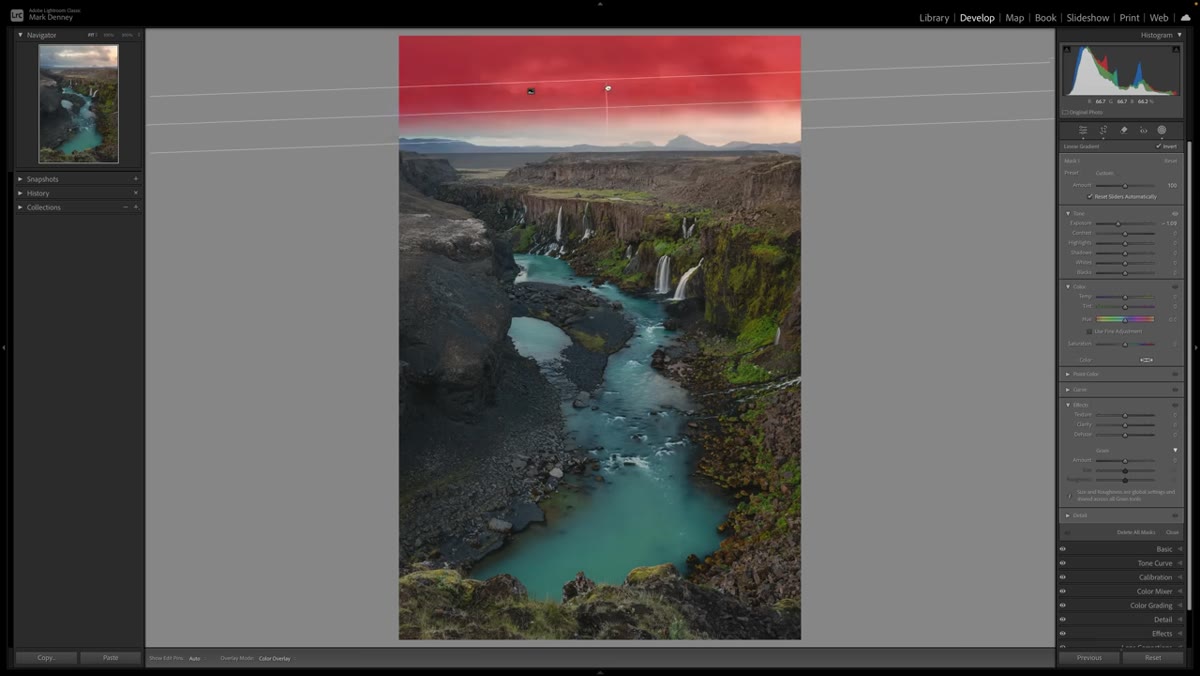
Select “Intersect Mask With Linear Gradient” from that menu. Lightroom will prompt you to draw the gradient directly on your image. Drag from outside the selection inward – in Denney’s demo, he drags from above the horizon downward into the sky. The gradient transitions from full opacity at the top to zero at the bottom.
Linear gradient being dragged down over the sky mask
Select “Intersect Mask With Linear Gradient” from that menu. Lightroom will prompt you to draw the gradient directly on your image. Drag from outside the selection inward – in Denney’s demo, he drags from above the horizon downward into the sky. The gradient transitions from full opacity at the top to zero at the bottom.
What this creates is a soft, controllable feather along the edge of your original selection. Drag the gradient handles up or down to tighten or loosen the transition. In portrait retouching, I draw this across the forehead or along the chin line when I want an adjustment to fade out naturally rather than stop at a hard edge. Toggle the mask overlay on while you’re positioning it so you can actually see what you’re doing – the red overlay makes the graduation visible immediately.
Step 4: Use a Foreground Gradient to Add Depth with a Darkening Adjustment
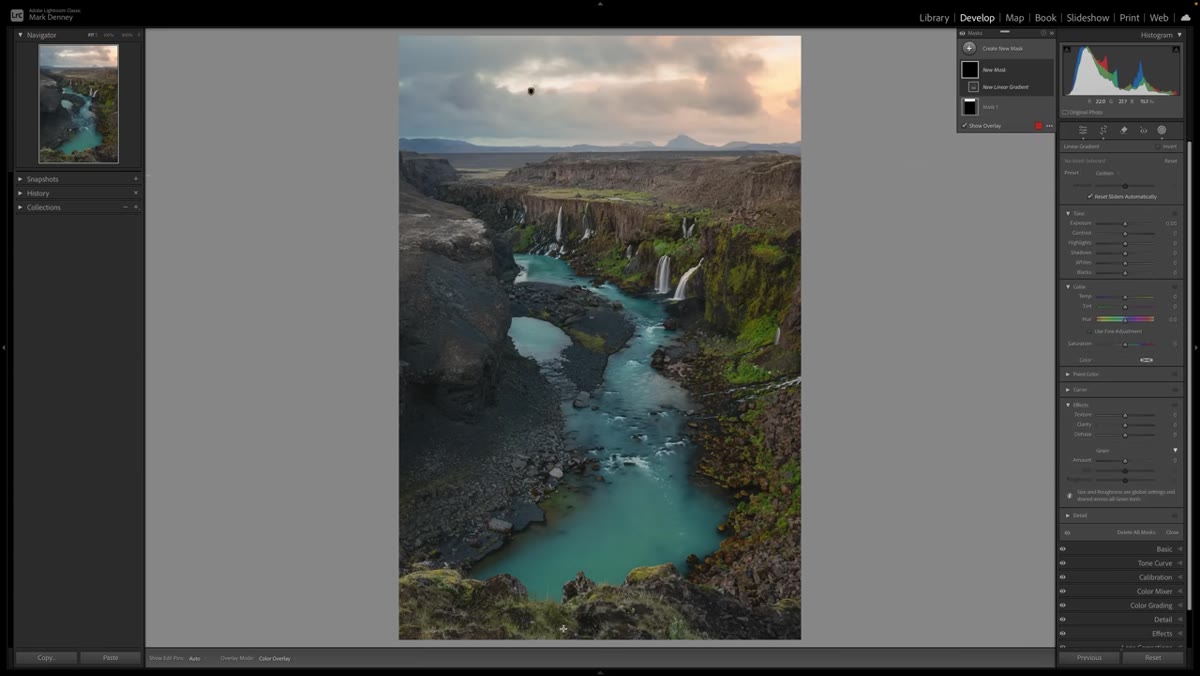 Linear gradient drawn across foreground of landscape image
Denney’s second technique is a standalone linear gradient used to subtly darken the lower portion of a frame. He draws it upward from the bottom edge, then pulls exposure down just slightly. The effect is a gentle vignette that pulls visual weight toward the center without looking like an actual vignette effect.
Linear gradient drawn across foreground of landscape image
Denney’s second technique is a standalone linear gradient used to subtly darken the lower portion of a frame. He draws it upward from the bottom edge, then pulls exposure down just slightly. The effect is a gentle vignette that pulls visual weight toward the center without looking like an actual vignette effect.
In portraits, this translates directly to dodging and burning with gradients instead of brushes. I’ll draw a gradient up from the bottom of a frame to deepen shadow detail in the chin and neck, or draw one down from the top to keep the forehead from reading as too bright. The key is subtlety – Denney keeps his adjustments conservative, and that restraint is what makes it look natural rather than manipulated.
Step 5: Refine Any Mask by Subtracting with a Brush
 Mask overlay showing feathered gradient intersection on sky
After you’ve built your intersection mask, you may find areas where the selection still isn’t quite right. Use the “Subtract” brush option within the same mask to paint away coverage in specific spots. This is non-destructive and you can adjust the brush’s flow and feather before painting.
Mask overlay showing feathered gradient intersection on sky
After you’ve built your intersection mask, you may find areas where the selection still isn’t quite right. Use the “Subtract” brush option within the same mask to paint away coverage in specific spots. This is non-destructive and you can adjust the brush’s flow and feather before painting.
For portraits, this step is where I clean up stray mask coverage around hair or ears. The combination of an AI selection, an intersecting gradient, and a cleanup brush gives you a three-layer refinement process that would have taken twice as long with manual selections alone.
How I Adapt This for Beauty Retouching Specifically
The gradient intersection trick changed how I handle skin tone adjustments across large areas. When I want to warm the midtones of a face without the effect looking pasted on, I’ll use Subject Select to isolate the person, then intersect it with a radial gradient centered on the cheeks. The result fades toward the edges of the face in a way that reads as natural light rather than a filter.
The other adaptation I keep coming back to: intersecting a luminance-range mask with a linear gradient. Lightroom lets you select by brightness range, which is useful for targeting highlights or shadows. Adding a gradient on top of that limits where the luminance selection is active, so you get precise tonal control in one part of the frame without it bleeding into areas where you don’t want it. For beauty work where you’re managing skin texture and highlight rolloff at the same time, this combination is genuinely powerful.
One honest caveat: these techniques reward patience. The first few times you try the intersection workflow it feels like extra steps. Stick with it through two or three images and it becomes fast.
The single most important idea in this tutorial is that Lightroom’s automated selections are a foundation, not a final answer. Using intersection to layer a gradient on top of a smart selection gives you the accuracy of AI with the softness of a hand-painted mask. That combination is what separates edits that hold up under scrutiny from ones that look processed.
Watch the full tutorial on YouTube to see Mark Denney walk through all four techniques on his Iceland landscape images – the visual demonstration of the gradient falloff in particular is worth seeing in motion.
Comments
Leave a Comment