
There’s a specific kind of frustration that comes from spending twenty minutes wrestling with Quick Selection on a wispy, complex subject, only to end up with a mask that looks like it was cut out with safety scissors. I’ve been there more times than I care to admit. Early in my retouching work, I treated channels like that drawer in the kitchen where you throw things you don’t understand but can’t bring yourself to delete. It took seeing someone else use them casually, almost offhandedly, before I realized how much time I was leaving on the table.
In this KelbyOne tutorial, Watch the full tutorial on YouTube, hosts Corey Barker and Pete walk through a paint splatter extraction technique built entirely around channel manipulation. It’s one of those approaches that looks almost too simple when you see it demonstrated, and then you do it yourself and feel slightly annoyed that you didn’t figure it out sooner. The technique is fast, clean, and produces an alpha mask with almost no manual cleanup. Let me walk you through it so you can put it to work immediately.
Step 1: Assess Your Image and Open the Channels Panel
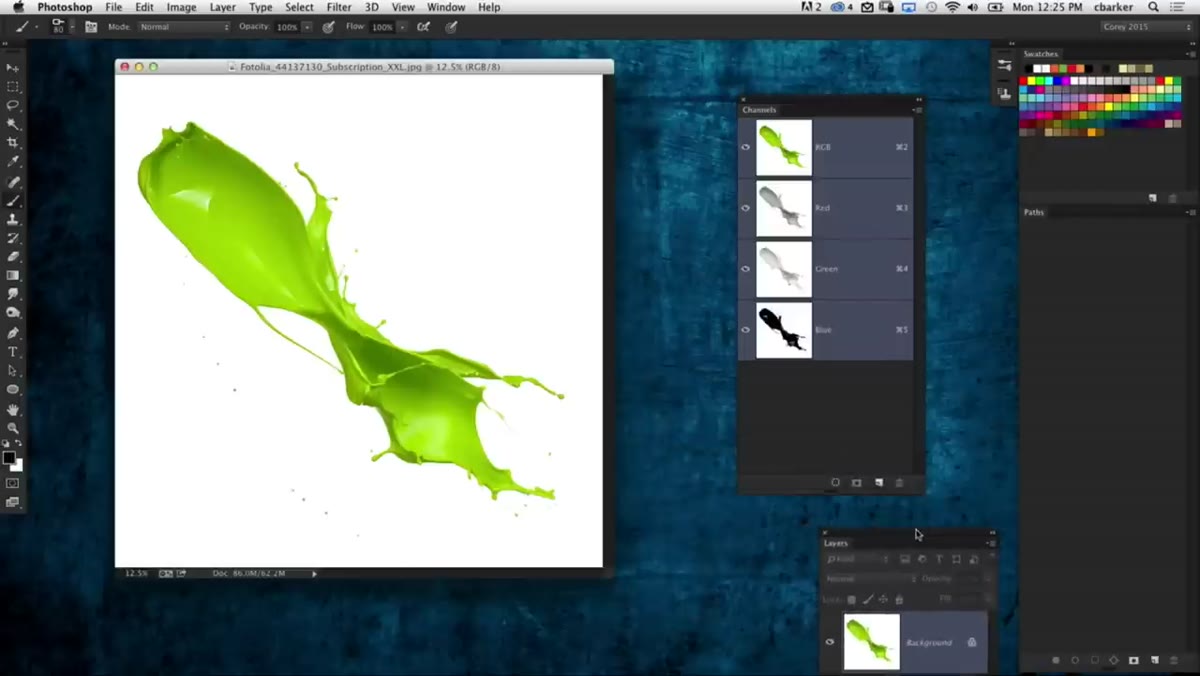 Paint splatter image on white background in Photoshop
Start with an image on a white or near-white background. The paint splatter example used in the tutorial works perfectly here because of the high contrast between the subject and the background. Open your Channels panel (Window > Channels) and take a moment to click through the Red, Green, and Blue channels individually. You’re looking for the channel where your subject appears darkest against the lightest background. In most cases with a white background, the Blue channel will give you the most dramatic separation. This one step of simply looking before you act saves a lot of corrective work later.
Paint splatter image on white background in Photoshop
Start with an image on a white or near-white background. The paint splatter example used in the tutorial works perfectly here because of the high contrast between the subject and the background. Open your Channels panel (Window > Channels) and take a moment to click through the Red, Green, and Blue channels individually. You’re looking for the channel where your subject appears darkest against the lightest background. In most cases with a white background, the Blue channel will give you the most dramatic separation. This one step of simply looking before you act saves a lot of corrective work later.
Step 2: Duplicate the Blue Channel
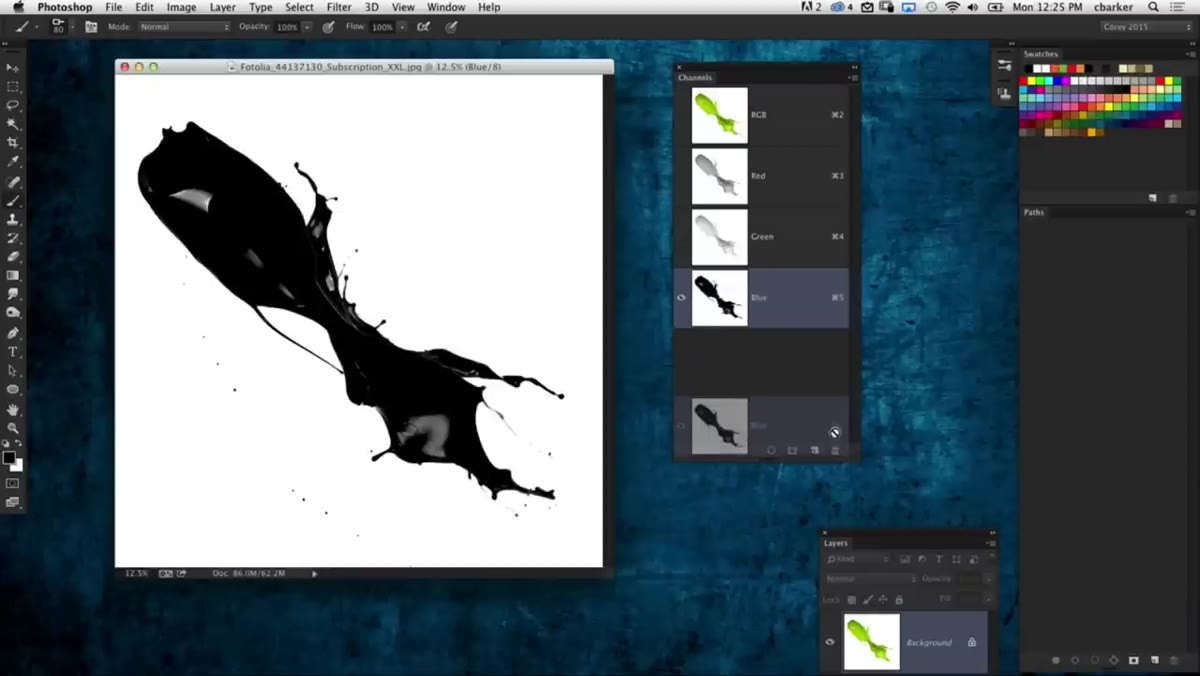 Blue channel selected and duplicated in Channels panel
Once you’ve identified the Blue channel as your best candidate, right-click on it in the Channels panel and choose Duplicate Channel. This creates a new alpha channel, sometimes labeled “Blue copy,” that you’ll work on non-destructively without touching the original color information. This is critical. You never want to paint directly on or alter your source channels, because that changes the actual color data in your image. The duplicate is your working space, and everything from here happens on that copy.
Blue channel selected and duplicated in Channels panel
Once you’ve identified the Blue channel as your best candidate, right-click on it in the Channels panel and choose Duplicate Channel. This creates a new alpha channel, sometimes labeled “Blue copy,” that you’ll work on non-destructively without touching the original color information. This is critical. You never want to paint directly on or alter your source channels, because that changes the actual color data in your image. The duplicate is your working space, and everything from here happens on that copy.
Step 3: Invert the Duplicate Channel
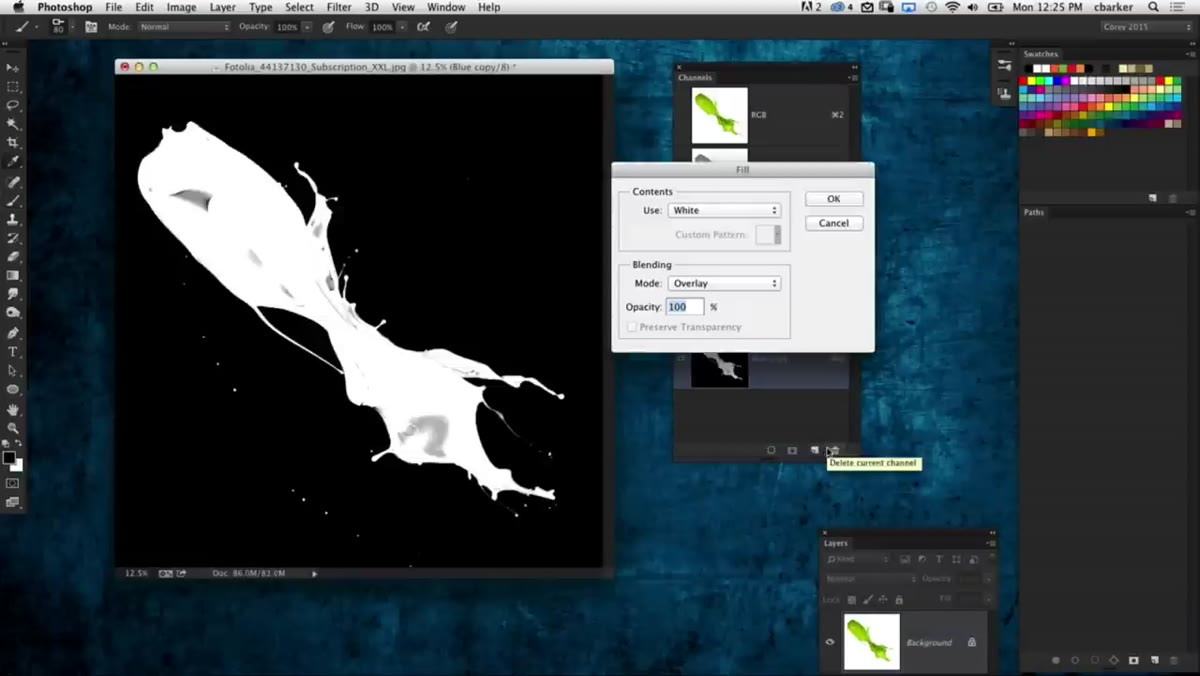 Inverted alpha channel showing white subject on black background
With your duplicated channel selected and active, go to Image > Adjustments > Invert, or press Command+I (Ctrl+I on Windows). This flips the channel so that what was dark becomes light and vice versa. Your paint splatter, which appeared dark against a white background, will now appear white against a black background. This is the orientation you need for a proper alpha mask, where white represents the area you want to keep and black represents what you want to remove. At this point your mask is close, but there may still be soft gray areas around the edges that need to be pushed to clean white.
Inverted alpha channel showing white subject on black background
With your duplicated channel selected and active, go to Image > Adjustments > Invert, or press Command+I (Ctrl+I on Windows). This flips the channel so that what was dark becomes light and vice versa. Your paint splatter, which appeared dark against a white background, will now appear white against a black background. This is the orientation you need for a proper alpha mask, where white represents the area you want to keep and black represents what you want to remove. At this point your mask is close, but there may still be soft gray areas around the edges that need to be pushed to clean white.
Step 4: Fill with White Using Overlay Blend Mode
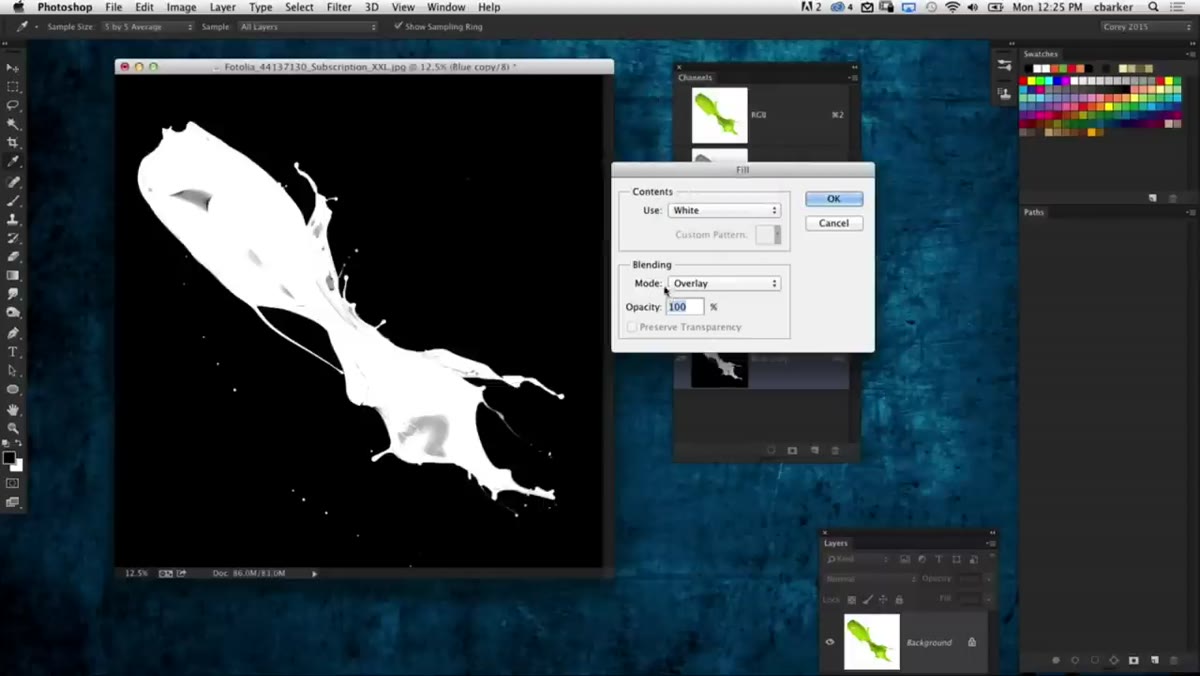 Fill dialog box showing white fill with Overlay blend mode selected
Here’s the clever part. Go to Edit > Fill. Set the Contents to White and, crucially, change the Blending Mode in the Fill dialog to Overlay. Do not use Normal. The Overlay mode is what makes this work so efficiently. It leaves your true blacks completely alone (protecting the background mask) while pushing any soft gray midtones toward pure white. This forces the subtle, semi-transparent areas of the splatter to become fully opaque in the mask without blowing out the edges into a hard, artificial-looking cutout. You may need to run this fill step twice if you still see gray areas, but one pass usually does the job on a well-lit subject against a clean background.
Fill dialog box showing white fill with Overlay blend mode selected
Here’s the clever part. Go to Edit > Fill. Set the Contents to White and, crucially, change the Blending Mode in the Fill dialog to Overlay. Do not use Normal. The Overlay mode is what makes this work so efficiently. It leaves your true blacks completely alone (protecting the background mask) while pushing any soft gray midtones toward pure white. This forces the subtle, semi-transparent areas of the splatter to become fully opaque in the mask without blowing out the edges into a hard, artificial-looking cutout. You may need to run this fill step twice if you still see gray areas, but one pass usually does the job on a well-lit subject against a clean background.
Step 5: Load the Channel as a Selection
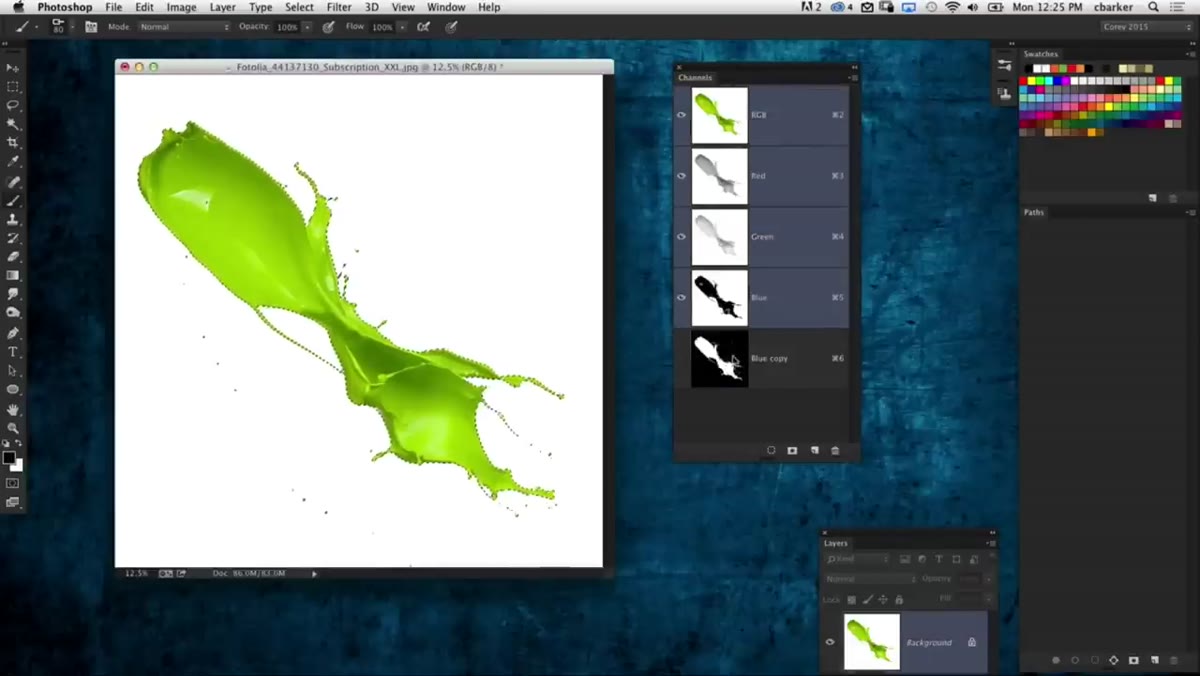 Marching ants selection loaded from alpha channel on canvas
With your clean alpha channel ready, Command-click (Ctrl-click on Windows) directly on the channel thumbnail in the Channels panel. This loads the white areas of your channel as an active selection, indicated by the marching ants on your canvas. Switch back to your RGB composite channel by clicking on it at the top of the Channels panel. Your selection should now be active on your full-color image, precisely outlining your subject based on the luminosity information you refined in the previous steps.
Marching ants selection loaded from alpha channel on canvas
With your clean alpha channel ready, Command-click (Ctrl-click on Windows) directly on the channel thumbnail in the Channels panel. This loads the white areas of your channel as an active selection, indicated by the marching ants on your canvas. Switch back to your RGB composite channel by clicking on it at the top of the Channels panel. Your selection should now be active on your full-color image, precisely outlining your subject based on the luminosity information you refined in the previous steps.
Step 6: Copy to a New Layer
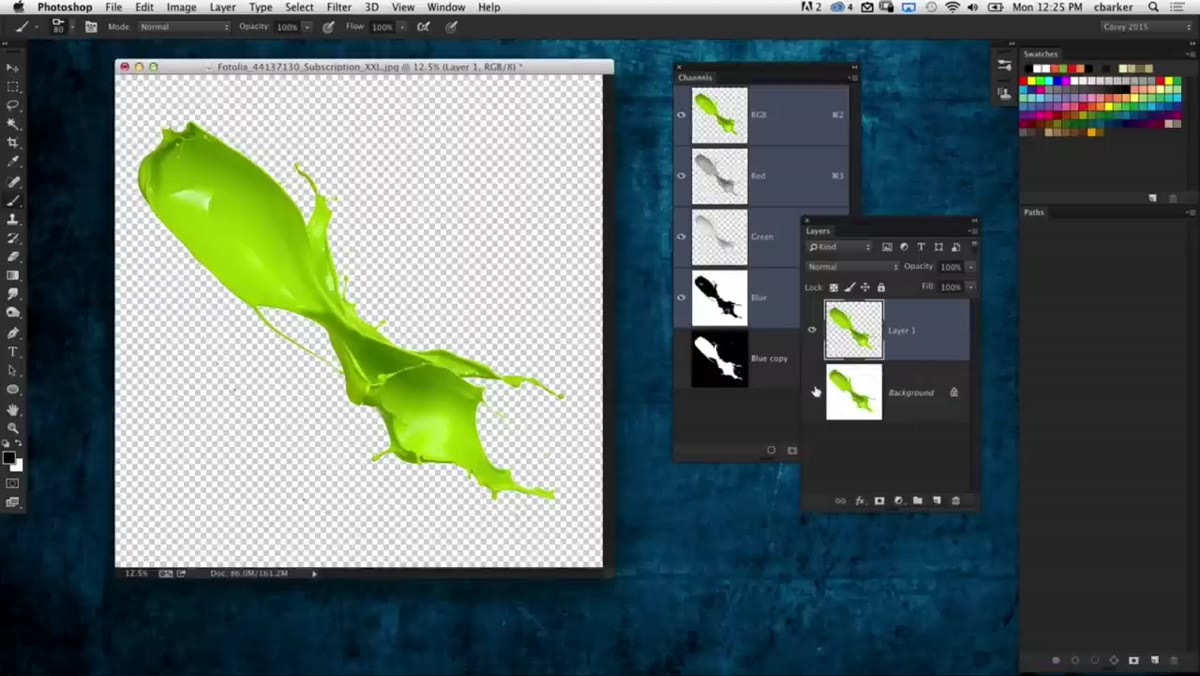 Paint splatter isolated on transparent layer in Layers panel
With the selection active, simply press Command+J (Ctrl+J on Windows). Photoshop copies the selected pixels to a brand new layer automatically. Turn off or delete your original background layer to confirm the extraction. What you should see is your paint splatter sitting cleanly on a transparent background with smooth, natural edges and no fringe artifacts. The whole process from duplicating the channel to this moment takes roughly two minutes once you’ve done it a few times. Compare that to the time you’d spend refining a Quick Selection result and the efficiency becomes obvious.
Paint splatter isolated on transparent layer in Layers panel
With the selection active, simply press Command+J (Ctrl+J on Windows). Photoshop copies the selected pixels to a brand new layer automatically. Turn off or delete your original background layer to confirm the extraction. What you should see is your paint splatter sitting cleanly on a transparent background with smooth, natural edges and no fringe artifacts. The whole process from duplicating the channel to this moment takes roughly two minutes once you’ve done it a few times. Compare that to the time you’d spend refining a Quick Selection result and the efficiency becomes obvious.
What I Add to This Workflow in Beauty Retouching
The channel extraction method in this tutorial is demonstrated on a graphic element, but I use a version of this approach regularly when I’m isolating hair, flyaways, or delicate lace texture for beauty and portrait work. The principle is identical: find the channel with the most contrast between subject and background, duplicate it, clean it up with targeted fills or a quick Curves adjustment on the channel itself, and load it as a selection.
One thing I’d add: after you load your selection and jump to a new layer, convert that layer to a Smart Object before you do anything else. It costs you nothing and gives you a safety net if you need to revisit the mask later. I also run a very gentle Minimum filter (Filter > Other > Minimum, radius 0.5 pixels) on the alpha channel before loading it when I’m working with portrait skin edges. It contracts the mask very slightly and eliminates that telltale bright fringe that can appear when you composite onto a darker background. It’s a small adjustment that makes the final image look like it always belonged in the new scene.
The single most important thing this tutorial reinforces is something I remind myself of constantly: the tools that feel old or technical are often the most precise. Channels have been in Photoshop since the beginning and they still outperform automated selection tools in specific situations, particularly on graphic elements and high-contrast subjects. Before you reach for the Object Selection tool out of habit, take ten seconds to look at your individual channels first. You might save yourself a lot of cleanup.
Watch the full tutorial on YouTube to see Corey and Pete demonstrate this live, including additional 3D compositing ideas that take the extracted element in a completely different creative direction.
Comments (2)
Solid advice. Especially the part about taking your time with it.
Quality content like this is rare. Keep it up.
Leave a Comment