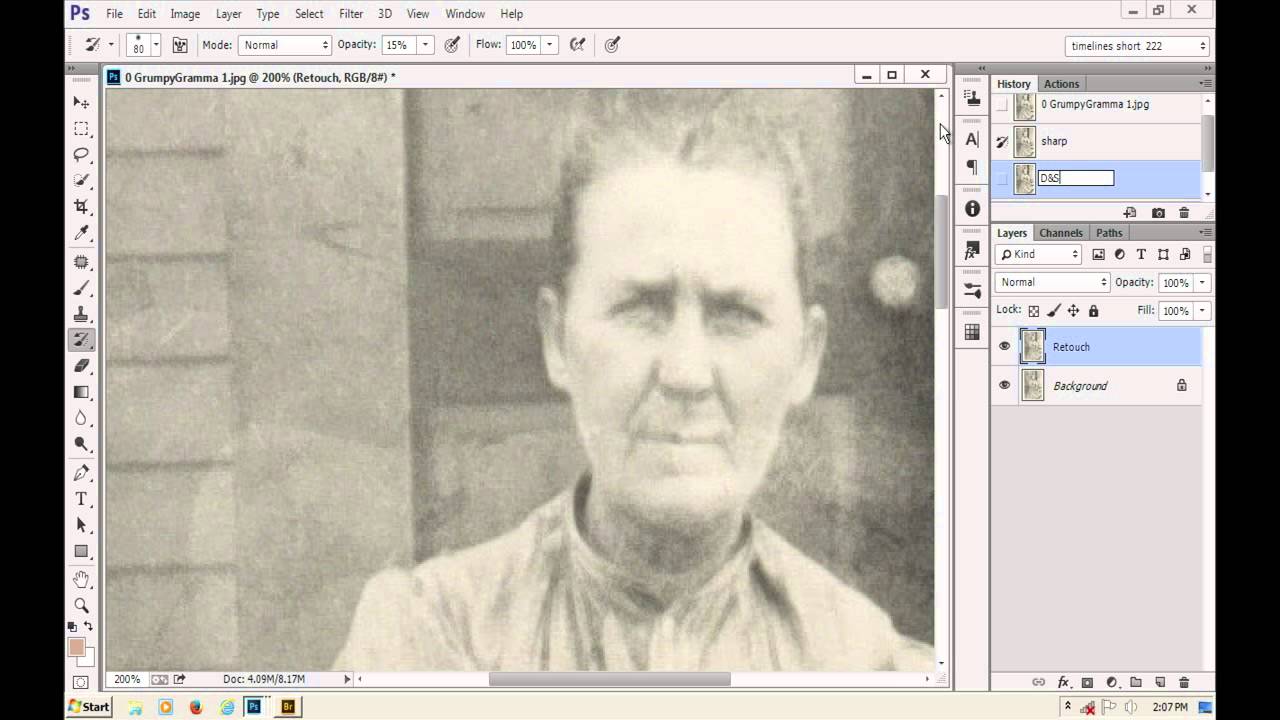
Client work doesn’t always mean smoothing skin on a fresh commercial shoot. Sometimes a family reaches out with a crumbling photograph of someone who died before anyone alive ever met them, and they want it back. I’ve had that request more times than I expected when I made the shift from shooting weddings to retouching full-time. The first few times I tried restoring heavily spotted antique prints, I spent entire afternoons clone-stamping individual flecks one by one. It was slow, it was tedious, and the results were inconsistent enough to make me question whether I was actually good at this.
That’s why the technique Suzette Allen demonstrates in this CreativeLive tutorial stopped me mid-sip of green tea the first time I watched it. Watch the full tutorial on YouTube – it’s worth your full attention. Allen works through a heavily spotted portrait of her great-great-grandmother and uses Photoshop’s History panel in a way most retouchers never think to attempt. Instead of treating History as just a safety net for undoing mistakes, she weaponizes it. The result is a workflow that eliminates hundreds of spots across an entire image in minutes, while preserving the grain structure that makes old photographs feel authentic rather than digitally scrubbed.
Here’s how it works, step by step.
Step 1: Duplicate Your Layer and Record a Named Snapshot
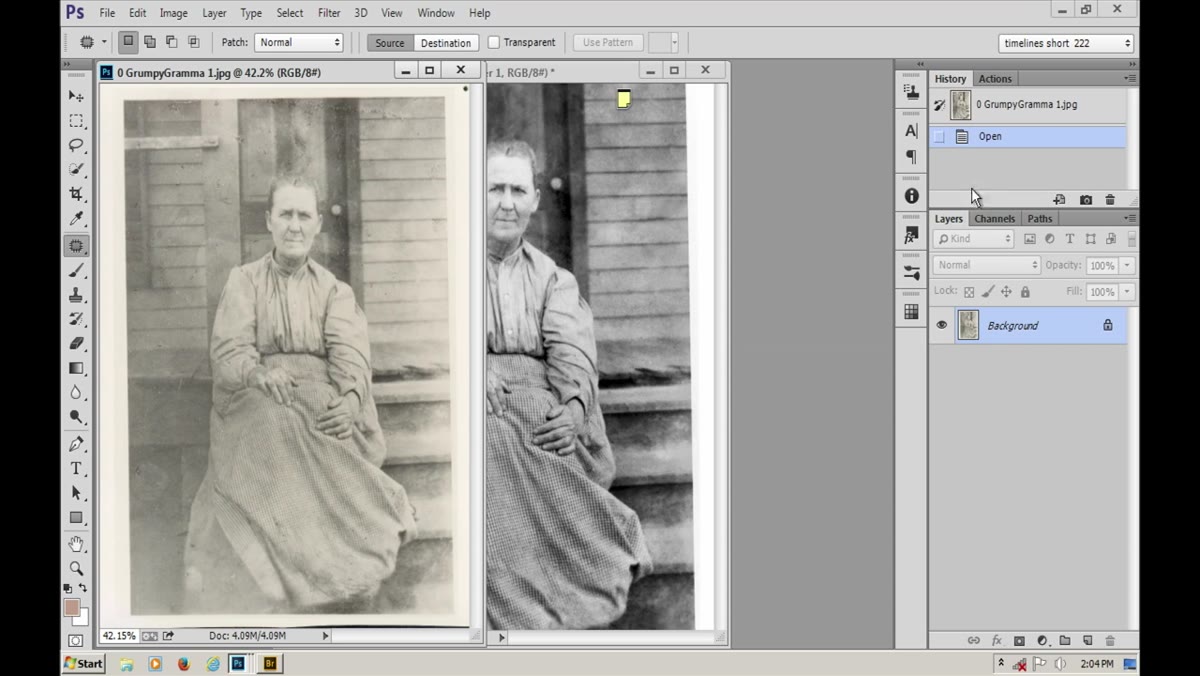 Duplicate layer action recorded on function key F12
Before touching anything on the image, Allen duplicates the background layer and immediately takes a History snapshot. She uses a custom action mapped to F12 that duplicates the layer and names it “Retouch” automatically – a workflow habit worth borrowing. The key move here is naming the snapshot something meaningful. She calls this first one “Sharp,” because the image is at its full, unfiltered sharpness at this moment. Go to the History panel, click the camera icon at the bottom to create a snapshot, and double-click it to rename it. This named snapshot becomes your anchor point for everything that follows.
Duplicate layer action recorded on function key F12
Before touching anything on the image, Allen duplicates the background layer and immediately takes a History snapshot. She uses a custom action mapped to F12 that duplicates the layer and names it “Retouch” automatically – a workflow habit worth borrowing. The key move here is naming the snapshot something meaningful. She calls this first one “Sharp,” because the image is at its full, unfiltered sharpness at this moment. Go to the History panel, click the camera icon at the bottom to create a snapshot, and double-click it to rename it. This named snapshot becomes your anchor point for everything that follows.
Step 2: Apply the Dust and Scratches Filter
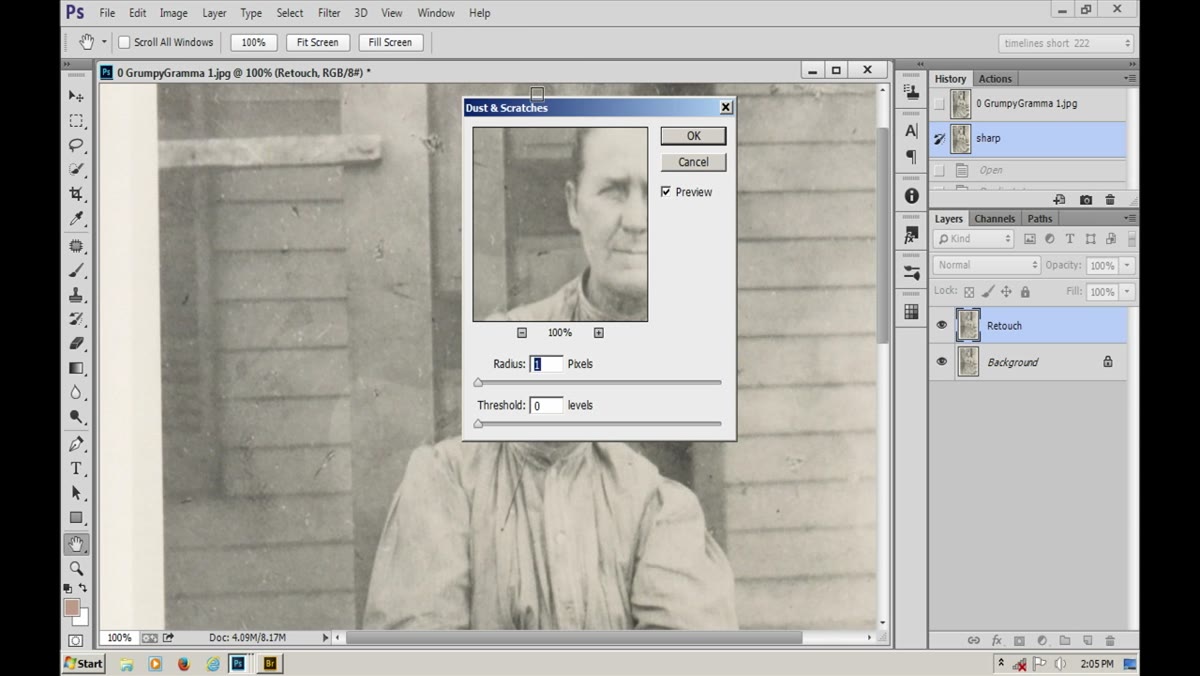 Filter menu open with Dust and Scratches dialog visible
With the duplicate layer active, navigate to Filter, Noise, Dust and Scratches. When the dialog opens, pull both the Radius and Threshold sliders all the way down to zero first. Then slowly increase the Radius until the white and black spots disappear from the preview. The catch is that a Radius high enough to eliminate spots will also blur and mush the underlying detail – faces, fabric texture, grain structure all go soft. Don’t panic. That’s expected, and it’s exactly what we’re about to solve.
Filter menu open with Dust and Scratches dialog visible
With the duplicate layer active, navigate to Filter, Noise, Dust and Scratches. When the dialog opens, pull both the Radius and Threshold sliders all the way down to zero first. Then slowly increase the Radius until the white and black spots disappear from the preview. The catch is that a Radius high enough to eliminate spots will also blur and mush the underlying detail – faces, fabric texture, grain structure all go soft. Don’t panic. That’s expected, and it’s exactly what we’re about to solve.
Step 3: Use Threshold to Recover Grain Without Recovering Spots
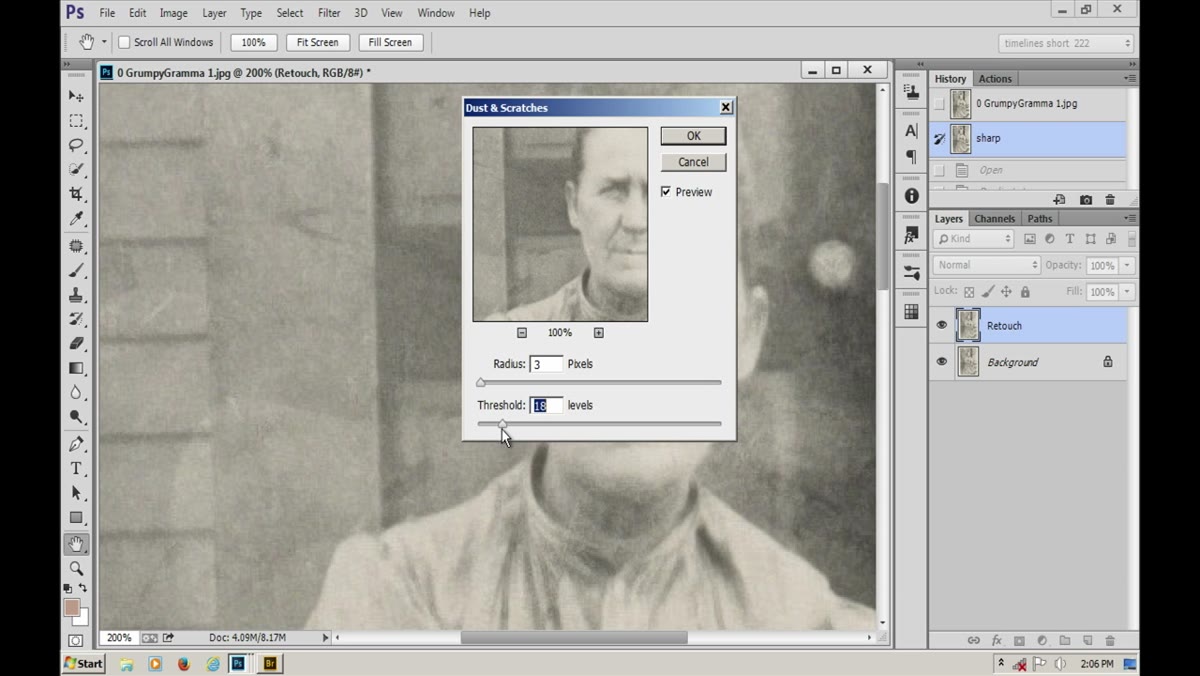 Threshold slider being raised inside Dust and Scratches dialog
This is where the filter earns its place in a restoration workflow. After raising the Radius until spots disappear, begin nudging the Threshold slider upward. Watch the preview carefully: the grain structure of the original photograph starts to return, which is exactly what you want for an antique image. The goal is to find the Threshold value where the grain comes back but the spots stay gone. Push it too far and the spots reappear. Every scan of every old photograph will land at a slightly different combination of Radius and Threshold values, so treat this as a calibration step rather than a formula. Click OK once you find that sweet spot.
Threshold slider being raised inside Dust and Scratches dialog
This is where the filter earns its place in a restoration workflow. After raising the Radius until spots disappear, begin nudging the Threshold slider upward. Watch the preview carefully: the grain structure of the original photograph starts to return, which is exactly what you want for an antique image. The goal is to find the Threshold value where the grain comes back but the spots stay gone. Push it too far and the spots reappear. Every scan of every old photograph will land at a slightly different combination of Radius and Threshold values, so treat this as a calibration step rather than a formula. Click OK once you find that sweet spot.
Step 4: Create a Second Named Snapshot of the Filtered State
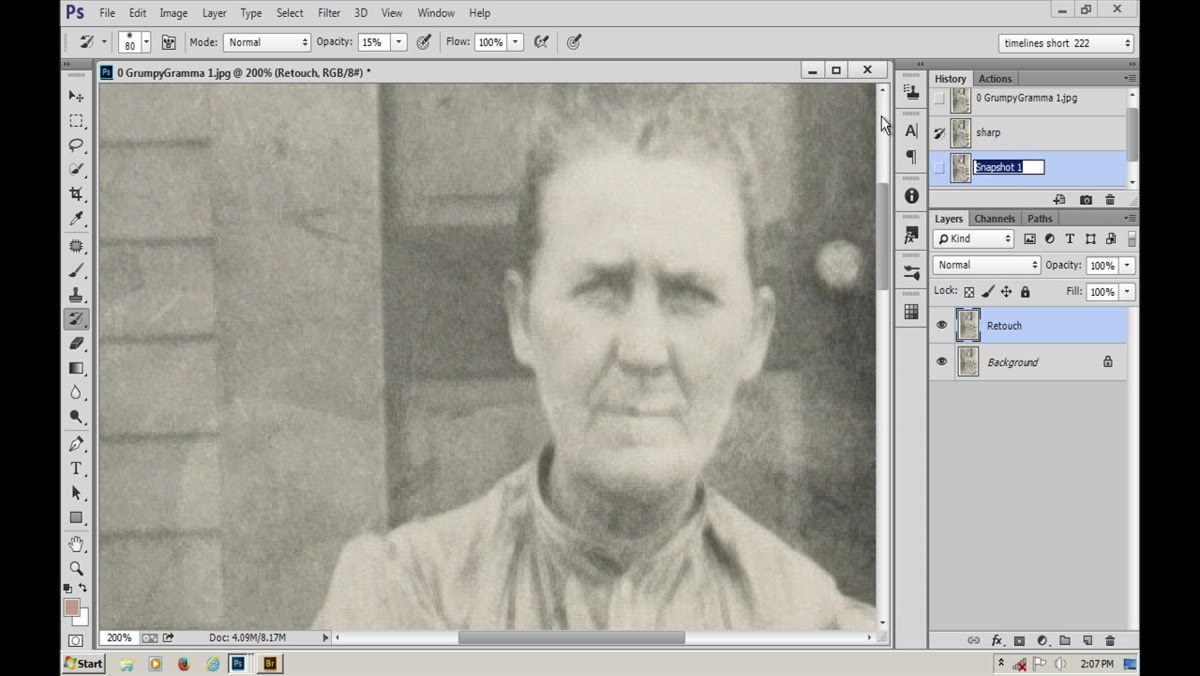 History panel with second snapshot being named DNS
Now take another snapshot of the image in its current filtered state. Allen names this one “DNS” for Dust and Scratches. This second snapshot is critical because the History panel thumbnails are tiny – you genuinely cannot tell which state is which without a clear label. You now have two named snapshots sitting in your History panel: Sharp (crisp detail, spots present) and DNS (spots gone, softened).
History panel with second snapshot being named DNS
Now take another snapshot of the image in its current filtered state. Allen names this one “DNS” for Dust and Scratches. This second snapshot is critical because the History panel thumbnails are tiny – you genuinely cannot tell which state is which without a clear label. You now have two named snapshots sitting in your History panel: Sharp (crisp detail, spots present) and DNS (spots gone, softened).
Step 5: Set the History Brush Source to the DNS Snapshot
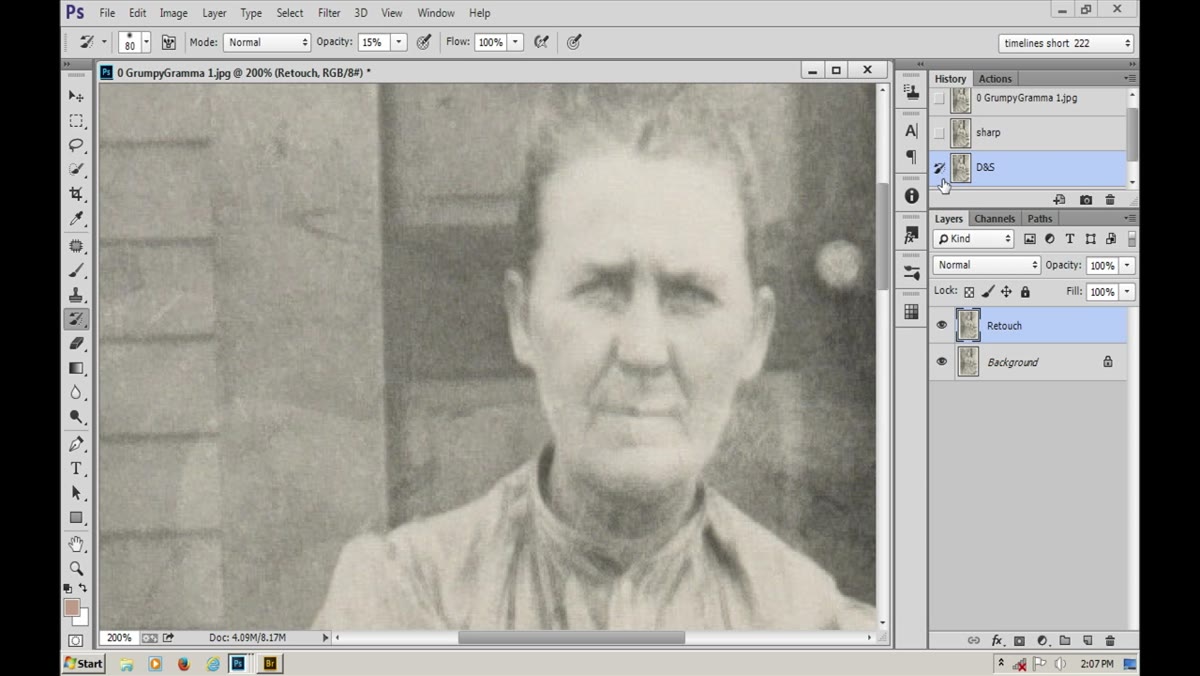 History marker being placed next to DNS snapshot in panel
In the History panel, you’ll see a small column to the left of each snapshot. Clicking that column places a history brush icon – a small paintbrush marker – next to that snapshot. Place it next to DNS. This tells Photoshop that when you paint with the History Brush, it should pull pixel data from the filtered, spot-free version of the image. Then click the name of the Sharp snapshot to restore the actual canvas to the sharp, detailed state. Your canvas looks sharp again. Your history brush is loaded with the clean, filtered data. Now you’re ready to paint.
History marker being placed next to DNS snapshot in panel
In the History panel, you’ll see a small column to the left of each snapshot. Clicking that column places a history brush icon – a small paintbrush marker – next to that snapshot. Place it next to DNS. This tells Photoshop that when you paint with the History Brush, it should pull pixel data from the filtered, spot-free version of the image. Then click the name of the Sharp snapshot to restore the actual canvas to the sharp, detailed state. Your canvas looks sharp again. Your history brush is loaded with the clean, filtered data. Now you’re ready to paint.
Step 6: Paint Away White Spots Using the History Brush in Darken Mode
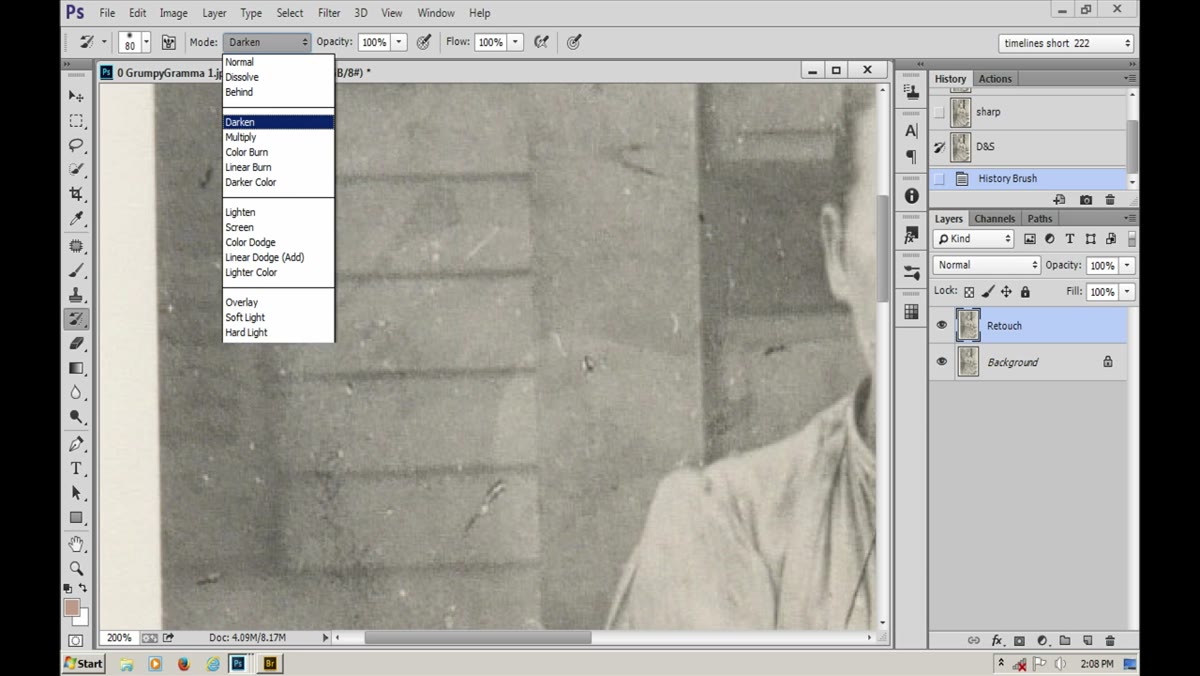 History Brush in Darken mode sweeping over spotted areas
Select the History Brush tool (Y), set it to a large, soft brush, and change the blend mode in the options bar to Darken. This is the move that makes the whole technique click. In Darken mode, the History Brush only affects pixels that are lighter than what the brush source contains. White spots are bright by definition, so the brush paints right over them – but it leaves darker tones like skin, shadow areas, and dark fabric completely untouched. You can sweep across large areas of the face and background in broad strokes, and only the spots respond. What used to take hours of careful clone-stamp work happens in a few minutes of loose scribbling.
History Brush in Darken mode sweeping over spotted areas
Select the History Brush tool (Y), set it to a large, soft brush, and change the blend mode in the options bar to Darken. This is the move that makes the whole technique click. In Darken mode, the History Brush only affects pixels that are lighter than what the brush source contains. White spots are bright by definition, so the brush paints right over them – but it leaves darker tones like skin, shadow areas, and dark fabric completely untouched. You can sweep across large areas of the face and background in broad strokes, and only the spots respond. What used to take hours of careful clone-stamp work happens in a few minutes of loose scribbling.
Allen notes one important exception: patterned areas like a gingham check print contain so many alternating light and dark squares that the brush can misread the pattern as spots. Work those sections more carefully, or avoid the broad-stroke approach there and handle them individually.
A Note From My Own Workflow
I’ve used this technique on everything from a client’s 1940s grandmother portrait to a badly foxed Victorian carte de visite, and the one thing I’d add is this: after you finish painting with the History Brush in Darken mode, do a second pass with the mode switched to Lighten to catch any dark spots or blotches that the first pass missed. It’s the same logic in reverse – Lighten mode only affects pixels darker than the brush source, so black spots and dark foxing marks become just as easy to scrub away. Running both passes back to back handles the full range of damage most antique photos carry, and the whole process still takes a fraction of the time that manual spotting requires.
The single most important takeaway from this tutorial is that Photoshop’s History panel is not just an undo buffer. When you treat named snapshots as deliberate reference states and pair them with the History Brush’s blend modes, you can selectively blend two versions of the same image with a paintbrush – and that changes what’s possible in restoration work entirely.
Watch the full tutorial on YouTube to see Suzette Allen walk through the complete image, including how she handles the more delicate areas where pattern and detail require a lighter hand.
Comments (3)
This should be required reading for anyone starting out.
Clear and practical. No fluff. Appreciate that.
The tip about the history brush trick that r was the missing piece for me. Thank you.
Leave a Comment