When I was first learning Photoshop, I duplicated every layer before touching anything. It was practically a reflex. Open file, hit Command-J, breathe. Nobody ever explained why we did it. It was just the rule, passed down from tutorial to tutorial like a photographic commandment. It took me years of freelance work, and honestly a few bloated, chaotic PSD files sent to clients, before I started questioning whether the habit still made sense.
That is exactly the moment this tutorial hits on. In this Matt Kloskowski tutorial, Watch the full tutorial on YouTube, Matt makes a case I have been half-forming in my own head for a while now: the “always duplicate your layer” advice is dated. It made sense in a pre-raw, pre-modern-Photoshop world. Today, with the tools we actually have, it often creates more clutter than protection.
This is not a radical take once you understand the reasoning. The retouching workflow has evolved. Our tools have evolved. The habit just has not caught up yet. Here is how to apply what Matt walks through, so you can start working cleaner right away.
Step 1: Send Your Raw File from Lightroom to Photoshop
 Lightroom interface with a landscape photo open
Whether you are working in Lightroom Classic or the newer Lightroom, the starting point is the same. Find the image you want to take further than what Lightroom’s tools allow, then go to Photo > Edit In > Photoshop. When you do this with a raw file, Lightroom automatically creates a copy of the file before handing it off. That copy is your safety net.
Lightroom interface with a landscape photo open
Whether you are working in Lightroom Classic or the newer Lightroom, the starting point is the same. Find the image you want to take further than what Lightroom’s tools allow, then go to Photo > Edit In > Photoshop. When you do this with a raw file, Lightroom automatically creates a copy of the file before handing it off. That copy is your safety net.
This is the detail that changes everything about the duplicate-layer debate. Because you are never editing the actual raw original, the main reason people historically duplicated layers inside Photoshop, protecting the source file from permanent changes, is already handled before Photoshop even opens. You are already working on a copy. Keep that in mind as we go.
Step 2: Recognize Why the Duplicate Layer Habit Started
 Background layer visible in Photoshop Layers panel
Before jumping into the actual technique, Matt takes a moment to explain the origin of this advice, and it is worth understanding rather than skipping. The Command-J or Control-J duplicate reflex came from an era when raw editing software was not robust, when many photographers were still working with JPEGs or TIFFs, and when Photoshop’s retouching tools required you to work directly on pixel data with no way to isolate changes afterward.
Background layer visible in Photoshop Layers panel
Before jumping into the actual technique, Matt takes a moment to explain the origin of this advice, and it is worth understanding rather than skipping. The Command-J or Control-J duplicate reflex came from an era when raw editing software was not robust, when many photographers were still working with JPEGs or TIFFs, and when Photoshop’s retouching tools required you to work directly on pixel data with no way to isolate changes afterward.
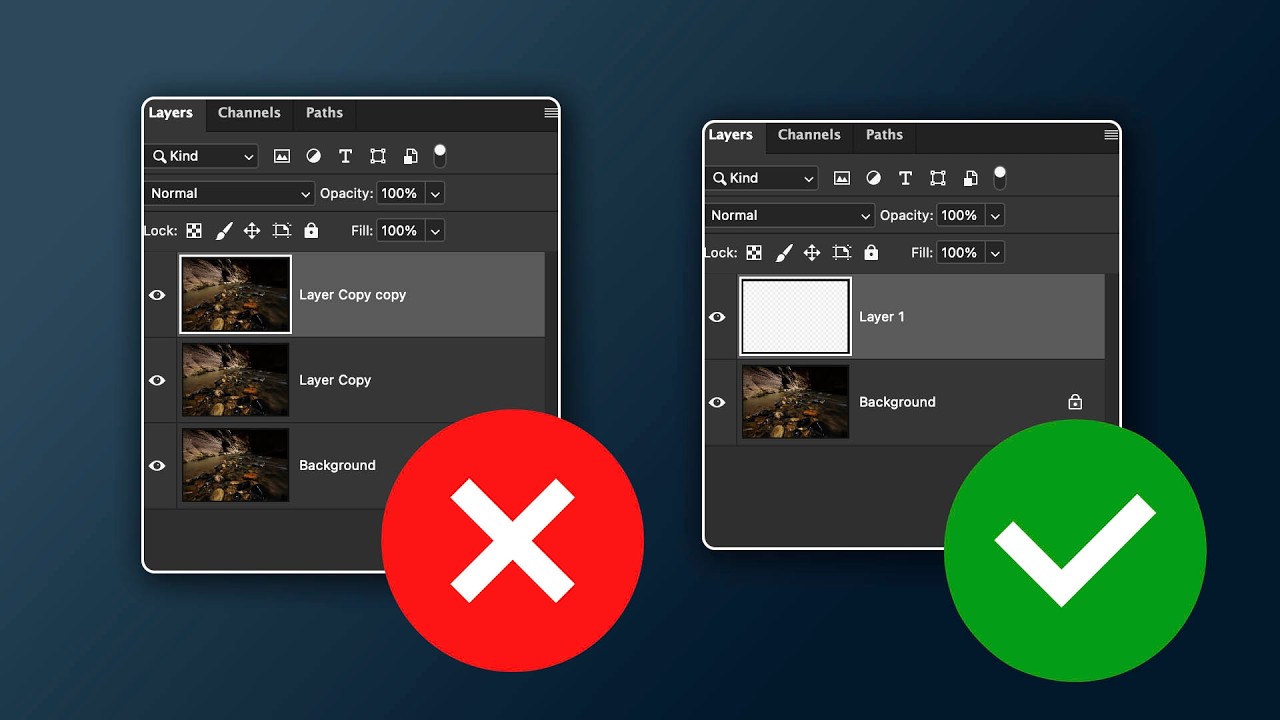
Back then, duplicating the layer was the only practical way to preserve a before state inside Photoshop. None of that is true anymore. Modern tools, especially those with a “Sample All Layers” option, let you do your work on a completely separate, empty layer while pulling information from the layers below. You get the isolation without the bloat.
Step 3: Create a New Blank Layer Instead of Duplicating
 Empty layer added above background layer in Layers panel
Here is the actual workflow shift. Instead of pressing Command-J to copy your background layer, create a new blank layer by clicking the new layer icon at the bottom of the Layers panel. That is it. No pixel data on this layer yet, just a clean, empty space sitting above your original.
Empty layer added above background layer in Layers panel
Here is the actual workflow shift. Instead of pressing Command-J to copy your background layer, create a new blank layer by clicking the new layer icon at the bottom of the Layers panel. That is it. No pixel data on this layer yet, just a clean, empty space sitting above your original.
This approach keeps your file size smaller, your layer stack easier to read, and your original image completely untouched underneath. For anyone doing beauty retouching, where PSD files can grow enormous with frequency separation layers, dodge-and-burn layers, and color grading adjustments, this kind of intentional tidiness matters. A leaner file is a faster file.
Step 4: Use the Remove Tool with “Sample All Layers” Turned On
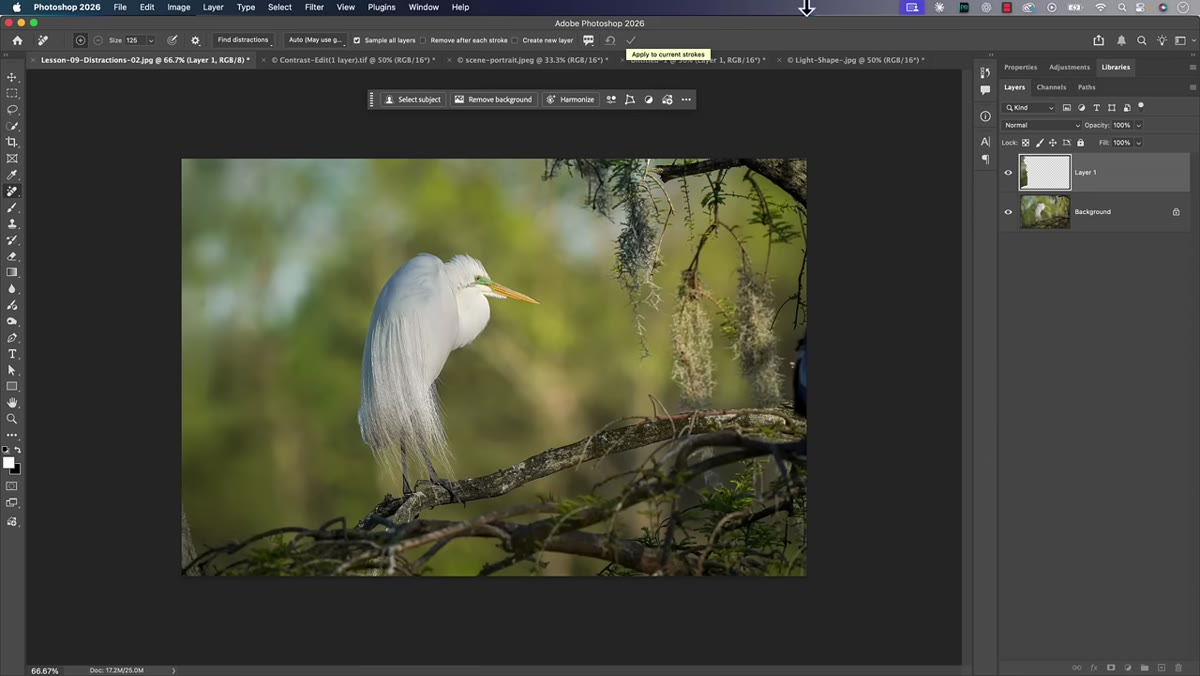
 Remove tool selected in toolbar, options bar visible at top
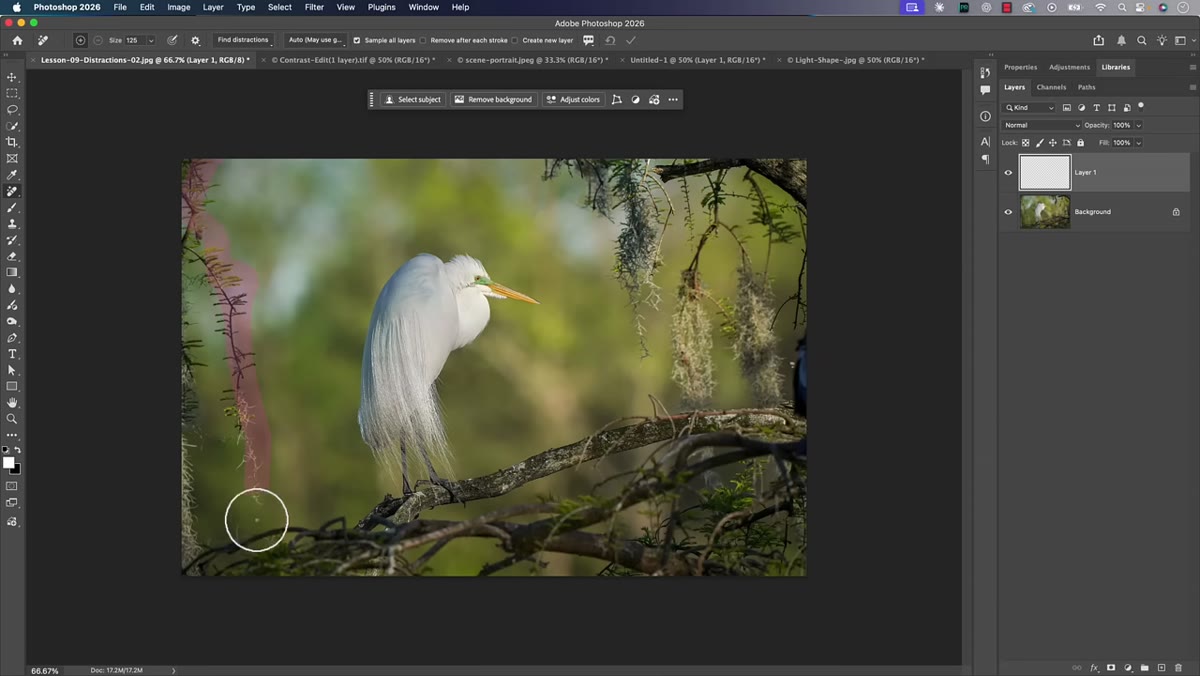
With your blank layer selected and active, grab the Remove tool from the toolbar. Before you paint over anything, check the options bar at the top of the screen and confirm that “Sample All Layers” is turned on. This setting is the whole reason this workflow functions. It tells the Remove tool to look at all the pixel information in your document when it calculates what to fill in, even though you are painting on an empty layer.
Remove tool selected in toolbar, options bar visible at top
With your blank layer selected and active, grab the Remove tool from the toolbar. Before you paint over anything, check the options bar at the top of the screen and confirm that “Sample All Layers” is turned on. This setting is the whole reason this workflow functions. It tells the Remove tool to look at all the pixel information in your document when it calculates what to fill in, even though you are painting on an empty layer.
Paint over the distraction you want gone, release, and let Photoshop calculate the fill. The correction appears on your blank layer, not on your background. You can turn that layer on and off to see exactly what changed, delete it entirely if you hate the result, or paint additional corrections on the same layer without ever touching the original pixel data underneath.
Step 5: Evaluate Honestly, Then Refine or Commit
 Layers panel showing blank layer with removal work above background
Once the initial removal lands, toggle your blank layer’s visibility on and off to check the result against the original. If the edges look rough or the fill left a smear, paint over that area again with the Remove tool still active on the same blank layer. Each correction builds on the layer without compounding into a mess of duplicates.
Layers panel showing blank layer with removal work above background
Once the initial removal lands, toggle your blank layer’s visibility on and off to check the result against the original. If the edges look rough or the fill left a smear, paint over that area again with the Remove tool still active on the same blank layer. Each correction builds on the layer without compounding into a mess of duplicates.
Matt is honest here in a way I appreciate: sometimes the result is clean enough that you do not even need the blank layer. If you are confident in the edit and the stakes are low, working directly on the background layer in Photoshop is a legitimate choice for personal work. What matters is that you are making a deliberate decision rather than following a rule you have never examined.
A Note from My Own Retouching Practice
The one area where I would add nuance to this workflow is client work, particularly in beauty retouching where revisions are common and sometimes requested weeks after delivery. For those projects, I still keep blank layers grouped and labeled, usually named after whatever tool I used on them, not because I am duplicating the background, but because I want to be able to hand off a PSD that another retoucher or art director can navigate without asking me questions.
Blank layers over an untouched background accomplish that just as well as duplicates did, and they do it with a fraction of the file weight. The key habit to shift is not “stop protecting your work.” It is “stop confusing file size with file safety.” A well-organized layer stack with a clean background and purposeful blank layers above it is more professional than a stack of duplicates you built up out of anxiety.
The single most important thing to take from this is that layer duplication was a workaround for limitations that no longer exist. When you are starting from a raw file sent through Lightroom, and when your tools support empty-layer workflows via “Sample All Layers,” the duplicate is mostly dead weight. Build the habit of reaching for a new blank layer instead, keep your layer stack intentional, and you will spend less time managing files and more time actually retouching.
Watch the full tutorial on YouTube to see Matt walk through this live, including a real removal that takes less than a minute once the workflow clicks.
Comments (6)
The before and after really sells it. Incredible difference.
Finally someone explains this in a way that actually makes sense.
This should be required reading for anyone starting out.
Quality content like this is rare. Keep it up.
Been doing this wrong for years apparently. Thanks for the wake-up call.
Excellent tutorial. I'd add that from a business standpoint, this technique is incredibly versatile.
Leave a Comment