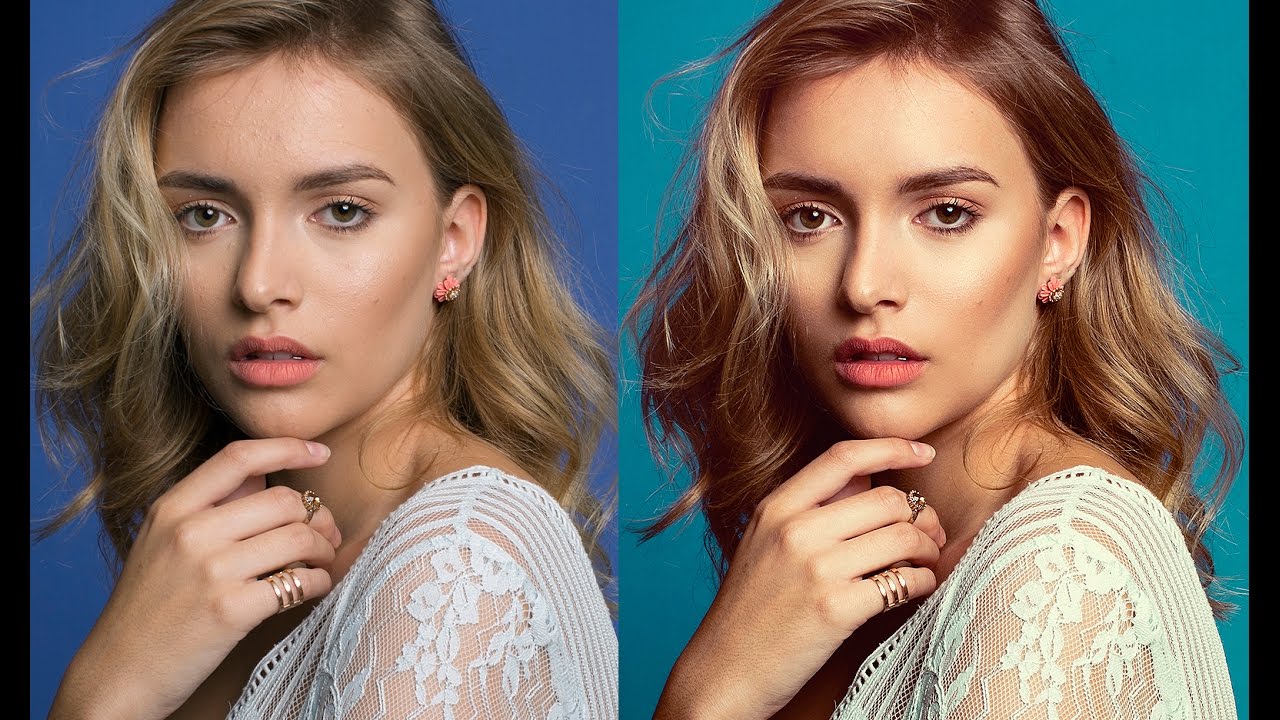
There is a specific kind of dread that comes from opening a portrait you shot on a busy studio day, knowing the background color is wrong and the skin tones are flat, and feeling like you have to fix all of it before the client follows up. I used to burn hours in Photoshop trying to rescue images that could have been shaped in two minutes inside Camera Raw first. That single shift in workflow order changed how fast I work and, honestly, how much I enjoy retouching. In this Jessica Kobeissi tutorial, she walks through exactly that kind of session: a studio portrait that needs skin work, a background color correction, and a tone curve adjustment, all handled methodically and without overcomplicating anything.
What I appreciate most about watching another working photographer edit is seeing what they actually prioritize versus what gets skipped. Jessica’s approach is refreshingly practical. She is not chasing perfection on every slider. She is building a solid foundation fast, which is exactly the mindset that keeps freelance retouching sustainable. Here is how the workflow breaks down, with the settings and reasoning you need to follow along yourself.
Step 1: Open the Image in Camera Raw Before Photoshop
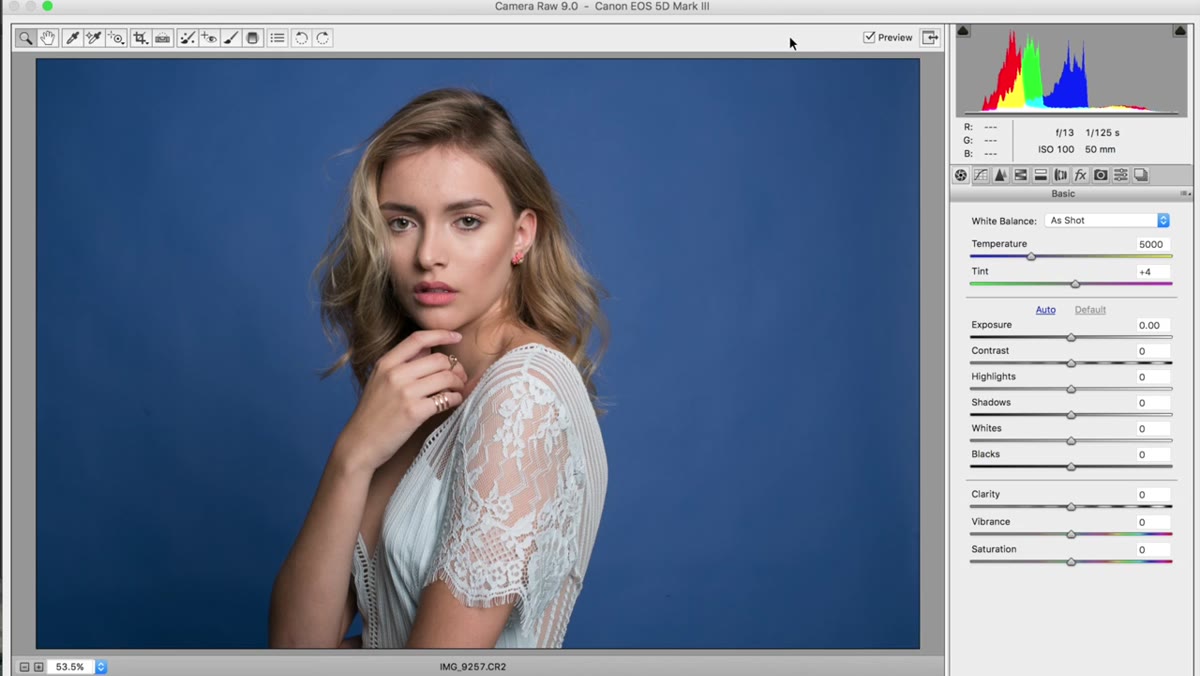 Camera Raw window open with raw portrait file loaded
Shooting in RAW is the prerequisite for everything that follows. When you double-click a RAW file, it opens in Camera Raw automatically, and that window gives you non-destructive control over the image’s base qualities before any pixel-level work begins. Think of Camera Raw as your structural edit and Photoshop as your detail edit. They serve different purposes, and conflating the two is where beginners lose time.
Camera Raw window open with raw portrait file loaded
Shooting in RAW is the prerequisite for everything that follows. When you double-click a RAW file, it opens in Camera Raw automatically, and that window gives you non-destructive control over the image’s base qualities before any pixel-level work begins. Think of Camera Raw as your structural edit and Photoshop as your detail edit. They serve different purposes, and conflating the two is where beginners lose time.
If you have been opening RAW files and immediately jumping past Camera Raw by clicking “Open Image,” start pausing here. Spend a few minutes on the foundational adjustments first. Your Photoshop workflow will be cleaner and shorter as a result.
Step 2: Apply Subtle Clarity, Shadow, and Contrast Adjustments
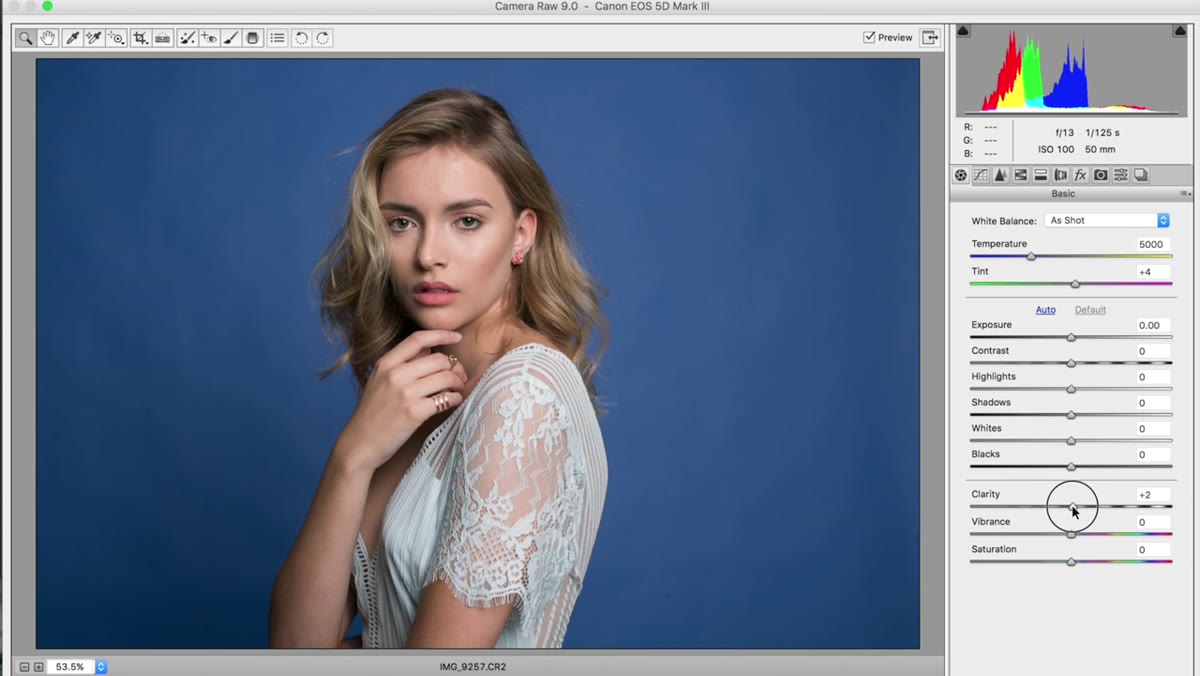 Camera Raw sliders panel showing Clarity bumped to plus three
Jessica’s adjustments here are deliberately conservative. Clarity goes up by about plus three. Not thirty, not fifteen. Three. Shadows get a moderate lift to open up detail in the darker areas of the face without blowing out the highlights. Contrast gets a small nudge, with the understanding that more precise contrast work will happen later inside Photoshop using curves or other tools.
Camera Raw sliders panel showing Clarity bumped to plus three
Jessica’s adjustments here are deliberately conservative. Clarity goes up by about plus three. Not thirty, not fifteen. Three. Shadows get a moderate lift to open up detail in the darker areas of the face without blowing out the highlights. Contrast gets a small nudge, with the understanding that more precise contrast work will happen later inside Photoshop using curves or other tools.
The restraint is the technique. Camera Raw sliders affect the entire image globally, so overcooking any one of them creates problems that are hard to isolate later. Use the preview toggle inside Camera Raw to flip between your adjusted and original view frequently. It keeps your eye honest, especially after you have been staring at the same image for a while and your perception of what looks “normal” has drifted.
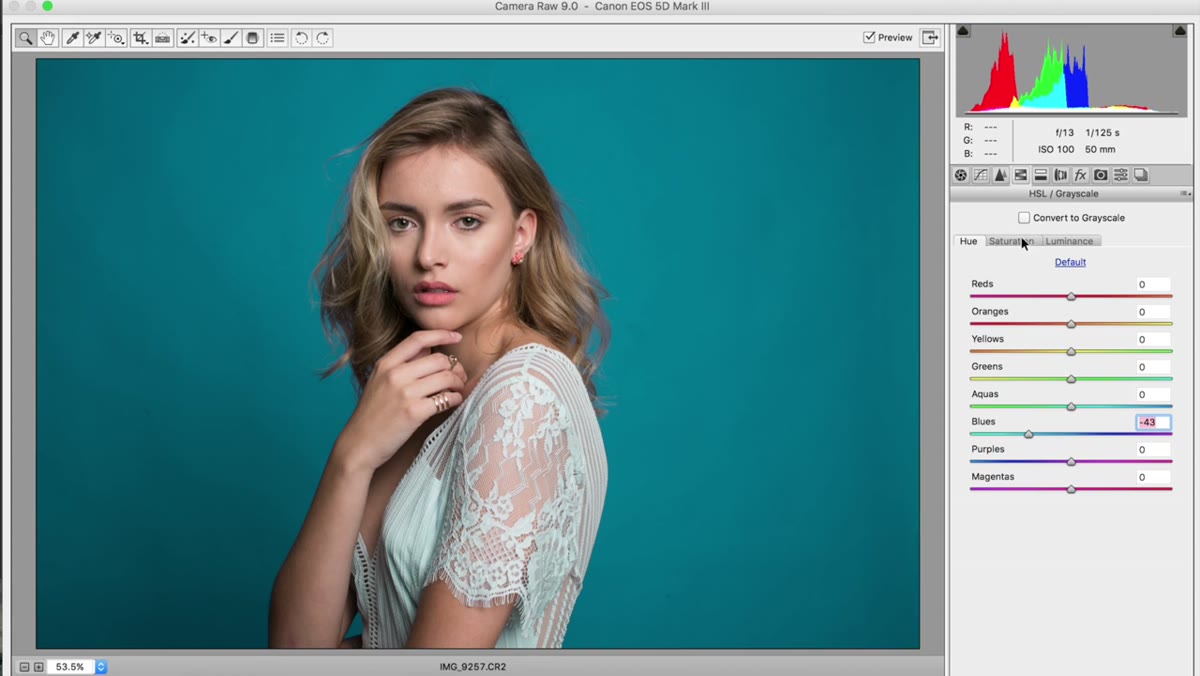
Step 3: Shift the Background Color Using the HSL Panel’s Hue Tab
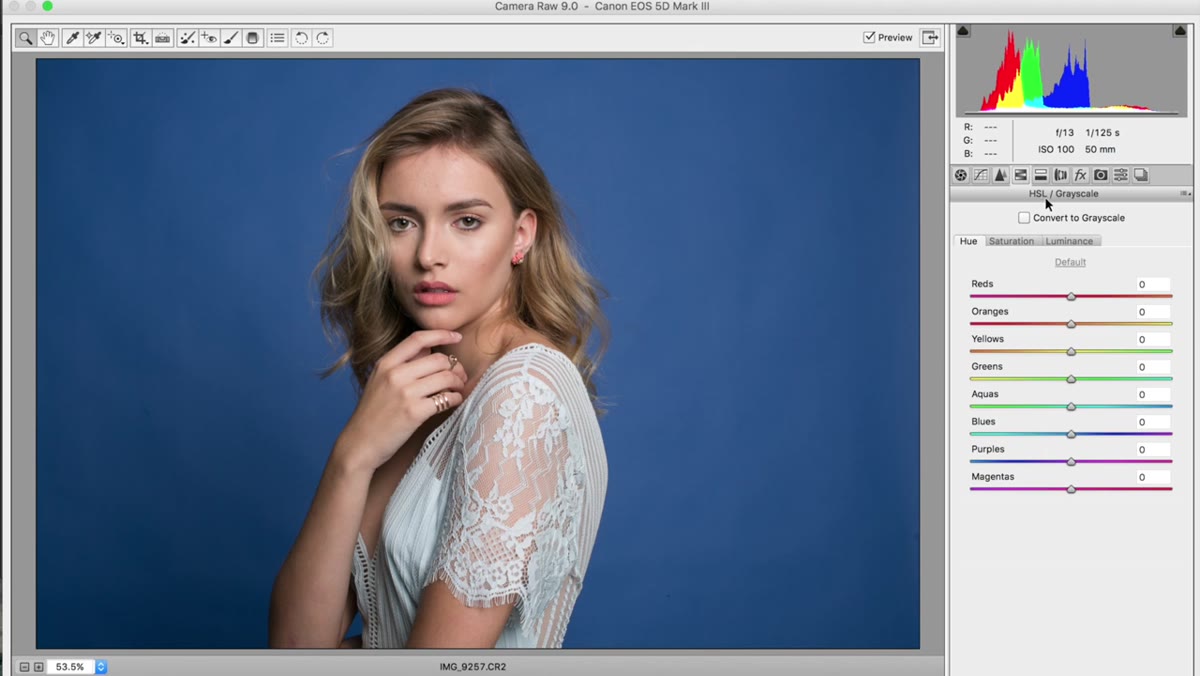 HSL panel open, Hue tab selected, Blue slider being adjusted
This is the step that genuinely surprises people who have not explored the HSL (Hue, Saturation, Luminance) panel deeply. If your subject was shot against a colored backdrop, you can change that color entirely without ever making a selection. Jessica was working with a blue studio background and wanted a different shade, so she navigated to the HSL panel, selected the Hue tab, and adjusted the Blue slider to approximately -43.
HSL panel open, Hue tab selected, Blue slider being adjusted
This is the step that genuinely surprises people who have not explored the HSL (Hue, Saturation, Luminance) panel deeply. If your subject was shot against a colored backdrop, you can change that color entirely without ever making a selection. Jessica was working with a blue studio background and wanted a different shade, so she navigated to the HSL panel, selected the Hue tab, and adjusted the Blue slider to approximately -43.
The reason this works so cleanly is that the subject’s skin tones fall in orange and yellow ranges, not blue. Shifting the blue hue does not touch the skin at all. If you have shot against a solid colored backdrop, this trick can save you from tedious masking. The key is knowing which color family your background falls into and only moving that slider.
Step 4: Boost the Background Color with the Saturation Tab
 HSL Saturation tab selected, Blue slider moved to plus thirteen
After shifting the hue, the background color can look a little dull or washed out. Switching to the Saturation tab within the same HSL panel and pushing the Blue slider up, Jessica lands around plus 13, brings the new color to life. You are essentially telling Camera Raw: here is the new hue I want, now give it some richness.
HSL Saturation tab selected, Blue slider moved to plus thirteen
After shifting the hue, the background color can look a little dull or washed out. Switching to the Saturation tab within the same HSL panel and pushing the Blue slider up, Jessica lands around plus 13, brings the new color to life. You are essentially telling Camera Raw: here is the new hue I want, now give it some richness.
Keep your saturation increases proportional to the hue shift. A big hue move paired with a big saturation push can make the background look artificial fast. Bump it up until the color reads as intentional and stop before it starts competing with your subject.
Step 5: Refine the Tone with the Luminance Tab
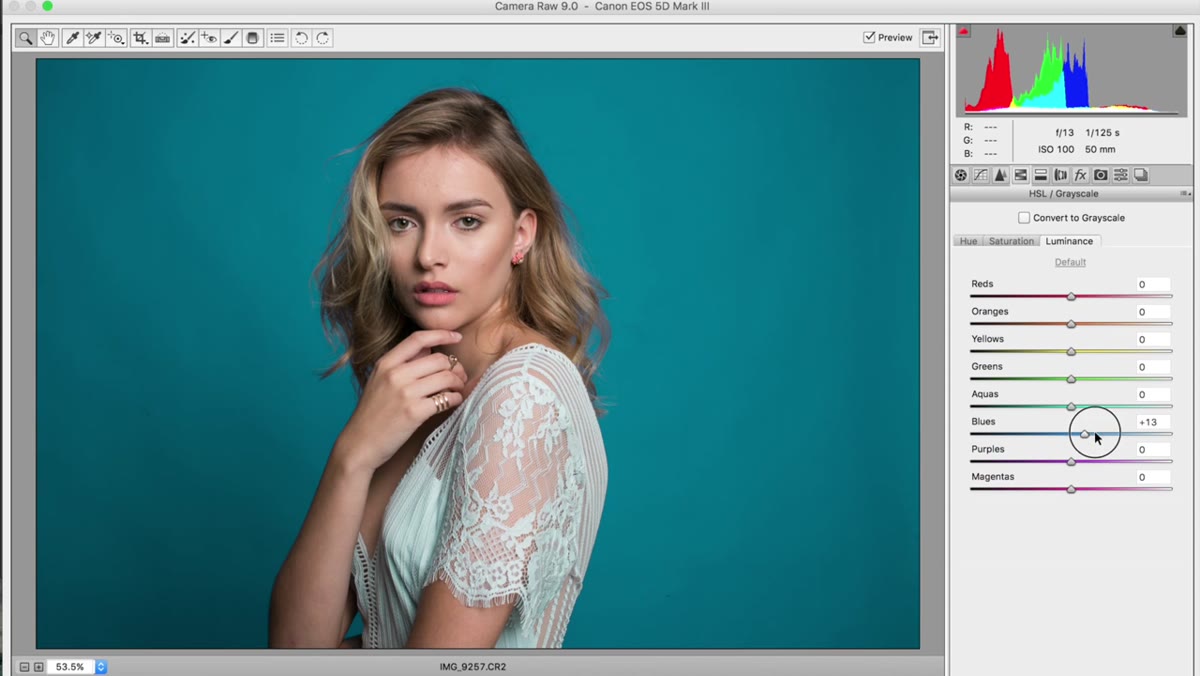 HSL Luminance tab selected with Blue channel being adjusted
The third tab in the HSL trio, Luminance, controls how light or dark a specific color appears. After adjusting hue and saturation on the blue background, a small luminance adjustment helps the background integrate naturally with the overall exposure of the image. If the background looks too bright relative to the subject, bring the blue luminance down. If it looks muddy or underexposed, lift it slightly.
HSL Luminance tab selected with Blue channel being adjusted
The third tab in the HSL trio, Luminance, controls how light or dark a specific color appears. After adjusting hue and saturation on the blue background, a small luminance adjustment helps the background integrate naturally with the overall exposure of the image. If the background looks too bright relative to the subject, bring the blue luminance down. If it looks muddy or underexposed, lift it slightly.
Together, the three HSL tabs give you precise, targeted color control that would otherwise require multiple masked adjustment layers in Photoshop. Running through all three takes less than a minute once you know what each one does.
Step 6: Shape the Tone Curve in the RGB Channel
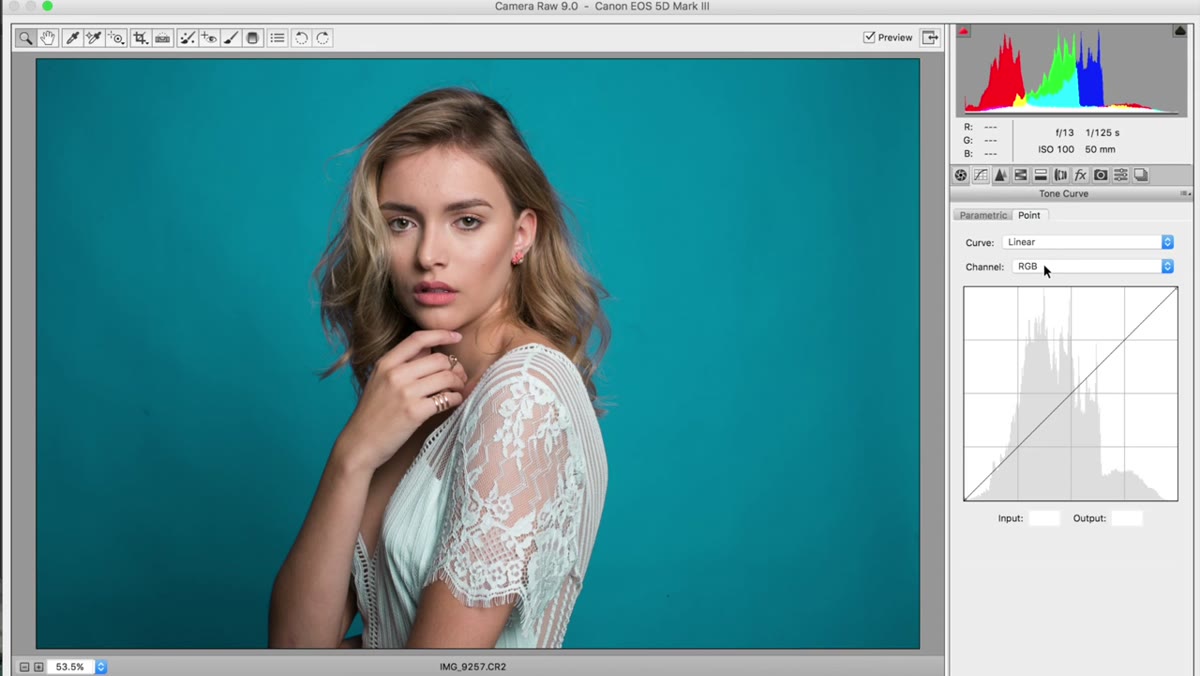 Tone curve panel open with anchor points being placed on the RGB curve
Jessica’s final Camera Raw step is a tone curve adjustment in the RGB channel. She places a few anchor points along the curve to lock certain tonal regions in place, then makes small adjustments to shape the overall contrast and mood of the image. Her advice here is genuinely useful: stop trying to follow a formula and use the curve to get the image feeling right to your eye.
Tone curve panel open with anchor points being placed on the RGB curve
Jessica’s final Camera Raw step is a tone curve adjustment in the RGB channel. She places a few anchor points along the curve to lock certain tonal regions in place, then makes small adjustments to shape the overall contrast and mood of the image. Her advice here is genuinely useful: stop trying to follow a formula and use the curve to get the image feeling right to your eye.
That said, the basic S-curve principle is worth knowing. A gentle S-shape, where the shadows dip slightly below the diagonal baseline and the highlights rise slightly above it, adds contrast while keeping the image looking natural. Anchor points in the midtones prevent the curve from affecting areas you want to leave alone. Start with a light touch and compare against your preview often.
What I’d Add from My Own Workflow
Before I bring any portrait into Photoshop, I also check the white balance inside Camera Raw against a neutral reference point in the image, usually the whites of the eyes or a gray card if I shot one. Color temperature errors that look minor in Camera Raw compound significantly when you start doing skin tone work in Photoshop. Getting the balance close here saves real time later.
I also recommend naming your Camera Raw presets if you find a combination of settings that works consistently for your lighting setup. I have a preset built around my most common studio configuration that gives me a neutral, workable starting point every time. Less decision fatigue per image means more consistent results across a gallery.
The single most important idea in this entire workflow is sequence: shape the image globally in Camera Raw first, then move to Photoshop for detail. It sounds obvious once you hear it, but most of us learned the hard way by doing it backwards. Jessica’s tutorial is a clean, honest look at how a working photographer actually moves through a portrait edit without overthinking every slider.
Watch the full tutorial on YouTube to see the color shifts and curve adjustments in real time. Watching someone move through a workflow live fills in details that written instructions can’t fully capture.
Comments (1)
Would love to see a follow-up going deeper into this topic.
Leave a Comment