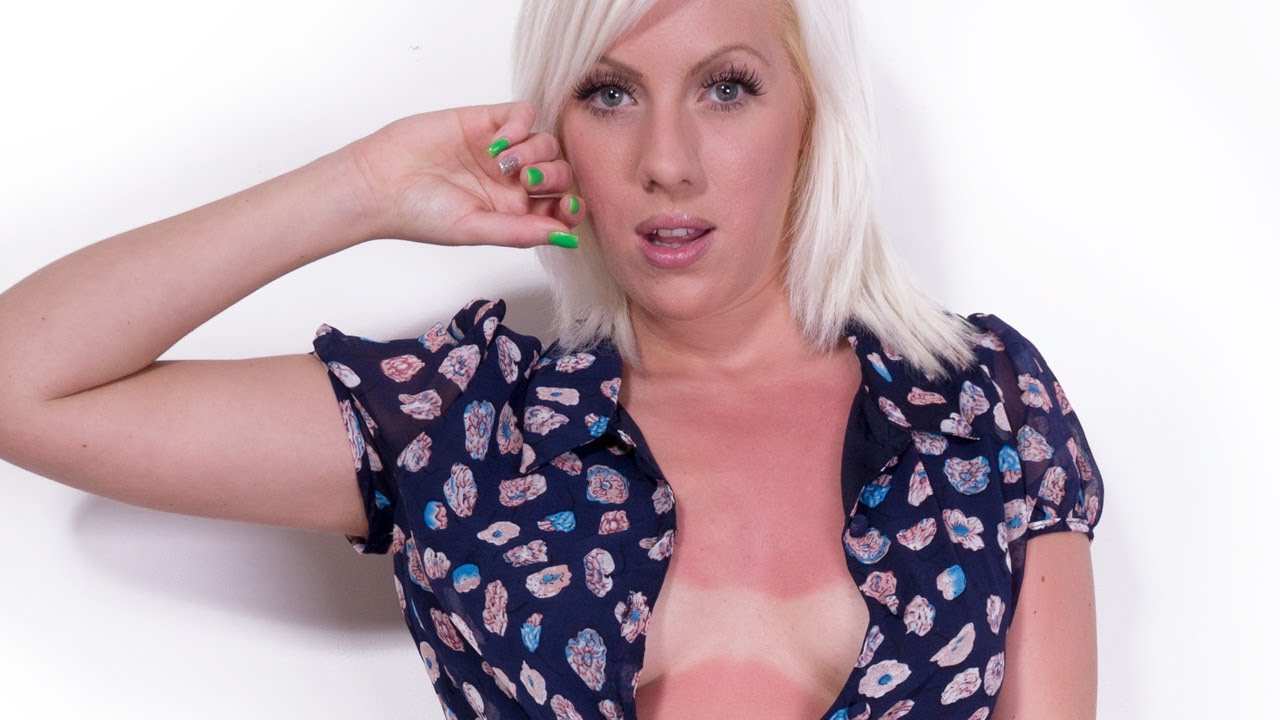
Summer shoots are some of my favorites to work on. The light is gorgeous, the energy is high, and then the files land in my inbox and I remember: tan lines. Swimsuit straps, watch marks, sock lines, the full chest-and-shoulder sunburn that turns an otherwise beautiful portrait into a puzzle. Early in my retouching career I used to attack these with a Hue/Saturation layer applied to the whole image and wonder why it looked wrong. The answer, of course, is that you cannot color-correct a localized skin problem with a global adjustment. You need a precise selection first, and that selection has to follow color, not shape.
Watch the full tutorial on YouTube
In this Aaron Nace (PHLEARN) tutorial, Aaron works through a real client image submitted by a viewer - a portrait with visible tan lines and redness across the chest - and shows exactly how to isolate that discolored skin using Photoshop’s Color Range tool before blending it back into the surrounding skin tone. The workflow is cleaner than anything I cobbled together on my own, and I’ve folded it into my standard beauty retouching process ever since.
Step 1: Assess the Image and Decide Which Direction to Edit
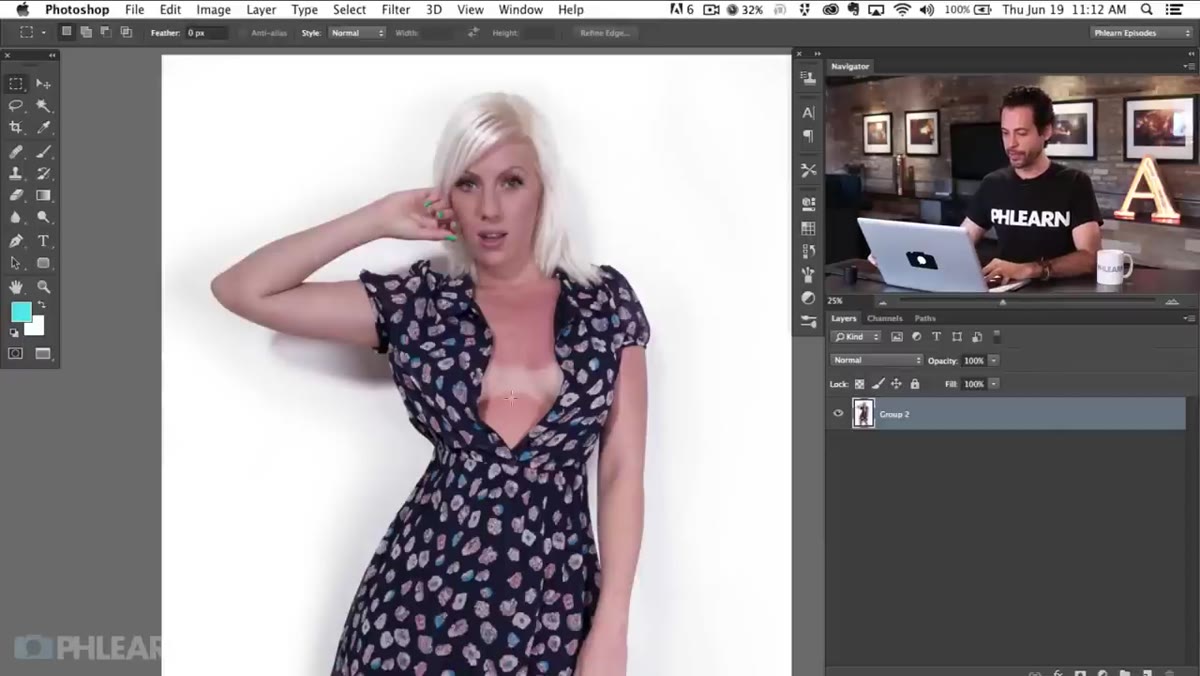 Aaron examining the tan line area on a portrait
Before you touch a single tool, look at the image and make a decision: which area of skin do you want to move toward the other? In this image, there’s a sunburned, red patch sitting next to a more neutral skin tone. The goal is to pull the red area toward the natural skin color, and then, once they’re matching, darken the whole zone slightly so it reads as a healthy tan rather than a burn. That two-stage thinking - match first, then stylize - keeps the result looking real.
Aaron examining the tan line area on a portrait
Before you touch a single tool, look at the image and make a decision: which area of skin do you want to move toward the other? In this image, there’s a sunburned, red patch sitting next to a more neutral skin tone. The goal is to pull the red area toward the natural skin color, and then, once they’re matching, darken the whole zone slightly so it reads as a healthy tan rather than a burn. That two-stage thinking - match first, then stylize - keeps the result looking real.
This decision matters because it determines your selection target. You’re going to select the problem area, not the good skin.
Step 2: Open Color Range and Sample the Redness
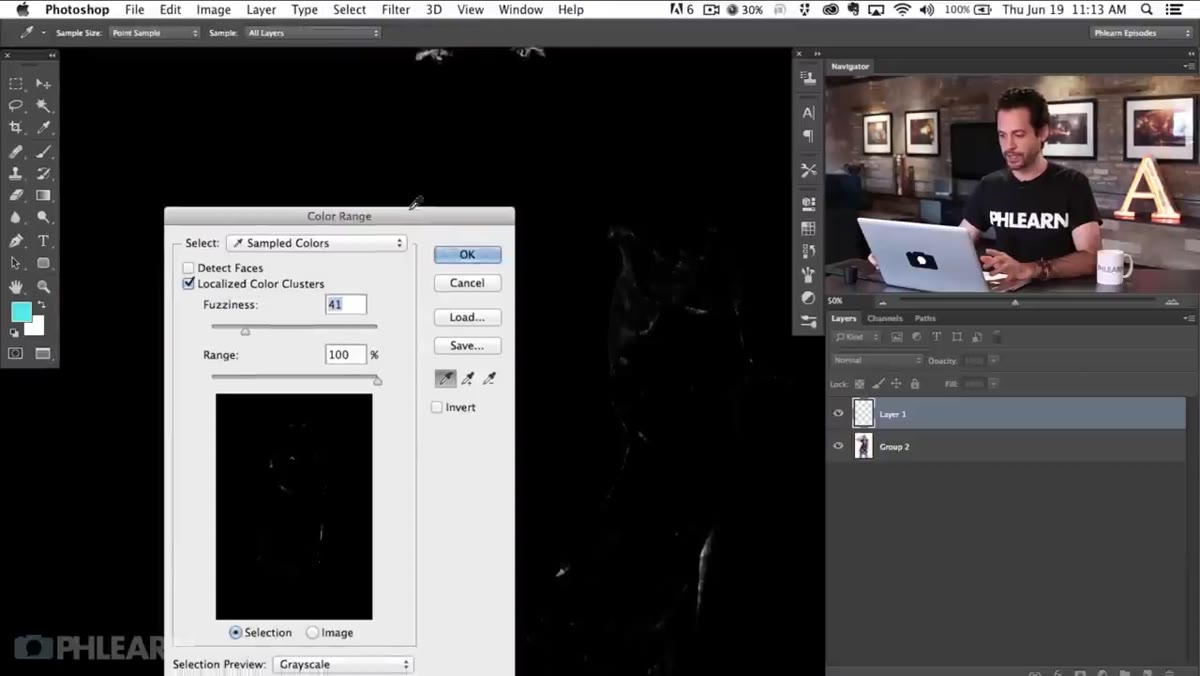 Color Range dialog open with eyedropper on red skin area
With your target layer active, go to Select, then Color Range. A dialog box opens with a small preview window and an eyedropper tool. Click directly on the reddest part of the sunburned skin. The preview will immediately show you a grayscale map - white areas are selected, black areas are not.
Color Range dialog open with eyedropper on red skin area
With your target layer active, go to Select, then Color Range. A dialog box opens with a small preview window and an eyedropper tool. Click directly on the reddest part of the sunburned skin. The preview will immediately show you a grayscale map - white areas are selected, black areas are not.
At this point you’ll likely see the selection spreading to other parts of the image that share a similar hue, including legs, face, or background. That’s fine for now. The next step is where you dial it in.
Step 3: Use Fuzziness and Range to Tighten the Selection
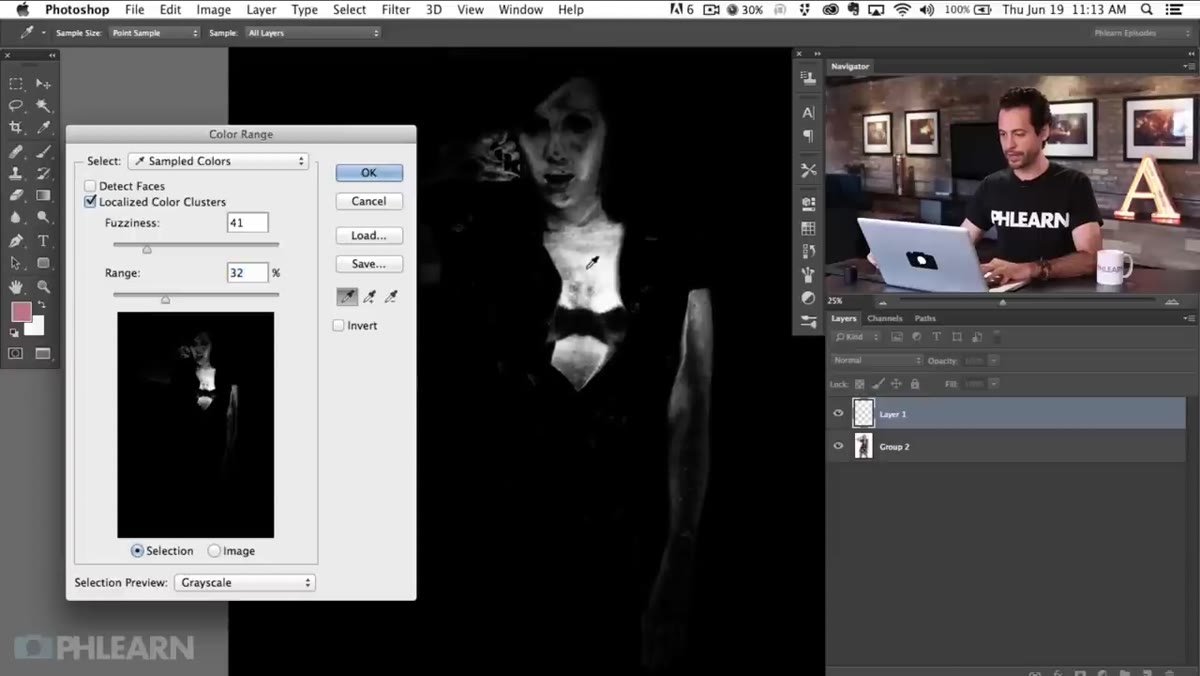 Fuzziness slider being adjusted in Color Range dialog
The Color Range dialog has two important sliders: Fuzziness and Range. Fuzziness controls how broadly Photoshop searches for colors similar to your sampled point. A high fuzziness grabs a wider band of tones, a low one is more specific. Range controls the softness of the falloff at the selection edges.
Fuzziness slider being adjusted in Color Range dialog
The Color Range dialog has two important sliders: Fuzziness and Range. Fuzziness controls how broadly Photoshop searches for colors similar to your sampled point. A high fuzziness grabs a wider band of tones, a low one is more specific. Range controls the softness of the falloff at the selection edges.
Start by lowering the Range slider until the selection pulls back from areas you don’t want to affect - the legs, the face, other parts of the body. Then nudge Fuzziness up just enough to fill in the redness you do want selected. You’re looking for a preview that shows the problem area as bright white and everything else close to black. If you need to add to the selection without starting over, switch to the plus eyedropper in the dialog and click on any missed patches of red. When the preview looks right, click OK. Photoshop loads the selection as marching ants on your canvas.
Step 4: Add a Hue/Saturation Adjustment Layer
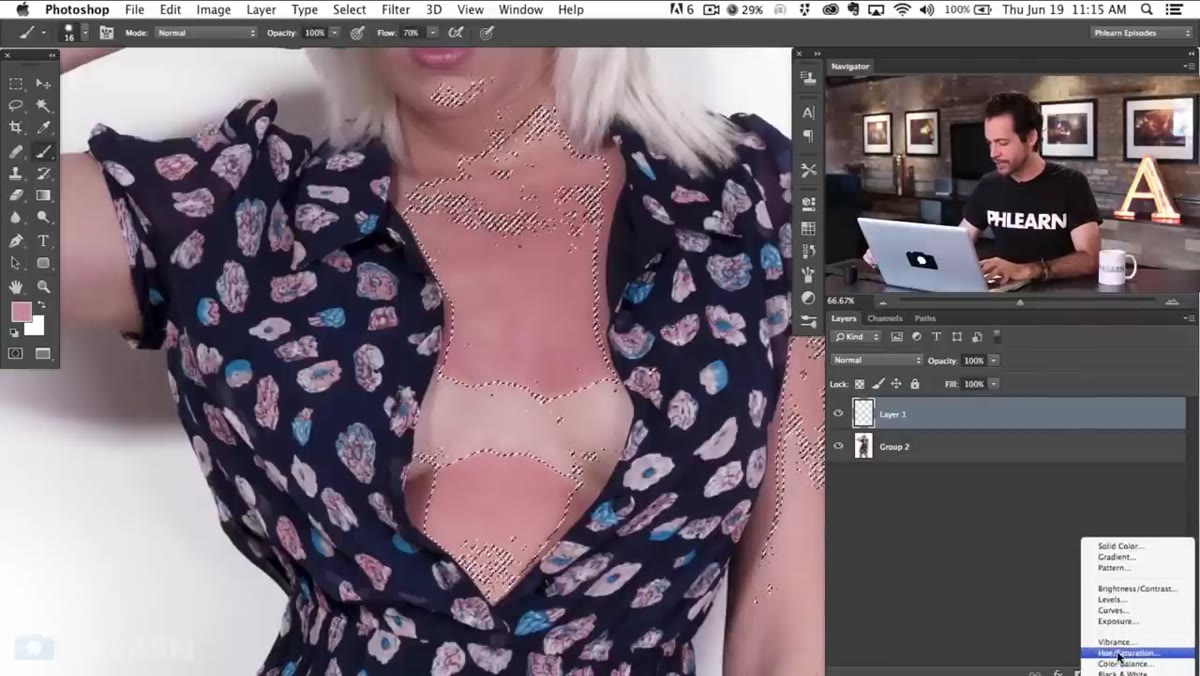 Hue Saturation adjustment layer being added with active selection
Here’s the part that makes this workflow elegant. Because you have an active selection when you create the adjustment layer, Photoshop automatically uses that selection as the layer mask. You don’t have to paint a mask by hand. Go to the Adjustments panel and click Hue/Saturation, or go to Layer, New Adjustment Layer, Hue/Saturation.
Hue Saturation adjustment layer being added with active selection
Here’s the part that makes this workflow elegant. Because you have an active selection when you create the adjustment layer, Photoshop automatically uses that selection as the layer mask. You don’t have to paint a mask by hand. Go to the Adjustments panel and click Hue/Saturation, or go to Layer, New Adjustment Layer, Hue/Saturation.
The adjustment layer appears with a mask already applied, restricting its effect to exactly the red area you selected. If you hold Alt (Option on Mac) and click the mask thumbnail, you’ll see the grayscale selection rendered as a mask - a useful sanity check before you start adjusting.
Step 5: Reduce the Reds to Match the Surrounding Skin
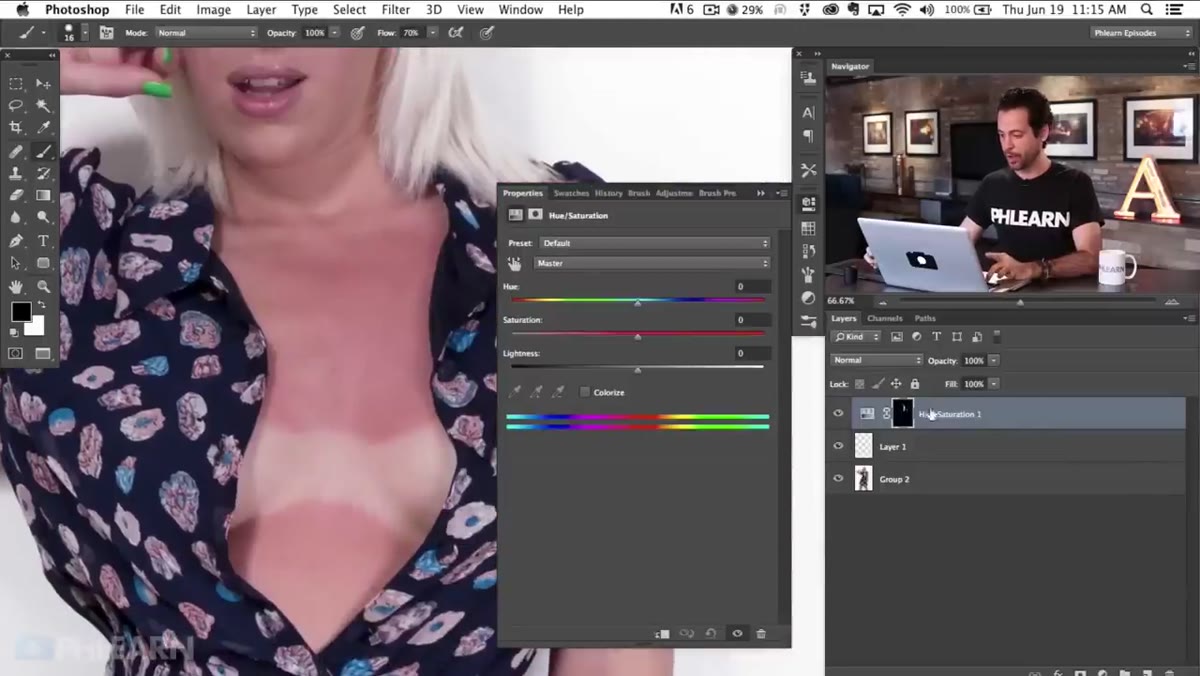 Hue Saturation sliders being adjusted on the masked layer
Inside the Hue/Saturation properties panel, start by pulling the Saturation slider to the left. This drains some of the intensity from the redness without changing the hue dramatically. Watch the image as you drag - you’re looking for the point where the burned area starts to feel like it belongs with the skin around it, not the point where it goes gray.
Hue Saturation sliders being adjusted on the masked layer
Inside the Hue/Saturation properties panel, start by pulling the Saturation slider to the left. This drains some of the intensity from the redness without changing the hue dramatically. Watch the image as you drag - you’re looking for the point where the burned area starts to feel like it belongs with the skin around it, not the point where it goes gray.
If the color is still pulling red or orange after desaturating, try nudging the Hue slider a small amount in either direction. Even a shift of 5 to 10 degrees can bridge the gap between sunburned skin and natural tone. Work slowly. The adjustment should feel invisible, like the burn is fading rather than being erased.
A Note from My Own Workflow: Don’t Skip the Mask Refinement
The Color Range selection is smart, but it’s not magic. In my experience working on high-resolution beauty files for brand clients, I almost always need to do a quick pass on the auto-generated mask before committing to the adjustment. I bring the mask up with Alt-click and look for hard edges, stray selected areas in the hair or background, or patches of important skin that were accidentally excluded.
A soft round brush at 20-30% opacity is usually all I need to clean things up - painting black to remove parts of the mask, white to recover them. I also add a slight Gaussian Blur to the mask (Filter, Blur, Gaussian Blur, around 2-3 pixels) when the edge of the tan line is gradual rather than sharp. Tan lines from T-shirts tend to be sharper. Sunburn transitions are usually soft. Match your mask edge to the actual edge in the photo and the result will hold up at full zoom.
One more thing I’ve learned: do this correction on a smart object or keep the original layer untouched beneath everything. Color matching is iterative. You will come back and nudge the Hue/Saturation values after you look at the image fresh the next morning. Give yourself that flexibility.
The biggest thing I took from Aaron’s approach is the principle of selecting by color rather than by shape when dealing with skin tone problems. Lasso selections and even masking by luminosity fall apart on skin because the problem is about hue and saturation, not about where a shape begins and ends. Color Range speaks the right language for this kind of work, and once you’ve used it for sunburn you’ll find yourself reaching for it on bruises, uneven flash exposure, and color casts from mixed lighting.
Watch the full tutorial on YouTube to see Aaron walk through the complete edit, including how he handles the overall darkening pass after the redness is brought under control.
Comments (2)
Just subscribed. If the rest of your content is this good, I'm in.
Solid advice. Especially the part about taking your time with it.
Leave a Comment