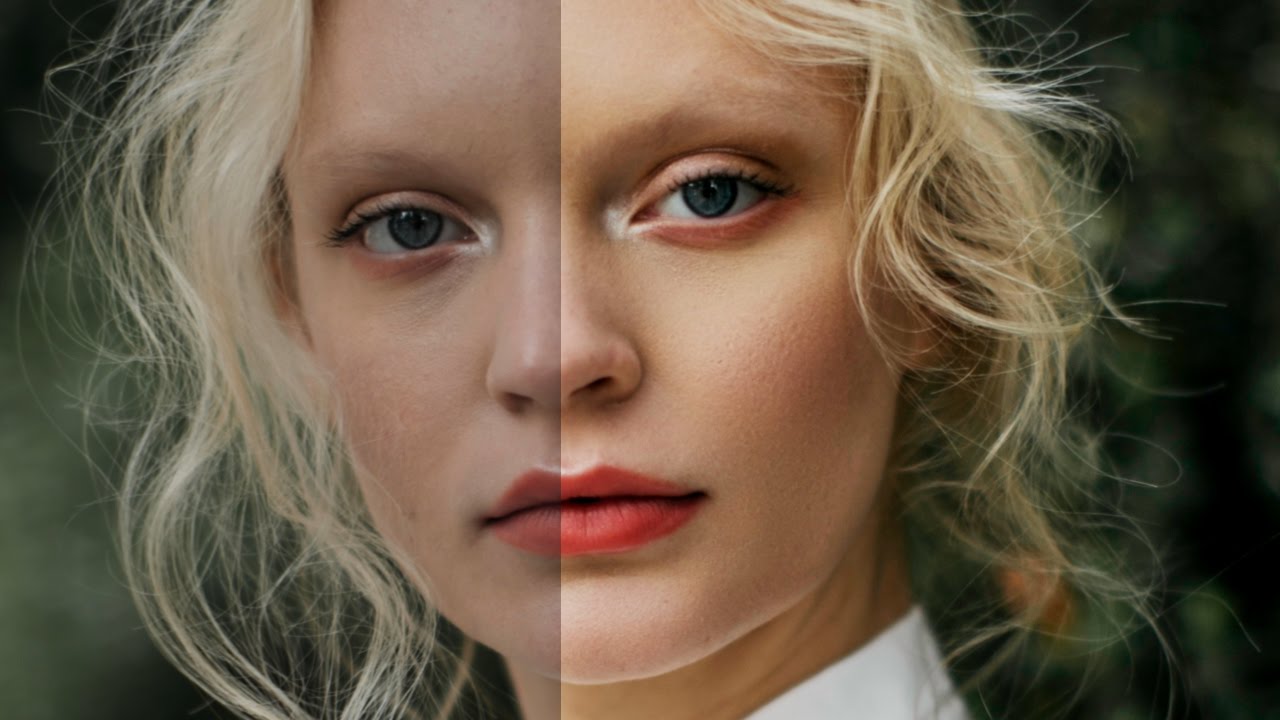
Early in my retouching career, I had a client look at a finished portrait and tell me the skin looked “like a wax figure.” She wasn’t wrong. I’d been painting over everything on a single merged layer, smoothing out texture along with blemishes, and the result was exactly as plastic as she described. That comment sent me down a long road of learning how to separate what I was fixing from what I needed to preserve.
That’s why I keep coming back to Jessica Kobeissi’s approach to skin retouching. In this Jessica Kobeissi tutorial on basic skin retouching, she walks through the frequency separation method in a way that’s genuinely accessible without being condescending. She’s not just showing you where to click. She’s explaining the logic underneath the technique, which makes the difference between copying steps and actually understanding what you’re doing.
The method she demonstrates is one I use on almost every beauty job I take now. Freelancing for cosmetics clients means the bar for skin quality is high, and frequency separation gives me the control to meet it without destroying the natural character of the skin. Here’s how the technique works, step by step.
Step 1: Understand What Frequency Separation Actually Means
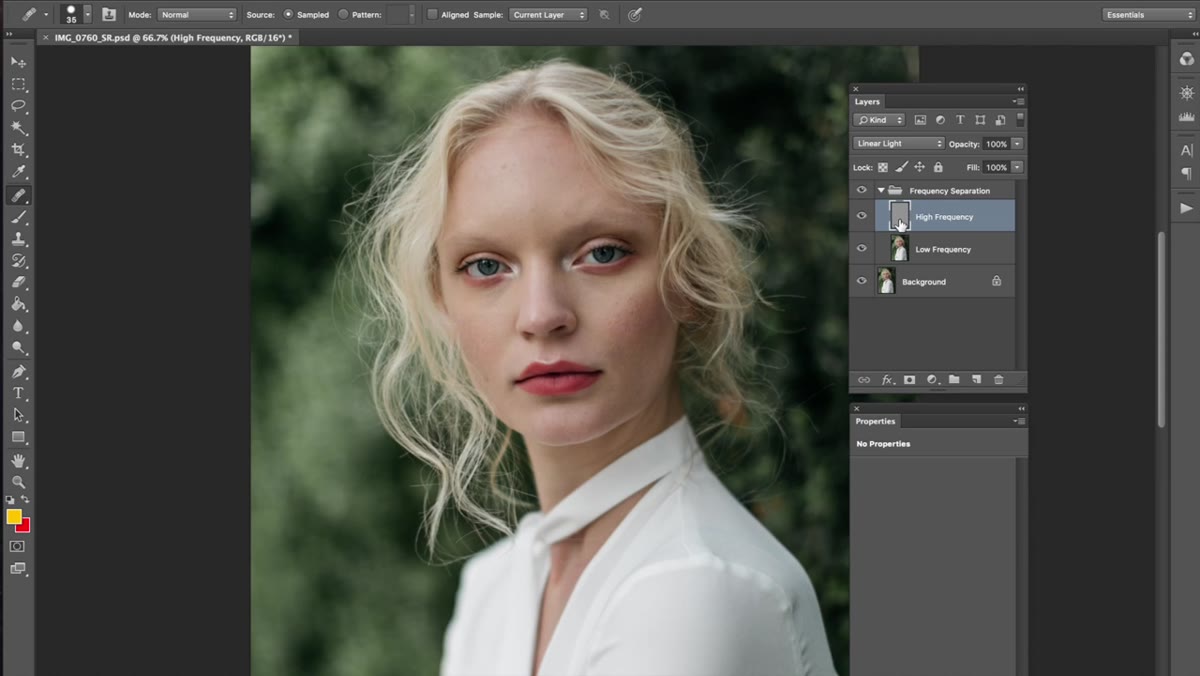 High-frequency layer shown in isolation against black fill
Before touching a single tool, Jessica pauses to explain the two-layer logic behind frequency separation, and this is genuinely the most important part of the tutorial. The high-frequency layer holds the skin’s texture: pores, fine lines, the actual physical surface of the skin. The low-frequency layer holds the color and tone: the blush across a cheek, the shadow under a jaw, the overall warmth or coolness of the complexion. When you stack them together, you get the complete image. When you separate them, you can fix color problems without disturbing texture, and vice versa.
High-frequency layer shown in isolation against black fill
Before touching a single tool, Jessica pauses to explain the two-layer logic behind frequency separation, and this is genuinely the most important part of the tutorial. The high-frequency layer holds the skin’s texture: pores, fine lines, the actual physical surface of the skin. The low-frequency layer holds the color and tone: the blush across a cheek, the shadow under a jaw, the overall warmth or coolness of the complexion. When you stack them together, you get the complete image. When you separate them, you can fix color problems without disturbing texture, and vice versa.
Most retouching mistakes happen because these two things get edited simultaneously. Smoothing out a red patch on a single flat layer also smooths out the pore structure sitting on top of it. Frequency separation lets you go into the color layer and neutralize that redness while the texture layer stays completely untouched above it.
Step 2: Set Up Your Frequency Separation Layers
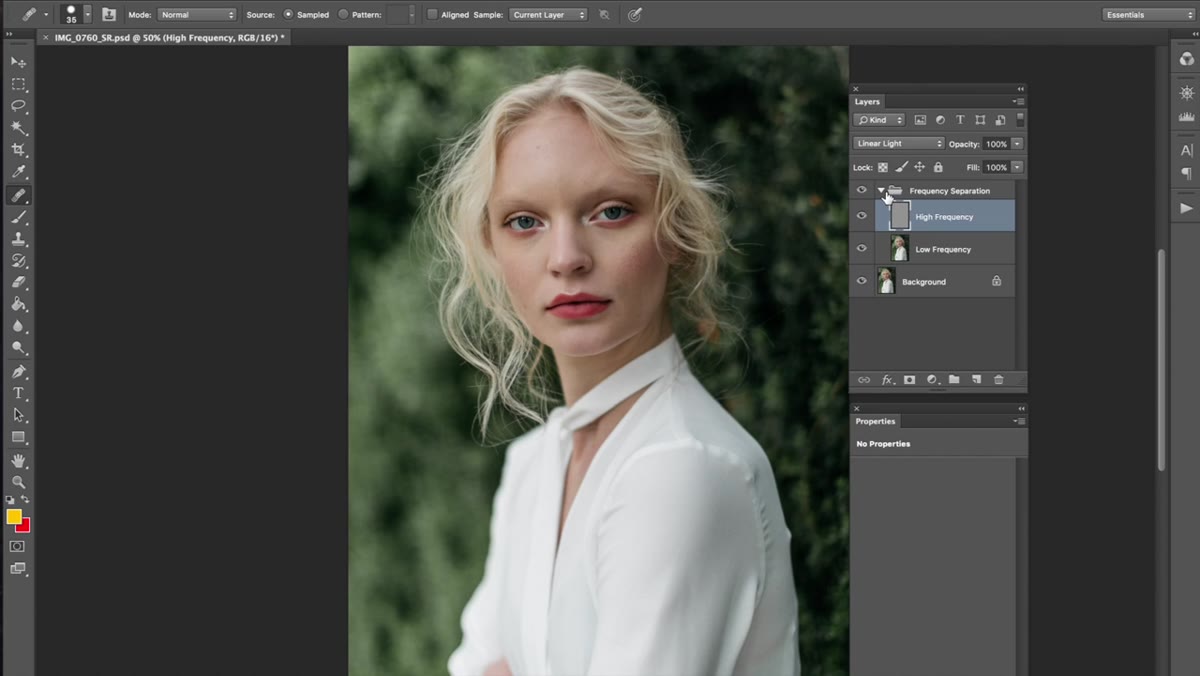 Two-layer panel showing high and low frequency layers stacked
Jessica uses a custom Photoshop action to generate her frequency separation layers quickly. If you haven’t set that up yet, she points to a previous tutorial that covers the full process. For now, the key thing to know is that you’re working with two layers: the high-frequency layer set to Linear Light blend mode, and the low-frequency layer beneath it. These two layers together reproduce the original image faithfully.
Two-layer panel showing high and low frequency layers stacked
Jessica uses a custom Photoshop action to generate her frequency separation layers quickly. If you haven’t set that up yet, she points to a previous tutorial that covers the full process. For now, the key thing to know is that you’re working with two layers: the high-frequency layer set to Linear Light blend mode, and the low-frequency layer beneath it. These two layers together reproduce the original image faithfully.
If you’re new to actions, think of them as recorded sequences of Photoshop steps you can replay with one click. Creating a frequency separation action is worth the upfront time investment. I named mine after a film I won’t embarrass myself by naming here, but the point is that it runs in seconds and gets me into the actual work faster.
Step 3: Duplicate the Low-Frequency Layer
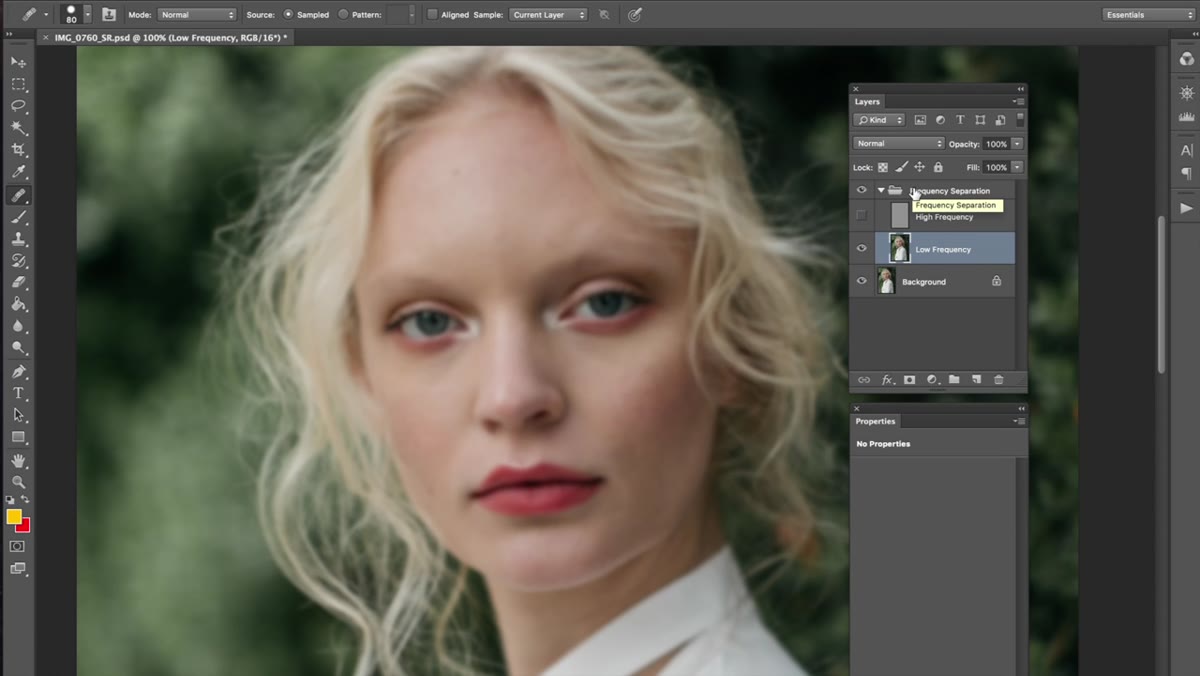 Duplicate low-frequency layer appearing in the layers panel
Before making any edits, Jessica hides the high-frequency layer and duplicates the low-frequency layer using Command J (Control J on PC). The duplicate is where all the actual retouching happens. The original low-frequency layer stays beneath it as a safety net. If something goes wrong, you delete the duplicate and start again without losing your setup.
Duplicate low-frequency layer appearing in the layers panel
Before making any edits, Jessica hides the high-frequency layer and duplicates the low-frequency layer using Command J (Control J on PC). The duplicate is where all the actual retouching happens. The original low-frequency layer stays beneath it as a safety net. If something goes wrong, you delete the duplicate and start again without losing your setup.
Working on the blurred, texture-free version of the image can feel disorienting at first. Everything looks soft and slightly dream-like. Push through that. The blur is what allows you to see tonal and color issues clearly, without the distraction of texture pulling your eye around the image.
Step 4: Configure the Healing Brush Tool
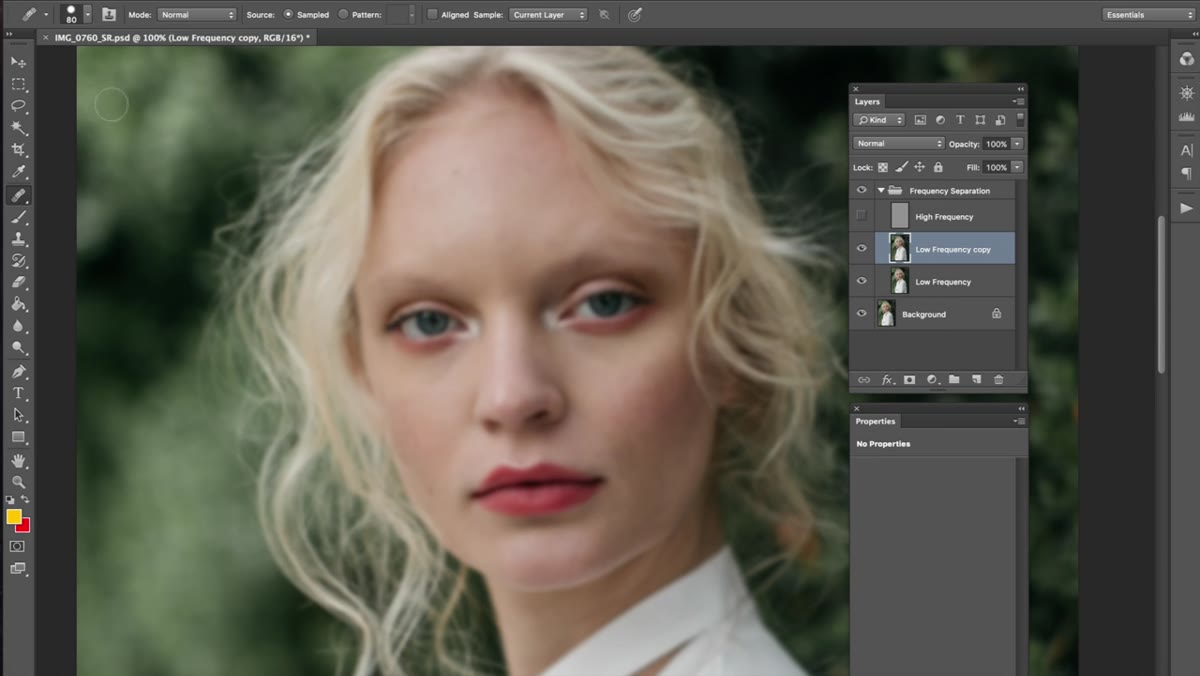 Healing brush tool settings panel showing size, hardness, and spacing values
With the duplicate low-frequency layer selected, switch to the Healing Brush tool (not the Spot Healing Brush - the regular one). Jessica’s settings are specific enough to be worth noting: size around 80 pixels, hardness at approximately 71 percent, spacing at 33 percent, roundness at 100 percent, angle at zero. These aren’t arbitrary. The hardness setting in particular affects how the healed area blends at its edges. Too soft and you lose control. Too hard and you get visible rings around each stroke.
Healing brush tool settings panel showing size, hardness, and spacing values
With the duplicate low-frequency layer selected, switch to the Healing Brush tool (not the Spot Healing Brush - the regular one). Jessica’s settings are specific enough to be worth noting: size around 80 pixels, hardness at approximately 71 percent, spacing at 33 percent, roundness at 100 percent, angle at zero. These aren’t arbitrary. The hardness setting in particular affects how the healed area blends at its edges. Too soft and you lose control. Too hard and you get visible rings around each stroke.
Start with her settings and adjust from there based on your image. A tighter crop with more visible skin detail might need a smaller brush. A wide editorial shot with softer lighting might tolerate slightly lower hardness. Let the image tell you.
Step 5: Sample and Paint to Even Out Skin Tone
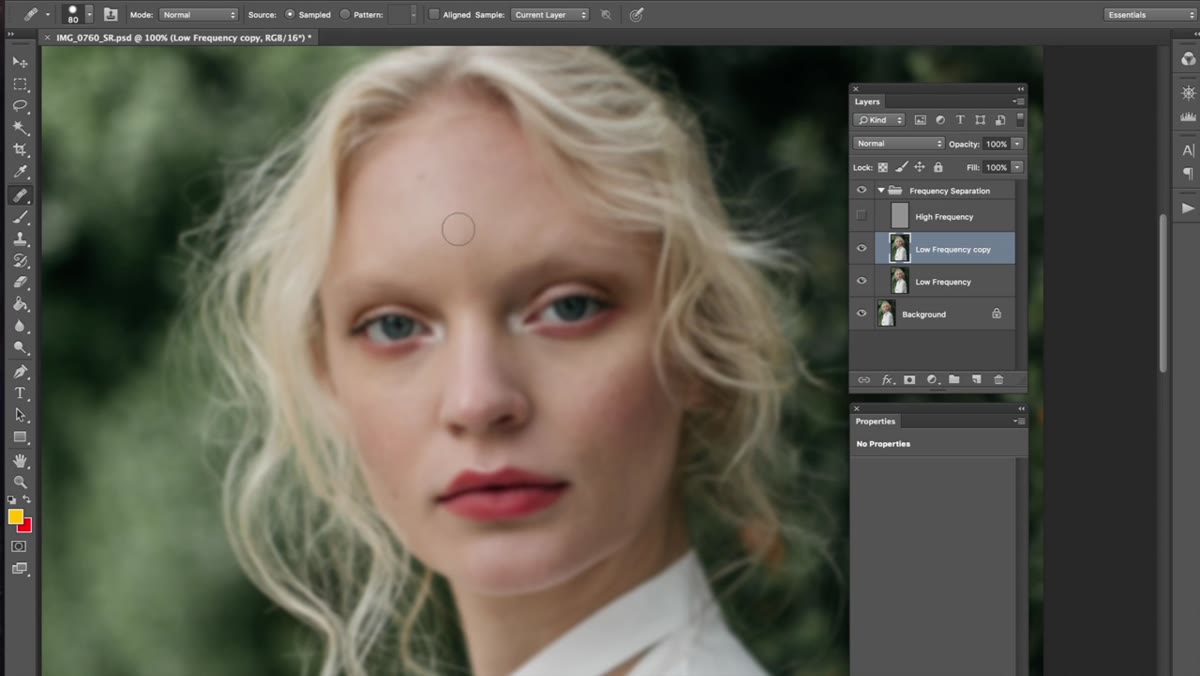 Healing brush sampling a clean area of skin on the low-frequency layer
The Healing Brush works by sampling a nearby area of the image and blending that sample into the spot you paint over. On the low-frequency layer, this means you’re sampling color and tone, not texture. Hold Alt (Option on Mac) and click a clean area of skin near the problem spot, then paint over the blemish, discoloration, or uneven patch you want to correct.
Healing brush sampling a clean area of skin on the low-frequency layer
The Healing Brush works by sampling a nearby area of the image and blending that sample into the spot you paint over. On the low-frequency layer, this means you’re sampling color and tone, not texture. Hold Alt (Option on Mac) and click a clean area of skin near the problem spot, then paint over the blemish, discoloration, or uneven patch you want to correct.
Work in small sections. Sample frequently. The further your sample point drifts from the area you’re healing, the more likely you are to introduce color or tonal inconsistency. Jessica’s approach is methodical and patient, and that patience is what separates results that look natural from results that look retouched.
A Note From My Own Practice
One thing the tutorial doesn’t cover, simply because it’s focused on fundamentals, is what to do when the high-frequency layer has issues of its own. Acne scarring, for example, is texture, not just tone. It lives on the high-frequency layer. For those situations I use the Clone Stamp tool directly on the high frequency layer, sampling similar skin texture from nearby areas and stamping it over the rough patches. This keeps the low-frequency work clean and targets the problem where it actually lives.
I’d also suggest zooming out regularly while you work. It’s easy to get lost at 200 percent and over-retouch patches that look fine at actual viewing size. My rule is that if I can still see the edit clearly at 100 percent, I’ve gone too far.
Frequency separation takes practice to feel natural. I kept my first attempt at this method saved in a folder somewhere, mostly as a reminder that confusion early on is part of the process, not a sign you’ve chosen the wrong technique.
The single most important idea in this tutorial is one Jessica states plainly: when you retouch everything on one layer, you give up control. Separating texture from tone means every correction is targeted, reversible, and much harder to overdo. That one shift in how you think about a retouching file changes everything downstream.
Watch the full tutorial on YouTube to see Jessica walk through the complete process on a real portrait, including how she handles the high-frequency layer and her overall workflow from start to finish.
Comments (2)
Just subscribed. If the rest of your content is this good, I'm in.
Printing this out and pinning it next to my monitor. That good.
Leave a Comment