There’s a specific frustration I remember from my early beauty retouching work: I’d drag a graduated filter across an image to darken a blown-out background, and it would eat into my subject’s shoulder or hair like it had a personal grudge. Feathering helped, but only so much. The mask didn’t know the difference between the bright sky and the bright highlights on a cheekbone. It was blunt where the work required precision. I spent more time cleaning up the side effects of my own corrections than I did making them.
That changed when I started working with Lightroom’s range masking features, specifically the luminance and color range options tucked into the bottom of the masking panel. In this Matt Kloskowski tutorial, he walks through exactly how these tools work, pushing them to their limits so you understand not just the mechanics but the logic behind them. Watch the full tutorial on YouTube — and then come back here for a step-by-step breakdown you can follow alongside your own images.
One important note before we start: range masking only exists in the Creative Cloud versions of Lightroom and Camera Raw. If you’re on an older standalone version, you won’t see these options. If you are on Creative Cloud and still don’t see them, go to Help and check for updates.
Step 1: Draw Your Base Mask with a Graduated Filter
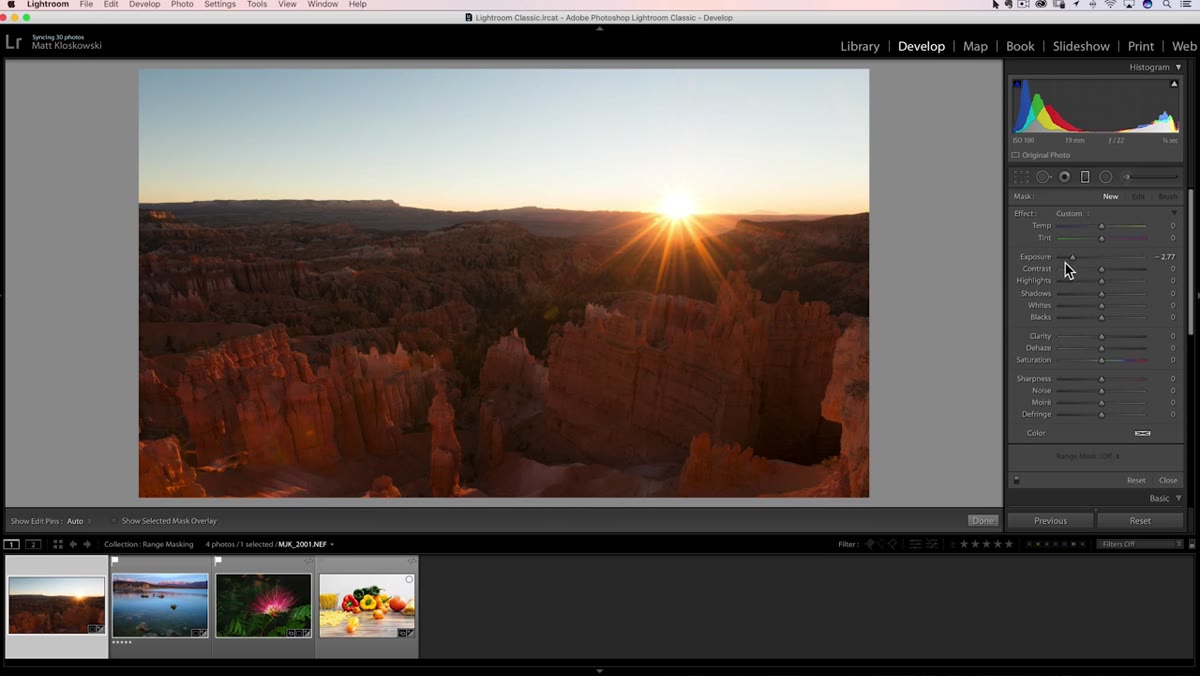 Graduated filter dragged across image, exposure pulled down
Start by selecting the Graduated Filter tool and dragging it across your image. For learning purposes, Matt pulls the exposure way down — something obviously ugly — so the effect is impossible to miss. That’s the right instinct when you’re testing a new tool. Subtle doesn’t teach you anything. Once you understand how the range controls behave at the extremes, dialing back to something realistic is easy.
Graduated filter dragged across image, exposure pulled down
Start by selecting the Graduated Filter tool and dragging it across your image. For learning purposes, Matt pulls the exposure way down — something obviously ugly — so the effect is impossible to miss. That’s the right instinct when you’re testing a new tool. Subtle doesn’t teach you anything. Once you understand how the range controls behave at the extremes, dialing back to something realistic is easy.
The graduated filter is just the delivery vehicle here. Everything we’re actually interested in lives at the bottom of the panel, in the Range Mask section. This same workflow applies if you start with an Adjustment Brush or a Radial Filter instead.
Step 2: Open the Range Mask Panel and Choose Luminance
 Range Mask dropdown at bottom of panel, set to Luminance
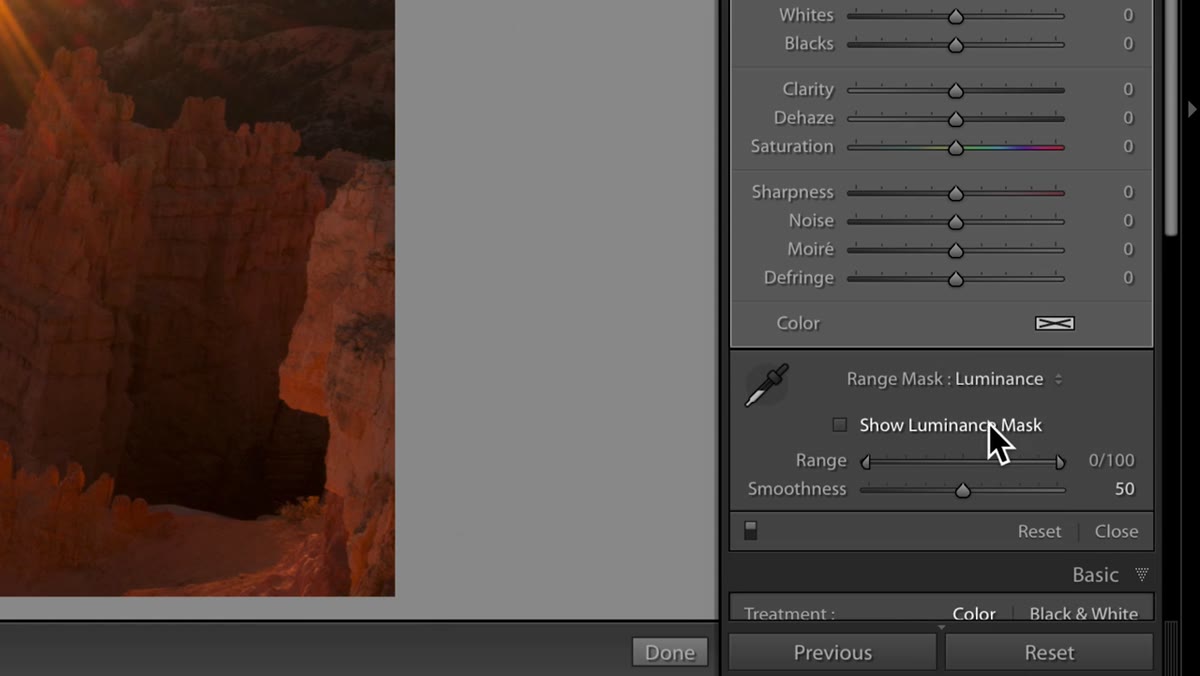
Scroll to the bottom of the Graduated Filter panel after you’ve drawn your mask. You’ll see a dropdown labeled Range Mask with three options: Off, Luminance, and Color. There’s also a Depth option that’s greyed out for most images because it only functions with specific computational photography files from certain smartphones. Don’t worry about it.
Range Mask dropdown at bottom of panel, set to Luminance
Scroll to the bottom of the Graduated Filter panel after you’ve drawn your mask. You’ll see a dropdown labeled Range Mask with three options: Off, Luminance, and Color. There’s also a Depth option that’s greyed out for most images because it only functions with specific computational photography files from certain smartphones. Don’t worry about it.
Select Luminance. This tells Lightroom we want to restrict where the filter applies its effect based on how bright or dark the pixels are, not based on their color. For exposure corrections on portraits, this is usually where we start because brightness is what’s actually conflicting between a subject and a background.
Step 3: Understand What the Range Slider Is Actually Doing
 Range slider spanning full width, gradient covering entire image
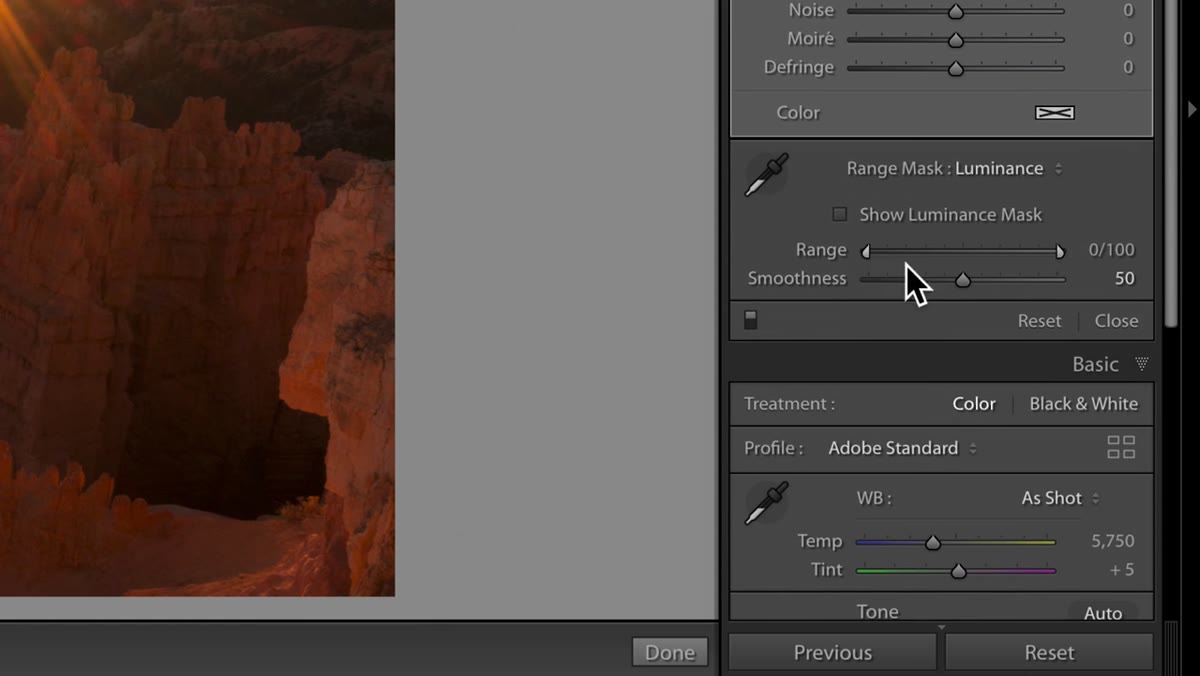
When you first switch to Luminance masking, the Range slider spans the full width of its track. That full-width position means Lightroom is applying your filter adjustment to every tonal value in the image, from pure black on the left to pure white on the right. In other words, range masking is technically on, but it isn’t restricting anything yet. The adjustment behaves exactly like a normal graduated filter at this point.
Range slider spanning full width, gradient covering entire image
When you first switch to Luminance masking, the Range slider spans the full width of its track. That full-width position means Lightroom is applying your filter adjustment to every tonal value in the image, from pure black on the left to pure white on the right. In other words, range masking is technically on, but it isn’t restricting anything yet. The adjustment behaves exactly like a normal graduated filter at this point.
Think of the two handles on that slider as boundaries. Everything inside those boundaries gets the adjustment. Everything outside them gets progressively less of it. This mental model makes the next two steps much easier to follow.
Step 4: Pull the Right Handle In to Protect the Highlights
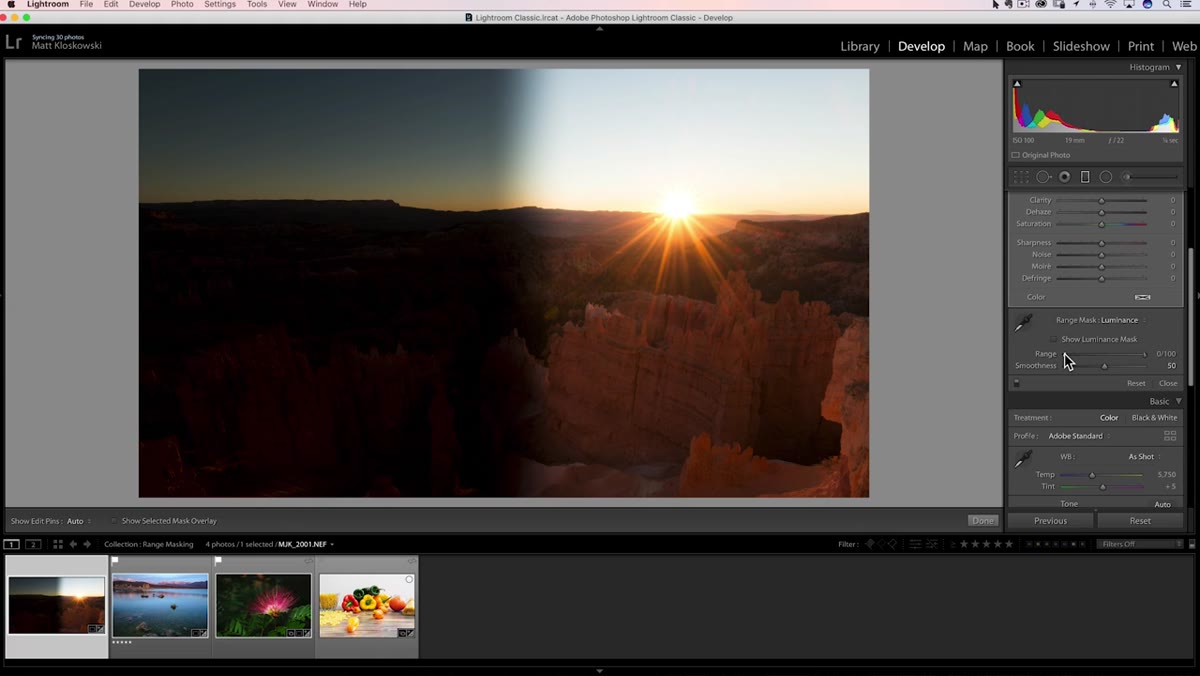 Right Range handle pulled left, gradient fading from bright areas
Grab the right handle and drag it toward the center. Watch what happens to your image: the filter effect starts to retreat from the brightest areas. If you applied a heavy exposure reduction, you’ll see it lift off the sky, the specular highlights, the bright fabric of a dress. Lightroom is now saying, “I’ll only apply this adjustment to tones darker than this threshold.”
Right Range handle pulled left, gradient fading from bright areas
Grab the right handle and drag it toward the center. Watch what happens to your image: the filter effect starts to retreat from the brightest areas. If you applied a heavy exposure reduction, you’ll see it lift off the sky, the specular highlights, the bright fabric of a dress. Lightroom is now saying, “I’ll only apply this adjustment to tones darker than this threshold.”
For portrait retouching, this is where the tool starts earning its place in my workflow. A graduated filter darkening a light background was always bleeding onto bright skin tones and hair. Pulling that right handle in protects those highlights. The adjustment lands where the background actually is, not where the filter gradient happens to cross.
Step 5: Pull the Left Handle In to Protect the Shadows
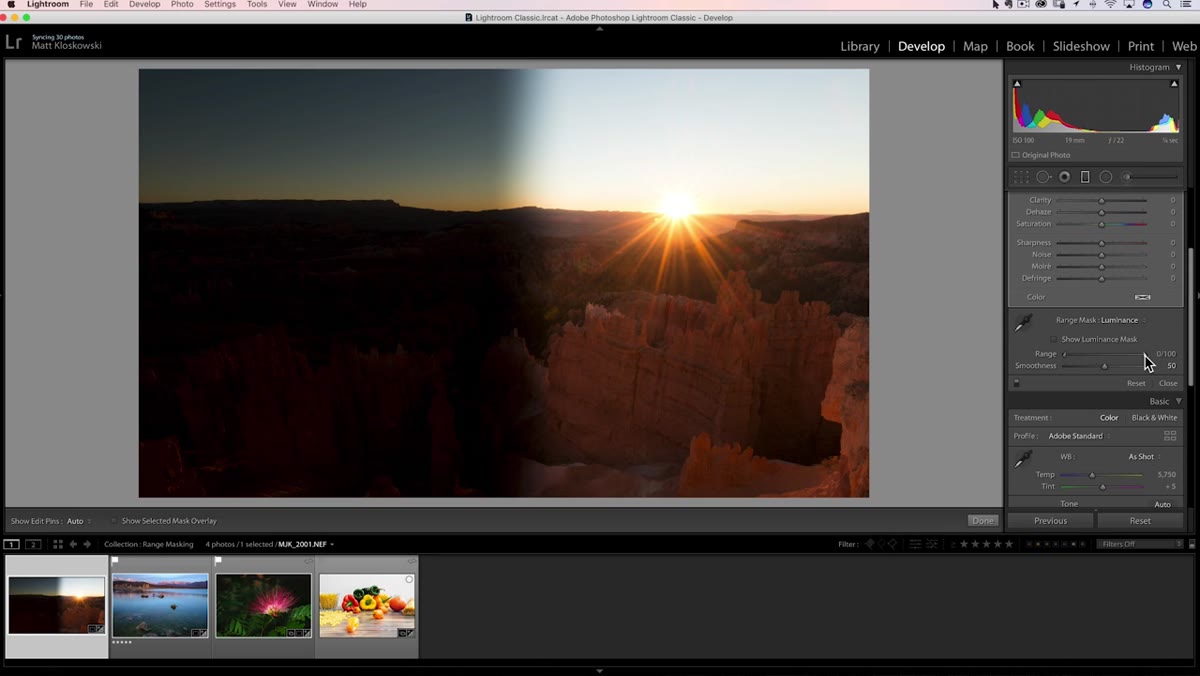 Left Range handle pulled right, gradient retreating from dark areas
Now do the opposite. Push the left handle toward the center and the filter retreats from your darkest tones. This is useful when you want your adjustment to live only in the midtones, or when you’re working on a subject against a dark background and you don’t want your correction to affect deep shadows.
Left Range handle pulled right, gradient retreating from dark areas
Now do the opposite. Push the left handle toward the center and the filter retreats from your darkest tones. This is useful when you want your adjustment to live only in the midtones, or when you’re working on a subject against a dark background and you don’t want your correction to affect deep shadows.
Matt is careful to note that going too far with either handle starts to produce strange results. The transition gets abrupt and you lose the natural falloff that makes a graduated filter look invisible. Think of these controls as a way to shave off the tonal ranges where your mask is causing problems, not as a precision selection tool. That nuance matters.
Step 6: Use the Smoothness Slider to Soften the Transition
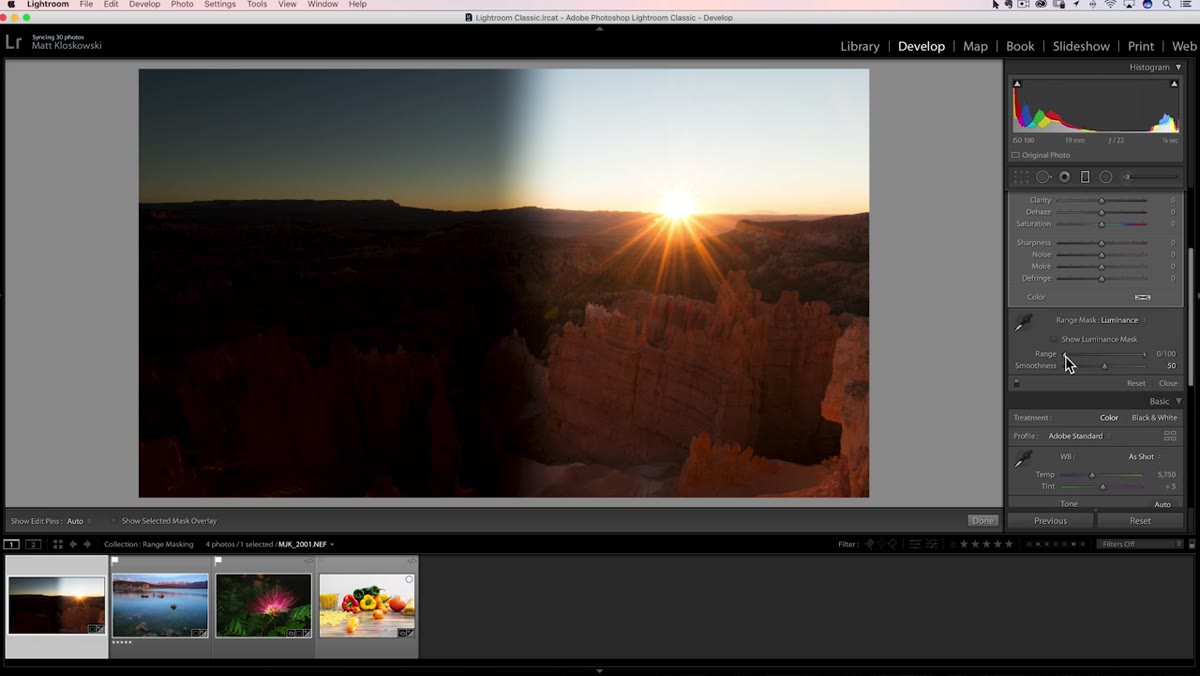 Smoothness slider adjusted, blend between masked and unmasked areas softening
Just below the Range slider is the Smoothness slider. Once you’ve tightened your luminance range, the boundary between the affected and unaffected areas can look like a hard line. Smoothness feathers that edge. Drag it to the right to create a gradual transition between the tones you’ve included in the mask and the ones you’ve excluded.
Smoothness slider adjusted, blend between masked and unmasked areas softening
Just below the Range slider is the Smoothness slider. Once you’ve tightened your luminance range, the boundary between the affected and unaffected areas can look like a hard line. Smoothness feathers that edge. Drag it to the right to create a gradual transition between the tones you’ve included in the mask and the ones you’ve excluded.
For beauty retouching specifically, I almost never leave Smoothness below 50. Skin is full of tonal variation and a hard boundary reads as artificial immediately. A higher Smoothness value lets the correction ease in across gradients naturally, which is exactly what we need when we’re working around someone’s jaw line or temple.
How I Actually Use This on Beauty Work
Kloskowski’s examples use landscapes to make the effect obvious, and that’s smart teaching. But the same logic maps directly to portrait and beauty work. My most common use case is separating a subject from a seamless background when the background has gone uneven. I’ll drop a radial or gradient over the background, pull exposure and color temperature corrections into it, and then use luminance masking to keep those corrections from touching the subject’s skin even where the tones are similar.
Color range masking, which we haven’t fully covered here, is the other half of this. When luminance alone isn’t enough to separate your subject from a background, switching to Color lets you sample specific hues and restrict the mask to those. Together, the two modes solve most of the localized adjustment problems I used to fix manually with a brush.
The most important thing range masking changed for me is this: my graduated filters and radial filters are no longer guesses. They’re informed. I draw the shape, and then I tell Lightroom which tones inside that shape actually deserve the edit. That’s the shift in thinking Kloskowski is after in this tutorial, and once it clicks, you won’t want to work without it.
Watch the full tutorial on YouTube to see both luminance and color range masking demonstrated on multiple images with the overlay view turned on.
Comments
Leave a Comment