There’s a particular kind of editing frustration I know well: you’re looking at an image and you need to isolate something specific, something Lightroom’s AI has no preset button for. Not the sky. Not the subject. Something in between, like a textured roof, a mountain range, a fabric pattern in the background. For years, my reflex was to sigh, open Photoshop, and start drawing paths. That workflow costs time, and time is the thing I never have enough of between client deliveries and workshop prep. So when I came across Watch the full tutorial on YouTube from Scott Kelby, I stopped what I was doing and watched it twice.
In this Scott Kelby tutorial, he demonstrates a Lightroom masking approach using Color Range that most people scroll right past in the masking panel. It works in Photoshop’s Camera Raw too, which matters for those of us who live in both applications depending on the job. The technique is specifically useful when you want to do more than change a color, when you want to brighten, darken, add texture, or locally adjust something that shares a hue across the frame. For portrait and beauty work, this translates directly: think adjusting the warmth of a specific fabric, pulling down a distracting background element, or refining a tonal area that sits just outside what Subject Select will grab cleanly.
What I appreciate most about Kelby’s approach is that he’s not teaching a workaround. He’s teaching the actual right tool for the job. Here’s how to follow along.
Step 1: Open the Masking Panel
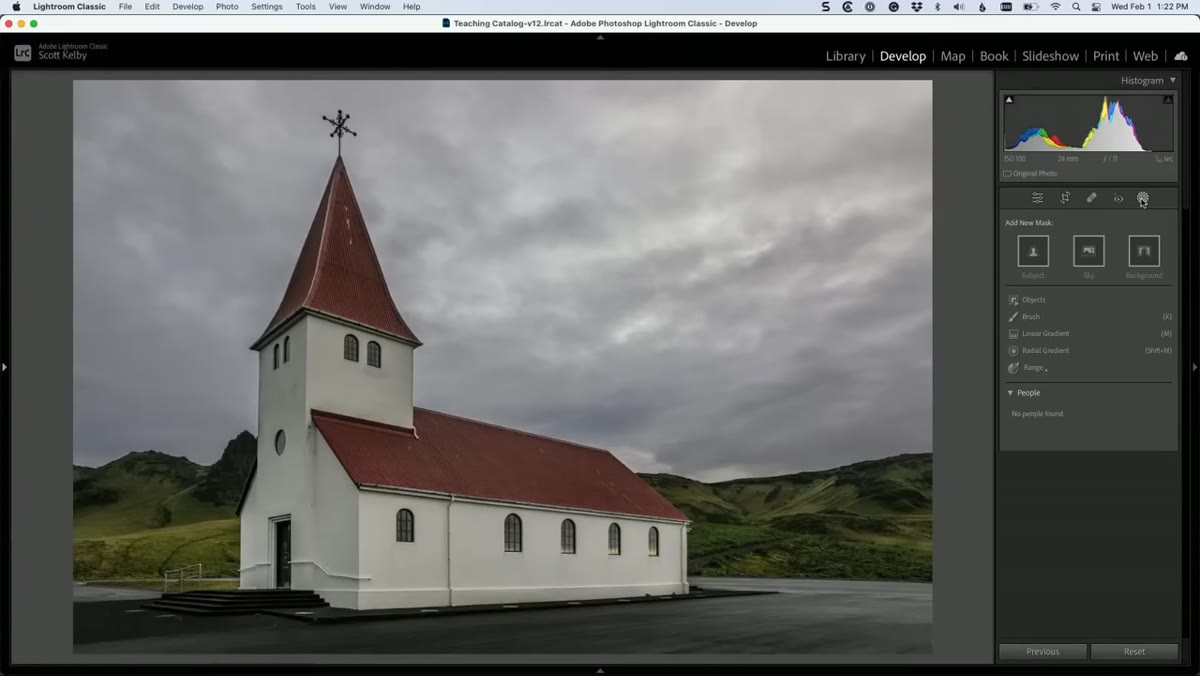 Clicking the masking icon in the Lightroom toolbar
Start in Lightroom’s Develop module with your image open. At the top of the right panel, look for the masking icon, it looks like a dotted circle. Click it to open the Add New Mask panel. You’ll see a full list of options: Subject, Sky, Background, and further down, a category called Range. That’s where we’re headed.
Clicking the masking icon in the Lightroom toolbar
Start in Lightroom’s Develop module with your image open. At the top of the right panel, look for the masking icon, it looks like a dotted circle. Click it to open the Add New Mask panel. You’ll see a full list of options: Subject, Sky, Background, and further down, a category called Range. That’s where we’re headed.
Step 2: Select Color Range from the Mask Options
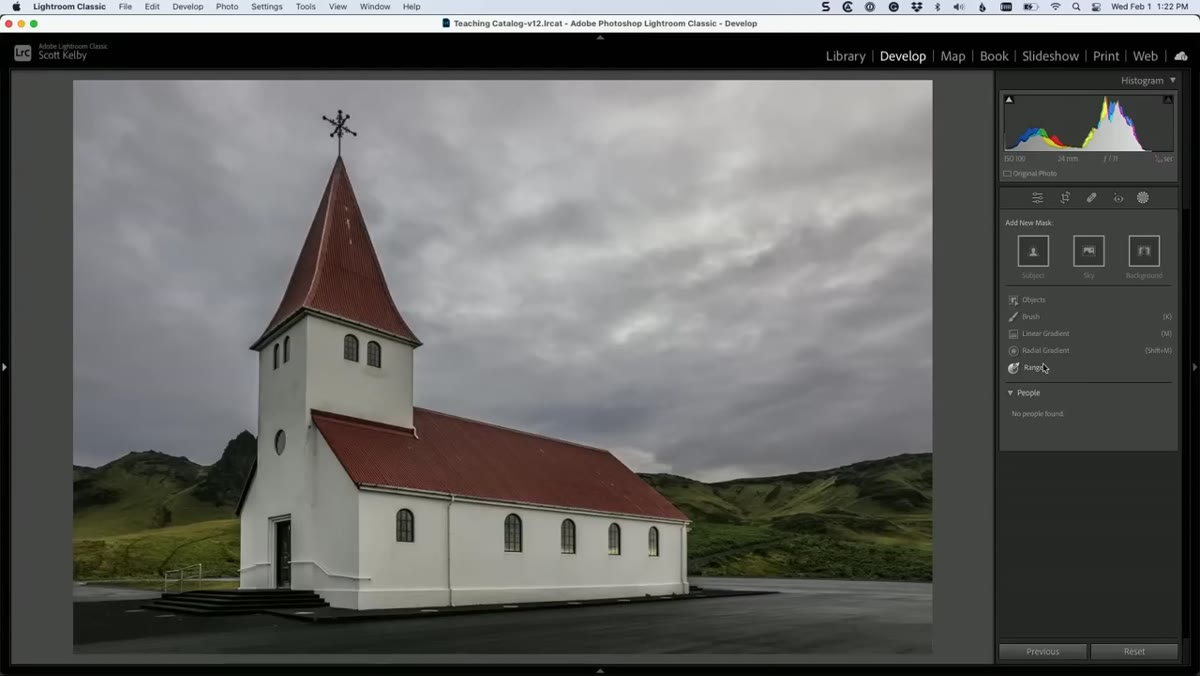 Add New Mask panel open showing Range and Color Range options
Inside the masking panel, scroll down to the Range section and click Color Range. This tells Lightroom you want to build a mask based on a specific color or range of colors present in the image, rather than relying on AI subject detection. It’s a manual, targeted approach, and that’s exactly what makes it powerful for unusual selections that the automated tools won’t recognize.
Add New Mask panel open showing Range and Color Range options
Inside the masking panel, scroll down to the Range section and click Color Range. This tells Lightroom you want to build a mask based on a specific color or range of colors present in the image, rather than relying on AI subject detection. It’s a manual, targeted approach, and that’s exactly what makes it powerful for unusual selections that the automated tools won’t recognize.
Step 3: Click and Drag on the Area You Want to Mask
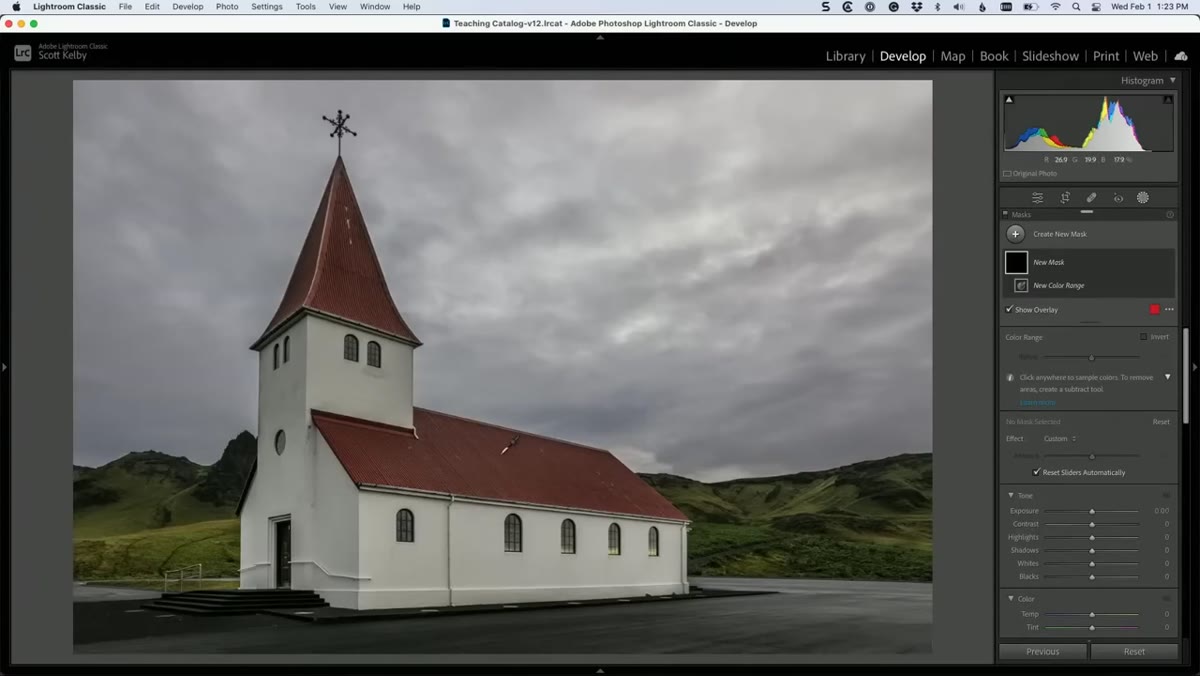 Clicking and dragging a small selection rectangle on the chapel roof
Here’s the detail that makes the difference. Rather than a single click on your target area, click and drag to draw a small rectangular selection over it. Kelby specifically recommends this because most surfaces, especially architectural elements, skin tones, or textured backgrounds, contain slight variations in tone. A single click samples only one color value. Dragging samples a range, which gives Lightroom more information to work with and produces a more complete, natural-looking mask on the first pass.
Clicking and dragging a small selection rectangle on the chapel roof
Here’s the detail that makes the difference. Rather than a single click on your target area, click and drag to draw a small rectangular selection over it. Kelby specifically recommends this because most surfaces, especially architectural elements, skin tones, or textured backgrounds, contain slight variations in tone. A single click samples only one color value. Dragging samples a range, which gives Lightroom more information to work with and produces a more complete, natural-looking mask on the first pass.
Aim to drag across an area that represents the full tonal spread of your subject. If the region has a lighter side and a darker side, try to capture both within your drag. You’ll see the mask overlay appear in real time as you drag.
Step 4: Evaluate the Initial Mask
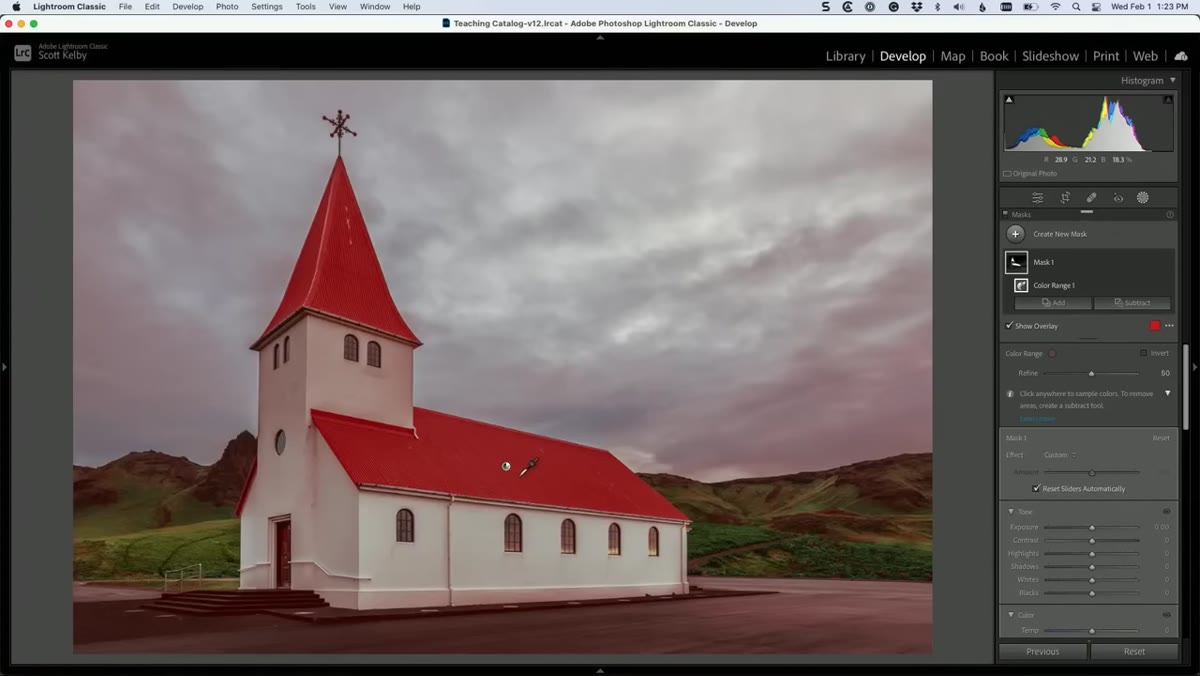 Mask overlay showing roof selected plus unwanted sky and parking lot areas
Once you release, Lightroom generates the mask and you can see the overlay showing what’s been selected. In Kelby’s example, the Color Range tool does a strong job picking up the chapel roof on both sides, but it also catches some of the parking lot and a patch of sky, because those areas share similar color values. This is normal behavior, not a flaw. The point is that the majority of your target is already cleanly selected in a single step. What’s left is refinement.
Mask overlay showing roof selected plus unwanted sky and parking lot areas
Once you release, Lightroom generates the mask and you can see the overlay showing what’s been selected. In Kelby’s example, the Color Range tool does a strong job picking up the chapel roof on both sides, but it also catches some of the parking lot and a patch of sky, because those areas share similar color values. This is normal behavior, not a flaw. The point is that the majority of your target is already cleanly selected in a single step. What’s left is refinement.
Step 5: Use the Refine Slider to Clean the Mask
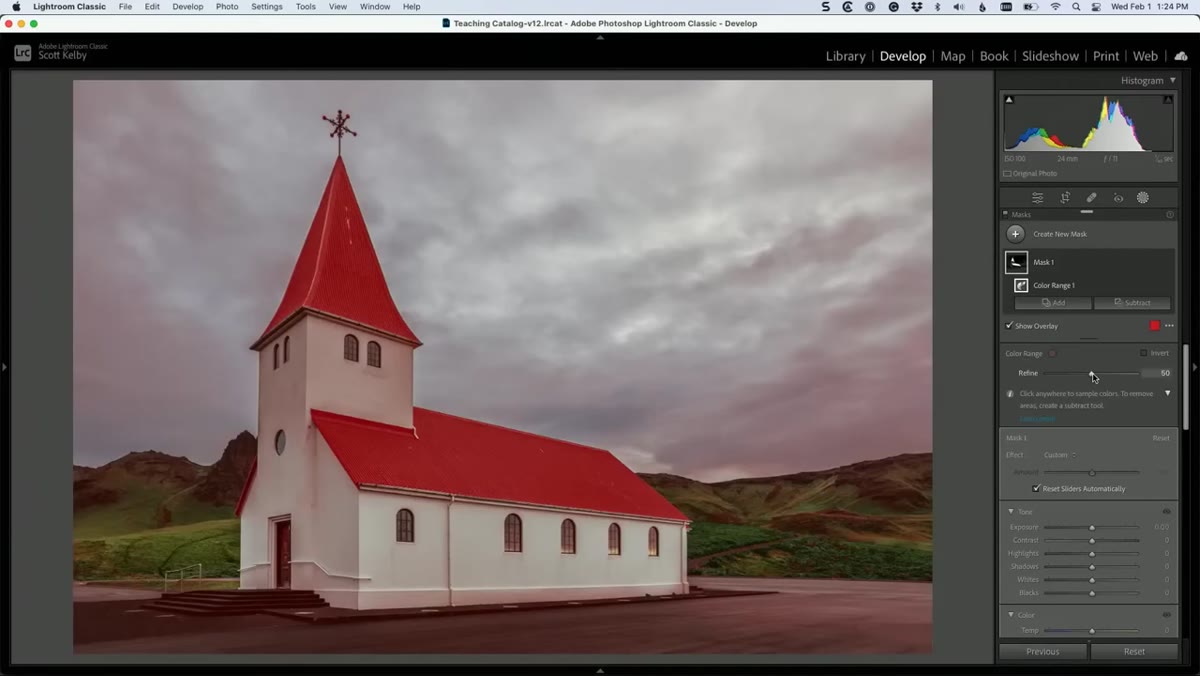 Color Range panel with Refine slider visible
After creating the Color Range mask, a small panel appears on the right side labeled Color Range. Inside it, you’ll find a Refine slider. This is the cleanup tool. Dragging the slider to the left narrows the color range the mask responds to, which removes those stray selected areas in the sky or parking lot that share a similar hue but aren’t part of your actual subject. Dragging right expands the range if you find the mask is missing areas.
Color Range panel with Refine slider visible
After creating the Color Range mask, a small panel appears on the right side labeled Color Range. Inside it, you’ll find a Refine slider. This is the cleanup tool. Dragging the slider to the left narrows the color range the mask responds to, which removes those stray selected areas in the sky or parking lot that share a similar hue but aren’t part of your actual subject. Dragging right expands the range if you find the mask is missing areas.
Work the slider slowly. Small adjustments make a visible difference. Your goal is to find the point where the roof (or whatever you’re targeting) remains fully covered, and the unwanted areas drop out of the selection. In most cases, a modest leftward nudge is all it takes.
Step 6: Apply Your Adjustments
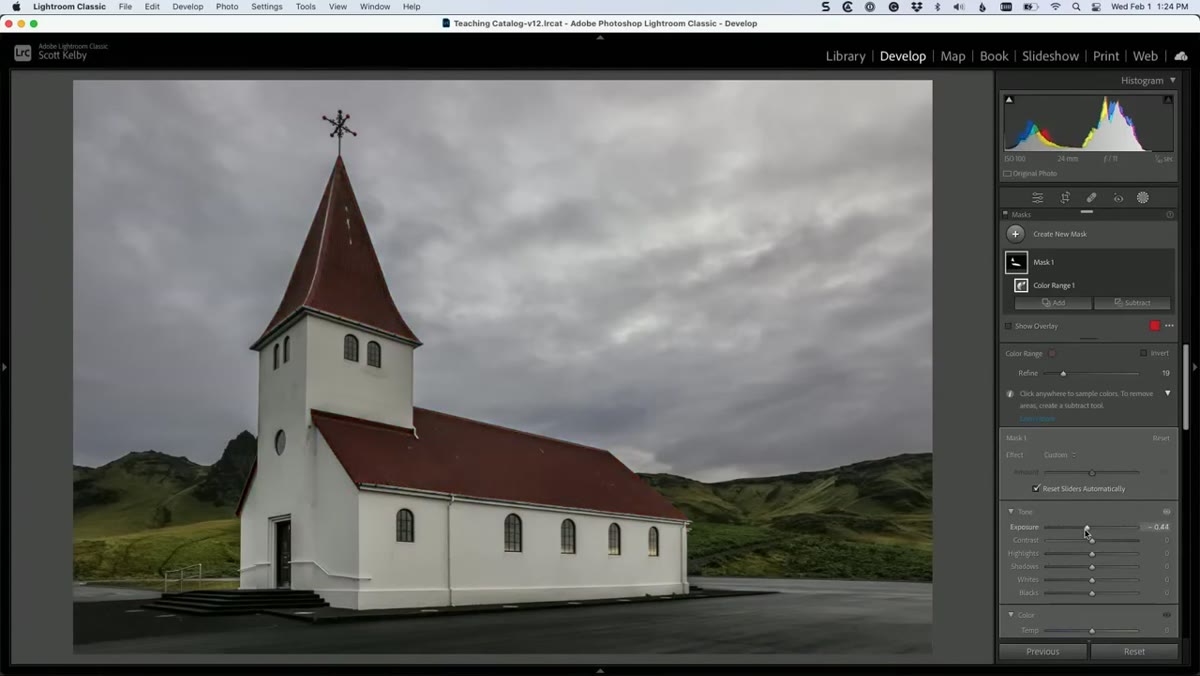 Lightroom adjustment panel with mask active over isolated roof area
With your mask refined, you’re now working locally on just that isolated element. Open the adjustment controls, Exposure, Contrast, Texture, Clarity, whatever the image needs, and make your edits. Because the mask is color-based, the adjustments conform to the actual shape of your subject rather than a rough geometric selection. You can brighten, add texture, or shift tone with precision. Kelby points out you can also change hue here if you need to, though his primary example focuses on luminosity and texture adjustments, which are often more useful in real editing scenarios.
Lightroom adjustment panel with mask active over isolated roof area
With your mask refined, you’re now working locally on just that isolated element. Open the adjustment controls, Exposure, Contrast, Texture, Clarity, whatever the image needs, and make your edits. Because the mask is color-based, the adjustments conform to the actual shape of your subject rather than a rough geometric selection. You can brighten, add texture, or shift tone with precision. Kelby points out you can also change hue here if you need to, though his primary example focuses on luminosity and texture adjustments, which are often more useful in real editing scenarios.
How I Use This in Beauty and Portrait Work
The chapel roof Kelby uses in his example is a helpful stand-in for problems I run into on every other beauty shoot. The most direct application for me is isolating background fabric or surfaces when a client wants a warmer or cooler environmental tone without re-shooting. Color Range lets me mask a painted backdrop, a garment, or even a band of shadow that falls across the frame, things that Subject Select will either ignore or partially grab in ways that require extra cleanup.
I’ve also used it to refine hair masking in situations where the hair color is close to the background. It doesn’t replace frequency separation or dedicated hair retouching, but as a first-pass selection tool for luminosity work, it saves real time. One thing to watch: if your subject contains a very wide range of values within the same hue, you may need to build two separate Color Range masks and subtract them, rather than relying on a single refined mask. It adds a step, but it keeps the edges clean.
The single most useful thing Kelby demonstrates here is the drag-to-sample behavior rather than a single click. That one habit change, selecting a tonal range instead of a single value, is what separates a mask that works from one you spend twenty minutes repainting. If you’ve been defaulting to Photoshop every time Lightroom’s automated options don’t cover your subject, this is worth testing before you jump applications.
Watch the full tutorial on YouTube to see Kelby walk through the mask building and refinement in real time. It’s a short watch and the visual of the overlay forming as he drags makes the technique click immediately.
Comments (2)
This is going in my reference folder. Incredibly useful.
Tried this technique this morning. Game changer for real.
Leave a Comment