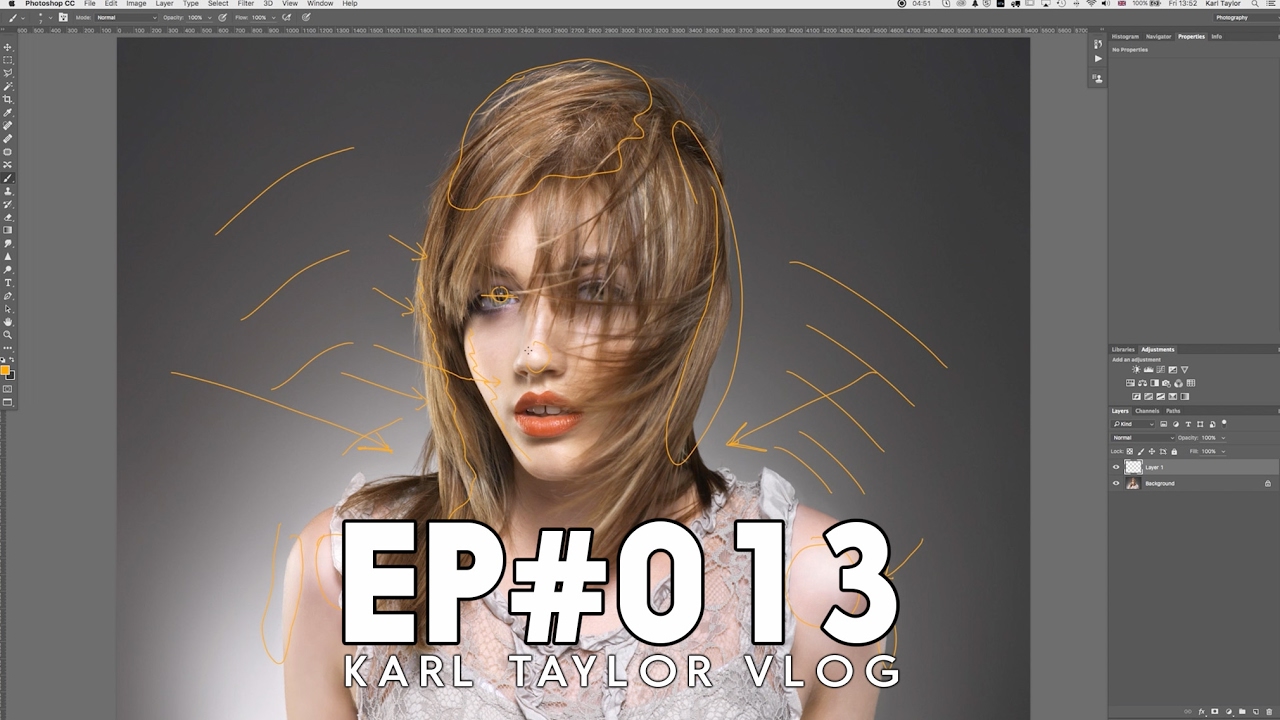
There’s a specific kind of frustration that comes from receiving a beauty image to retouch when you have no idea how it was lit. You can see something is off in the skin tones, or the shadows feel muddy, but you can’t diagnose it because you weren’t in the room. Understanding lighting setups, even as a retoucher, changes how you read an image entirely. It tells you which shadows are intentional, which highlights belong there, and where the photographer was going emotionally with the shot. That knowledge saves you from smoothing away exactly the things that make a portrait beautiful.
In this Visual Education tutorial, photographer Karl Taylor walks through one of his own beauty shots and reverse-engineers the entire lighting setup from clues visible in the final image, including the catchlights in the model’s eyes, the graduation of light across her hair, and the glow behind her on the background. Watch the full tutorial on YouTube before or after reading this breakdown. The image he’s analyzing is genuinely stunning, and seeing it annotated in real time is worth your time even if you never step foot in a studio.
What struck me most is how much information a single, well-lit frame contains for anyone who knows how to look. Let’s go through it step by step.
Step 1: Start With the Eyes to Identify the Key Light
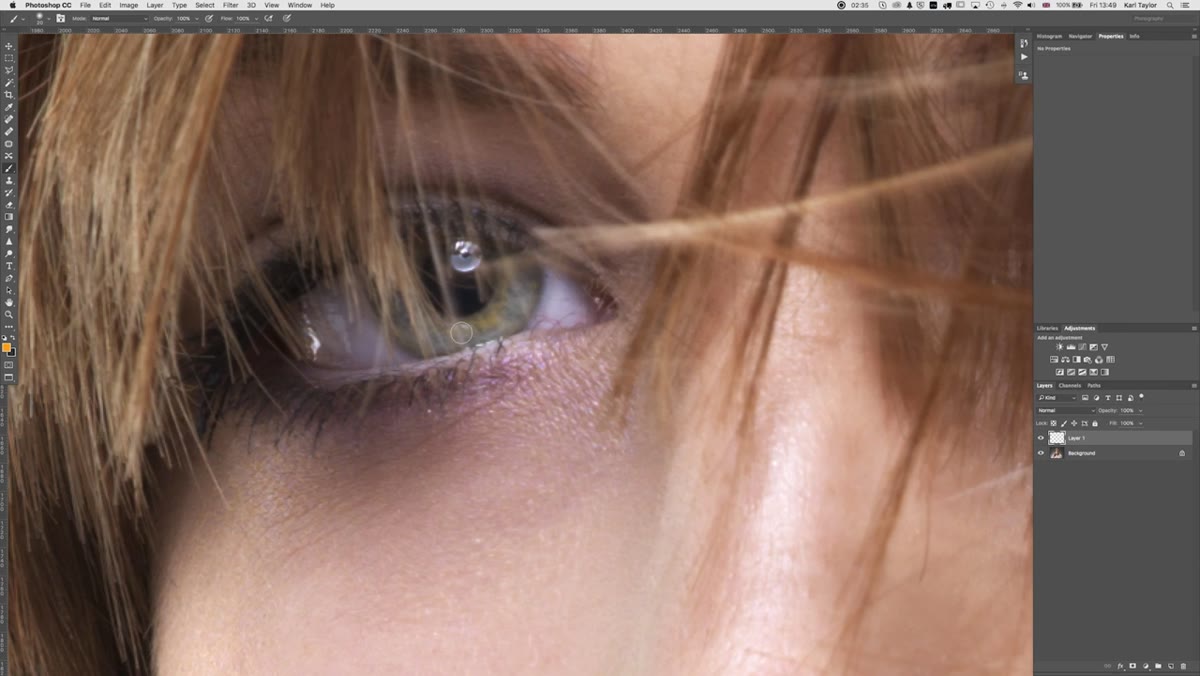 Zoomed-in view of model’s eye showing catchlight detail
Before you reach for any tool or piece of gear, zoom into the subject’s eyes. The catchlight is a tiny photograph of the entire lighting setup, and it tells you almost everything. In this image, Taylor identifies a beauty dish as the key light because of two specific visual clues: a dark central spot and a bright ring of light surrounding it. That’s the signature of a beauty dish, as opposed to a softbox (which shows an even rectangular or square glow) or a bare strobe (a small, hard point of light).
Zoomed-in view of model’s eye showing catchlight detail
Before you reach for any tool or piece of gear, zoom into the subject’s eyes. The catchlight is a tiny photograph of the entire lighting setup, and it tells you almost everything. In this image, Taylor identifies a beauty dish as the key light because of two specific visual clues: a dark central spot and a bright ring of light surrounding it. That’s the signature of a beauty dish, as opposed to a softbox (which shows an even rectangular or square glow) or a bare strobe (a small, hard point of light).
Pay attention not just to what the catchlight looks like, but where it sits in the iris. In this shot, the reflection falls low, which tells Taylor that the beauty dish was positioned much lower than his usual setup, almost at face level rather than elevated at 45 degrees. That one detail shifts the entire mood of the light from classic high-fashion contrast to something softer and more frontal.
Step 2: Look for Edge Illumination to Spot Secondary Lights
 Annotation highlighting rim light along the model’s cheek and face edge
Once you’ve identified the key light, scan the edges of the face. In Taylor’s image, there’s a clear gradient of brighter light running along one side of the face that cannot be explained by the frontal beauty dish alone. He toggles his annotation layer on and off to make this visible, and the difference is immediately obvious. That edge glow indicates at least one additional light source placed to the side.
Annotation highlighting rim light along the model’s cheek and face edge
Once you’ve identified the key light, scan the edges of the face. In Taylor’s image, there’s a clear gradient of brighter light running along one side of the face that cannot be explained by the frontal beauty dish alone. He toggles his annotation layer on and off to make this visible, and the difference is immediately obvious. That edge glow indicates at least one additional light source placed to the side.
This kind of rim or accent light is common in beauty work because it separates the face from the background and adds depth without creating harsh contrast on the front of the skin. When I’m retouching images with this kind of setup, I know not to neutralize that gradient along the cheek. It belongs there. Dodging and burning should follow it, not fight it.
Step 3: Map the Hair Lighting Separately
 Annotation showing brighter lit areas along the edges of the model’s hair
Hair and skin behave completely differently under light, and Taylor treats them separately in his analysis. Looking at the edges of the model’s hair, he points out two distinct zones of increased brightness: one along the side closest to the accent light, and another on the opposite side. Both are intentional. The first is the natural spill from the side accent light. The second suggests a second rim light placed on the other side specifically to lift the hair and prevent it from falling into shadow.
Annotation showing brighter lit areas along the edges of the model’s hair
Hair and skin behave completely differently under light, and Taylor treats them separately in his analysis. Looking at the edges of the model’s hair, he points out two distinct zones of increased brightness: one along the side closest to the accent light, and another on the opposite side. Both are intentional. The first is the natural spill from the side accent light. The second suggests a second rim light placed on the other side specifically to lift the hair and prevent it from falling into shadow.
This is a detail that retouchers miss all the time, myself included early in my career. When both sides of the hair have a slight lift, it usually means the photographer set up symmetrical rim lights. If you over-darken one side of the hair during a luminosity mask edit or a curves adjustment, you can accidentally destroy that balance. Read the image before you touch it.
Step 4: Identify the Background Light and What It’s Doing
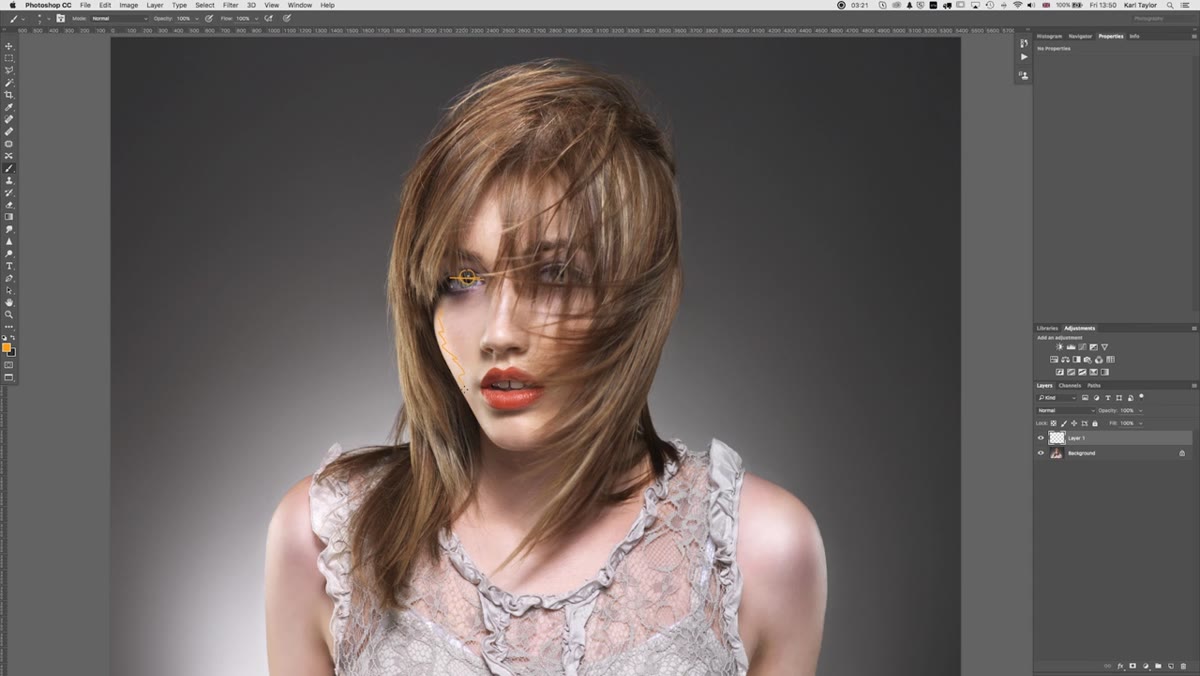
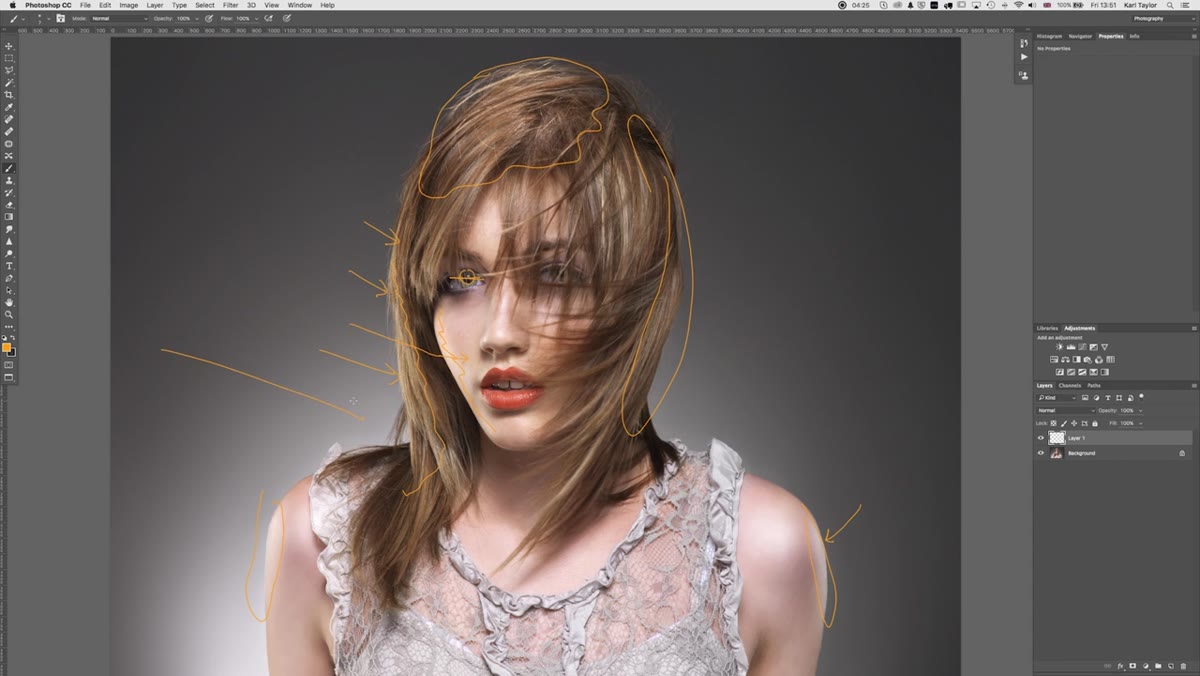 Wide view showing the glowing background halo behind the model
Taylor uses what he describes as his signature background treatment: a central glow that radiates outward from directly behind the model and then falls off into a darker vignette at the edges. This is a deliberate compositional choice, not an accident of exposure. The light is placed behind the subject to create a halo effect that visually anchors the model to the center of the frame and gives the image a sense of depth.
Wide view showing the glowing background halo behind the model
Taylor uses what he describes as his signature background treatment: a central glow that radiates outward from directly behind the model and then falls off into a darker vignette at the edges. This is a deliberate compositional choice, not an accident of exposure. The light is placed behind the subject to create a halo effect that visually anchors the model to the center of the frame and gives the image a sense of depth.
For retouchers, this matters because background glow like this should never be flattened. If you apply an aggressive vignette in post without accounting for the existing light falloff, you can create a double-darkening effect at the corners that looks unnatural. When I see this kind of background in an image, I note where the gradient starts and ends before I do anything to the overall tone.
Step 5: Connect the Shoulder Highlights Back to a Known Light Source
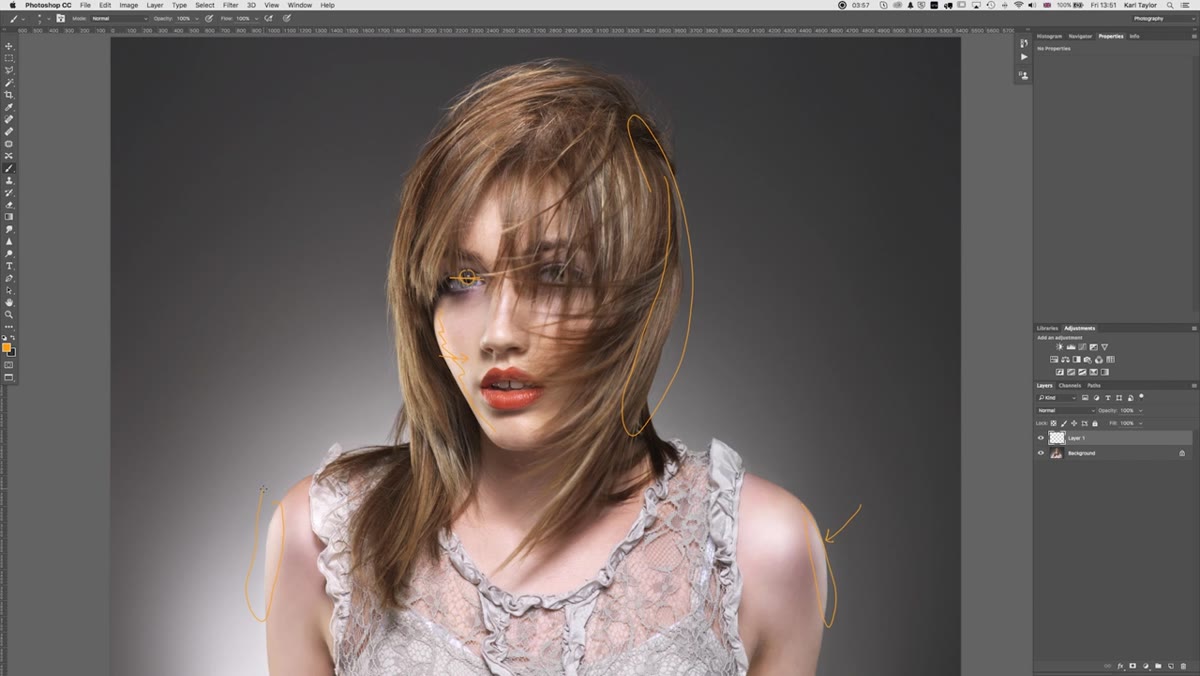
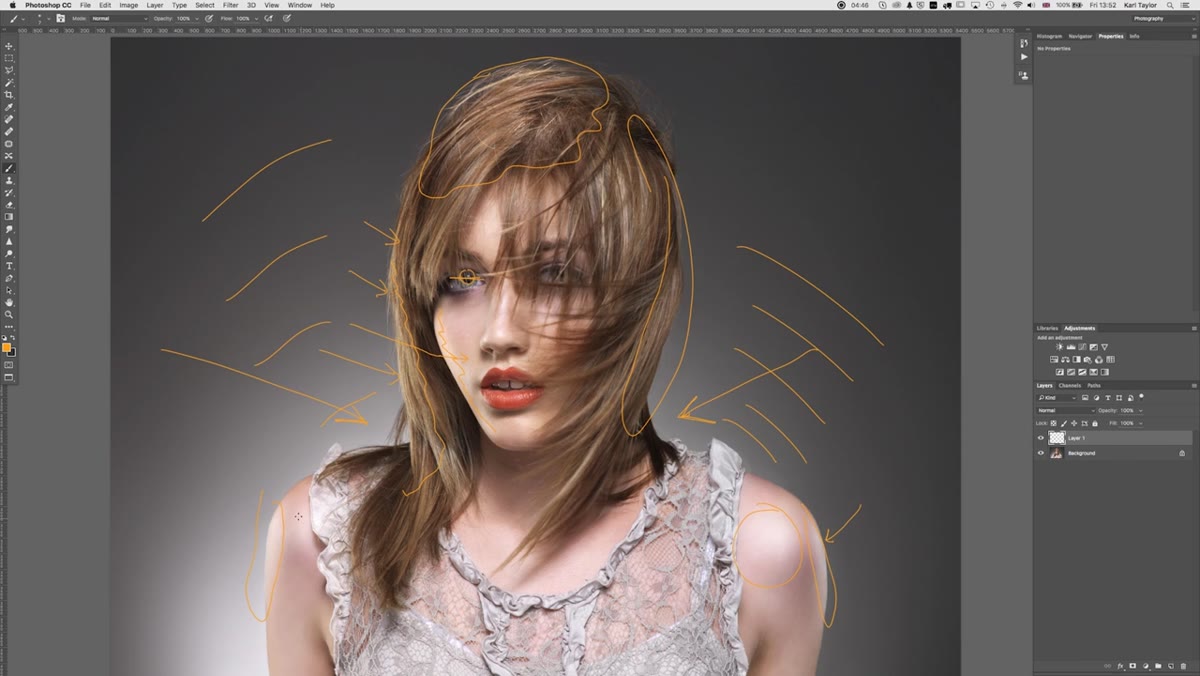 Annotation pointing to highlight on model’s shoulder and dress
The final element Taylor flags is the highlight sitting on the model’s shoulder and dress. Rather than assuming it came from a separate light, he traces it back to the beauty dish positioned low in front of her. Because the dish was angled lower than usual and the model’s dress has a slightly reflective surface, the same key light that illuminated her face also caught the shoulder at a favorable angle.
Annotation pointing to highlight on model’s shoulder and dress
The final element Taylor flags is the highlight sitting on the model’s shoulder and dress. Rather than assuming it came from a separate light, he traces it back to the beauty dish positioned low in front of her. Because the dish was angled lower than usual and the model’s dress has a slightly reflective surface, the same key light that illuminated her face also caught the shoulder at a favorable angle.
This is a good reminder that not every highlight in a beauty image needs its own light source. When retouching, if a shoulder or collarbone has a bright highlight that feels consistent with the key light’s angle, leave it. It’s structural. Reducing it in an attempt to even out the skin tones can make the image feel flat and directionless.
What I Apply Differently in My Own Retouching Workflow
Taylor’s walkthrough is focused on production, but the analytical method he uses translates directly into post-processing decisions. I now do a version of his eye-zoom technique on every beauty image I receive before I open a single adjustment layer. I zoom to 100 percent on the catchlight, identify the key light shape and position, then sketch out (sometimes literally, on paper) where the secondary lights probably were.
It took me an embarrassing amount of time in my early retouching years to understand that the errors I was making, flat skin, weird color casts on the face edges, over-smoothed hair, were actually lighting misreadings. I was retouching toward an imaginary neutral image instead of understanding and honoring the light the photographer put in the room. This kind of structural analysis is what separates retouching that looks expensive from retouching that looks processed.
The single most valuable thing Karl Taylor demonstrates here is that every element of a well-executed beauty image is a decision, and those decisions are readable if you know the visual language. Catchlights, edge gradients, background glow, shoulder highlights, each one is a fingerprint of a specific light in a specific position. Learn to read them and your retouching will start working with the image instead of against it.
Watch the full tutorial on YouTube to see Taylor annotate the image in real time. Watching him toggle the analysis layer on and off while pointing to each light effect is the kind of thing that clicks faster visually than any written description can fully capture.
Comments
Leave a Comment