
Every once in a while a technique lands in your lap that solves a problem you didn’t even know you’d been working around. For me, levitation compositing was one of those. I’d seen floating-subject shots all over editorial mood boards and assumed they required either a very brave model or very expensive rigging. Turns out, the magic happens almost entirely in post - and the approach is more methodical than mysterious. In this Jessica Kobeissi tutorial (Part 2 of her levitation series), she walks through exactly how to remove the prop that’s holding your subject up and replace it with a clean background, frame by frame, using masking instead of cloning.
Watch the full tutorial on YouTube
What I appreciate about this workflow is how honest it is about what you actually need before you even open Photoshop. The whole thing depends on shooting two specific frames on location: one with your subject on the prop, one without anyone in the frame at all. If you skip the second shot, you’re stuck cloning, and cloning a complex background is a miserable way to spend an afternoon. Once you have both files, the retouching process is surprisingly clean.
Step 1: Apply Your Color Grade Before You Composite
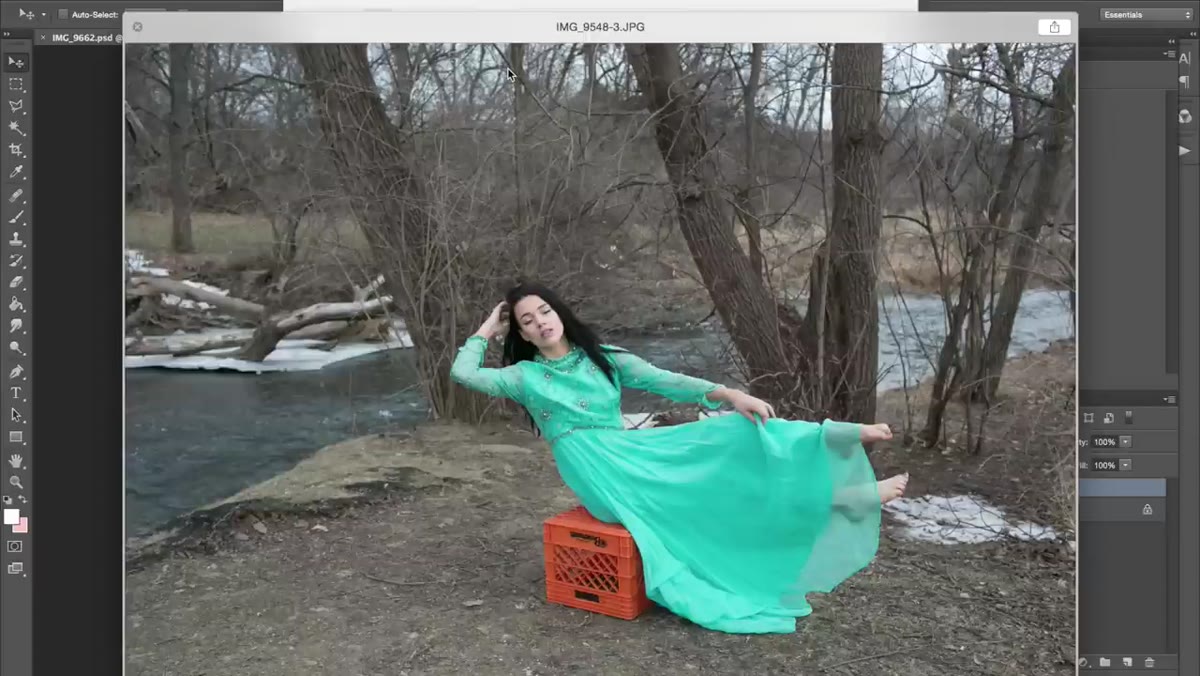 Color-graded subject photo open in Lightroom with Willow preset applied
Before you bring anything into Photoshop, do your color grading first. Jessica applies a Lightroom preset to her subject image to lock in the overall tone before compositing begins. The reason this order matters: if you grade after compositing, you’re trying to match two separate images that may have been shot in slightly different light. Grading the base image first gives you a target to match everything else against. Use whatever preset or manual adjustment gets you to your desired look, then export both your subject image and your clean background plate at the same settings.
Color-graded subject photo open in Lightroom with Willow preset applied
Before you bring anything into Photoshop, do your color grading first. Jessica applies a Lightroom preset to her subject image to lock in the overall tone before compositing begins. The reason this order matters: if you grade after compositing, you’re trying to match two separate images that may have been shot in slightly different light. Grading the base image first gives you a target to match everything else against. Use whatever preset or manual adjustment gets you to your desired look, then export both your subject image and your clean background plate at the same settings.
Step 2: Open Both Images and Copy the Background Plate
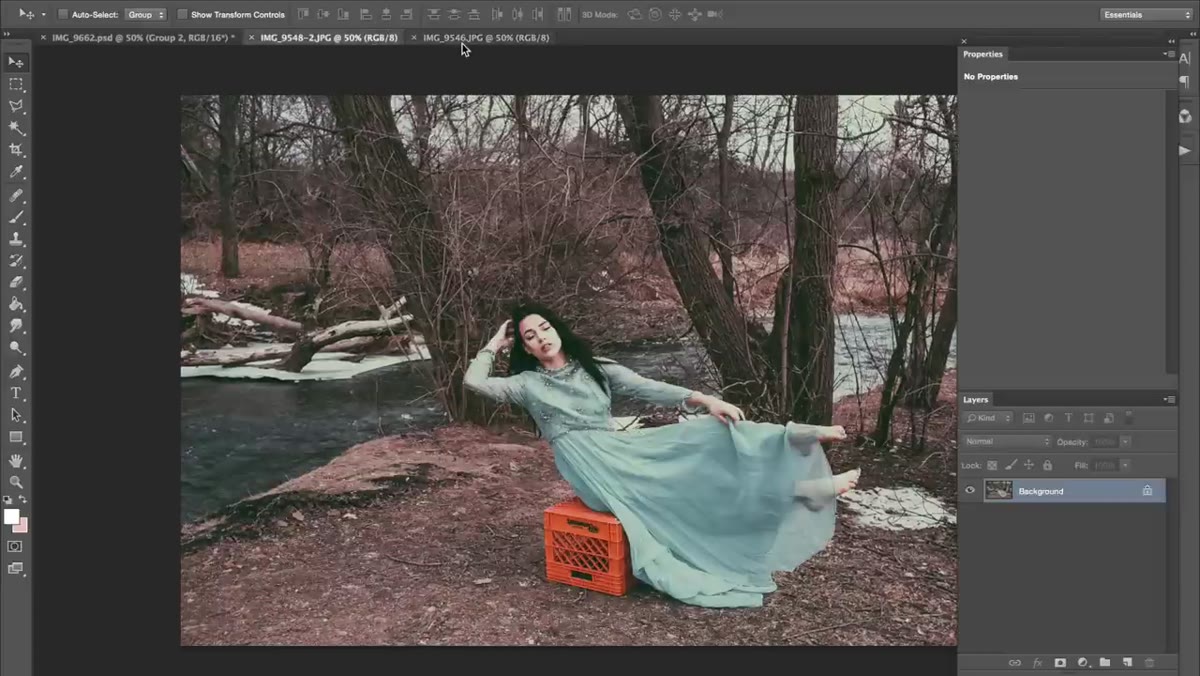 Two images open side by side in Photoshop before compositing
Open both files in Photoshop - your color-graded subject photo and your clean background plate. From the background plate, go to Edit, then Copy. Switch over to your subject document and paste. The background plate will land as a new layer sitting directly on top of your subject. This is the layer you’ll be masking to selectively reveal only the areas where the prop needs to disappear. Don’t merge or flatten anything yet. Keep every layer separate and named.
Two images open side by side in Photoshop before compositing
Open both files in Photoshop - your color-graded subject photo and your clean background plate. From the background plate, go to Edit, then Copy. Switch over to your subject document and paste. The background plate will land as a new layer sitting directly on top of your subject. This is the layer you’ll be masking to selectively reveal only the areas where the prop needs to disappear. Don’t merge or flatten anything yet. Keep every layer separate and named.
Step 3: Align the Background Plate Using Reduced Opacity
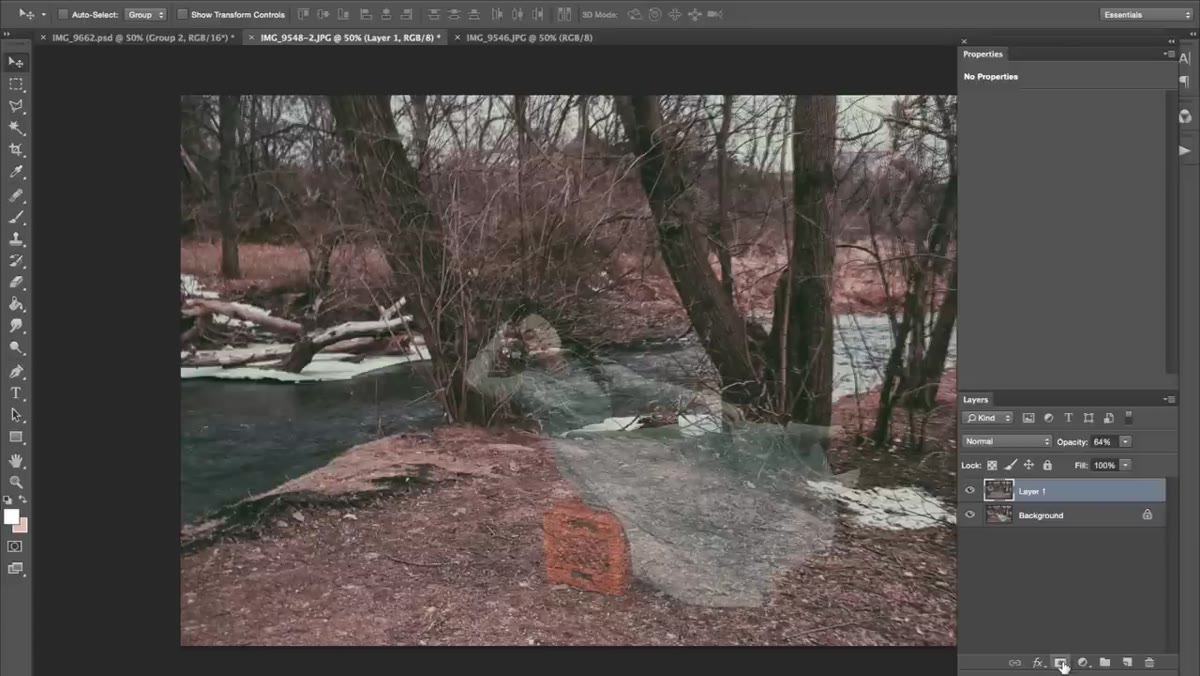
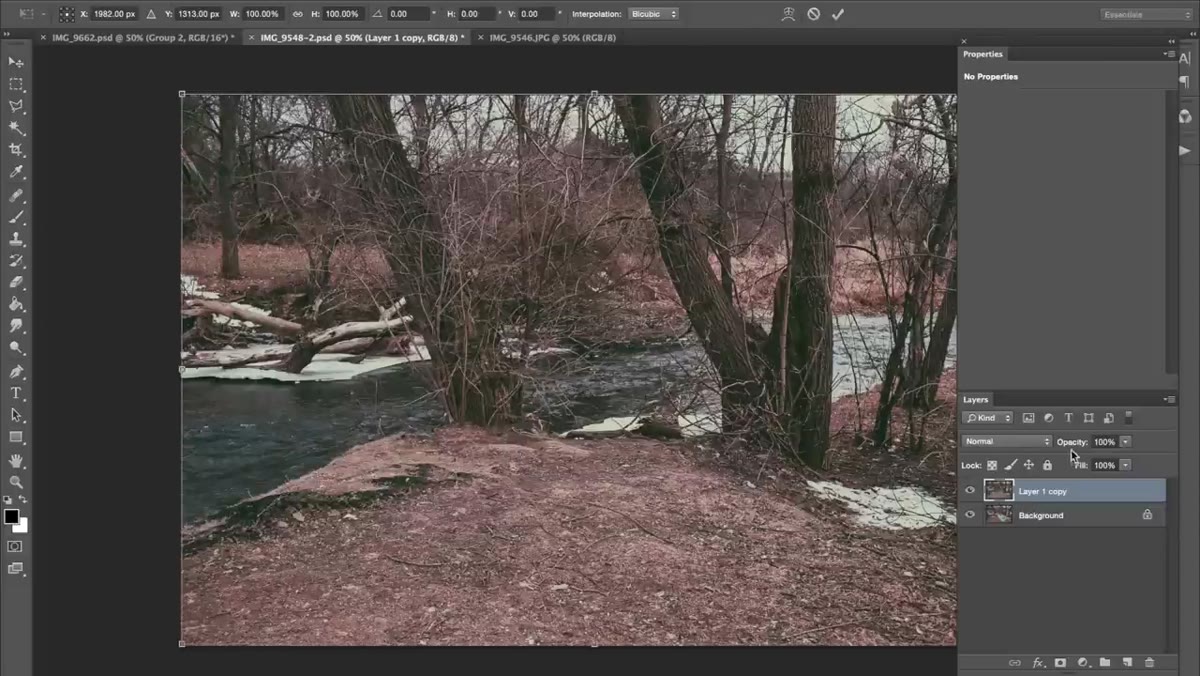 Background layer at reduced opacity overlaid on subject photo for alignment
Here’s where precision pays off. Select your background plate layer, hit Command-T to enter Free Transform, and immediately drop the layer opacity down to somewhere around 50 percent. This lets you see both images at once, which makes alignment visible. Slowly drag the layer until the environmental details - ground texture, shadows, any fixed objects - line up with the corresponding areas in your subject image. Jessica focuses especially on the lower portion of the frame, because that’s where the prop sits and where any misalignment will be most obvious. Use a specific shadow edge or a repeating pattern in the ground as your registration guide. Once you’re satisfied, confirm the transform and bring the opacity back to 100 percent. Toggle the layer on and off a few times to verify the alignment holds.
Background layer at reduced opacity overlaid on subject photo for alignment
Here’s where precision pays off. Select your background plate layer, hit Command-T to enter Free Transform, and immediately drop the layer opacity down to somewhere around 50 percent. This lets you see both images at once, which makes alignment visible. Slowly drag the layer until the environmental details - ground texture, shadows, any fixed objects - line up with the corresponding areas in your subject image. Jessica focuses especially on the lower portion of the frame, because that’s where the prop sits and where any misalignment will be most obvious. Use a specific shadow edge or a repeating pattern in the ground as your registration guide. Once you’re satisfied, confirm the transform and bring the opacity back to 100 percent. Toggle the layer on and off a few times to verify the alignment holds.
Step 4: Add a Layer Mask and Invert It
 Black layer mask added to background plate layer in Layers panel
With your background plate layer selected, click the Add Layer Mask button at the bottom of the Layers panel. By default, this creates a white mask that shows the entire layer - which isn’t what we want. Hit Command-I to invert the mask to black. A black mask hides the entire layer, which means your subject photo is now fully visible again and the background plate is temporarily invisible. This is the correct starting point. You’ll paint white onto the mask only where you want the clean background to show through, giving you surgical control over exactly which parts of the scene get replaced.
Black layer mask added to background plate layer in Layers panel
With your background plate layer selected, click the Add Layer Mask button at the bottom of the Layers panel. By default, this creates a white mask that shows the entire layer - which isn’t what we want. Hit Command-I to invert the mask to black. A black mask hides the entire layer, which means your subject photo is now fully visible again and the background plate is temporarily invisible. This is the correct starting point. You’ll paint white onto the mask only where you want the clean background to show through, giving you surgical control over exactly which parts of the scene get replaced.
Step 5: Paint the Prop Out With a Hard White Brush
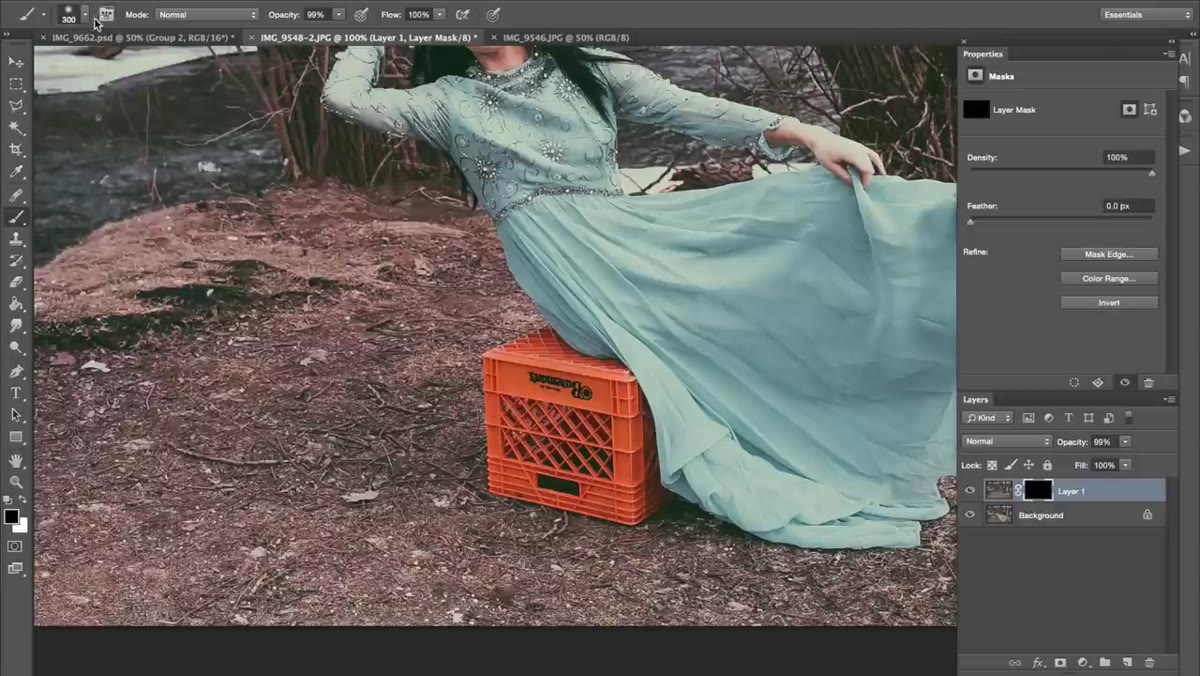 White brush painting over crate area on black layer mask
Select your Brush tool, set the hardness to 100 percent, and the opacity to 100 percent. Make sure your foreground color is white and that you have the mask thumbnail selected in the Layers panel, not the image thumbnail. Now zoom into the area where the prop sits - in Jessica’s case, a bright orange crate under the model’s feet - and paint directly over it. Because your background plate is aligned underneath, painting white on the mask reveals the clean background in exactly those areas, making the crate disappear. A hard-edged brush at full opacity gives you a clean, precise reveal with no soft halos or bleed. Work slowly around any areas where the subject’s body overlaps the prop, because those edges require more care.
White brush painting over crate area on black layer mask
Select your Brush tool, set the hardness to 100 percent, and the opacity to 100 percent. Make sure your foreground color is white and that you have the mask thumbnail selected in the Layers panel, not the image thumbnail. Now zoom into the area where the prop sits - in Jessica’s case, a bright orange crate under the model’s feet - and paint directly over it. Because your background plate is aligned underneath, painting white on the mask reveals the clean background in exactly those areas, making the crate disappear. A hard-edged brush at full opacity gives you a clean, precise reveal with no soft halos or bleed. Work slowly around any areas where the subject’s body overlaps the prop, because those edges require more care.
Step 6: Refine Edges Where Subject and Prop Overlap
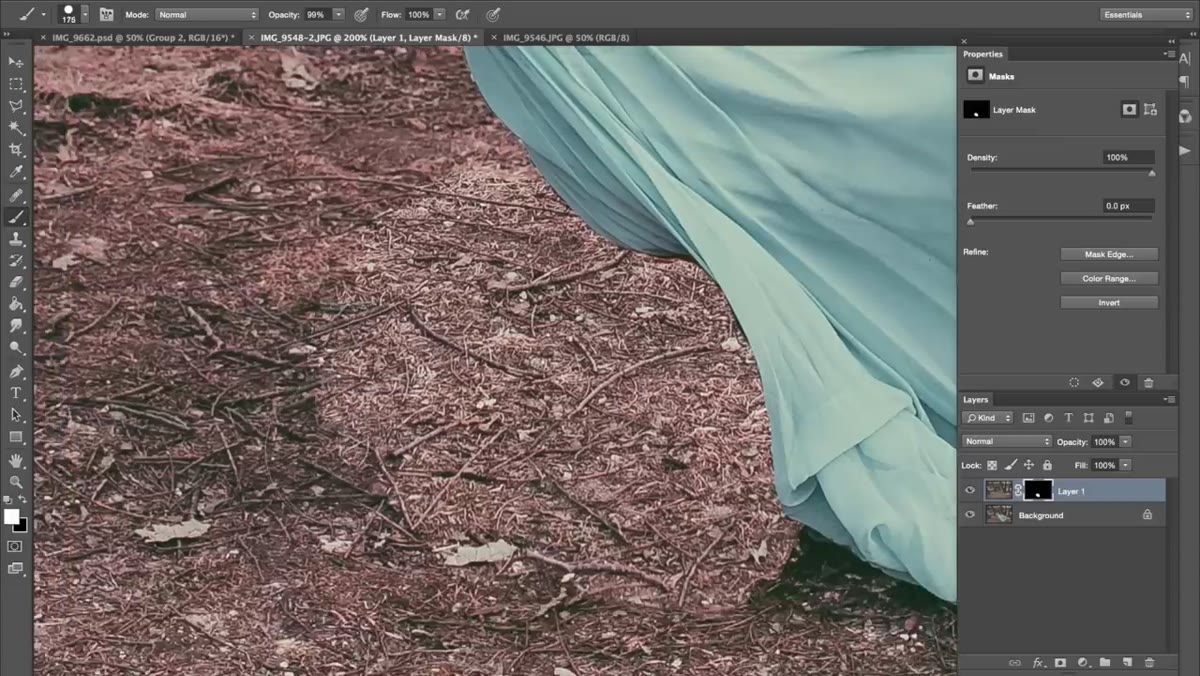 Close-up of mask edge refinement around model’s feet and prop area
This is the step where most people either get it right or create a floaty, poorly-composited mess. Zoom in tightly to wherever your subject’s feet, clothing, or hair overlap the area you’re masking. Reduce your brush size significantly and work along those edges with attention. If you accidentally paint over part of your subject, switch your foreground color to black and paint back to hide the background plate in that spot. Toggle the layer visibility repeatedly as you go - what looks clean at 100 percent zoom sometimes reveals obvious seams when you zoom out. The goal is a transition that reads as a single, uninterrupted photograph.
Close-up of mask edge refinement around model’s feet and prop area
This is the step where most people either get it right or create a floaty, poorly-composited mess. Zoom in tightly to wherever your subject’s feet, clothing, or hair overlap the area you’re masking. Reduce your brush size significantly and work along those edges with attention. If you accidentally paint over part of your subject, switch your foreground color to black and paint back to hide the background plate in that spot. Toggle the layer visibility repeatedly as you go - what looks clean at 100 percent zoom sometimes reveals obvious seams when you zoom out. The goal is a transition that reads as a single, uninterrupted photograph.
A Note From My Own Workflow
The technique Jessica demonstrates here is solid, and I use a version of it regularly. The one thing I’d add for anyone working with more complex backgrounds - say, foliage that moves between shots, or a location with variable light - is to shoot your clean background plate as quickly as possible after your hero shot. Wind moves leaves. Clouds shift the light. Even a five-minute gap can introduce enough difference between your two frames that alignment becomes much harder. I’ve learned to treat the clean plate as the second-most important shot of the day, right after the subject frame itself. Rushing it has cost me more time in post than it ever saved on set.
The single most important takeaway from this tutorial is that the clean background plate isn’t optional - it’s the entire foundation of the effect. Everything else is careful masking, and masking is learnable. The shot planning is what makes or breaks it before you even open Photoshop.
Watch the full tutorial on YouTube - and if you haven’t seen Part 1 of Jessica’s series, start there. She covers exactly how to capture both images on location, which sets up everything you’ve just read.
Comments
Leave a Comment