There’s a specific kind of client feedback that sticks with you. Mine was a bridesmaid who looked at her portrait and said the skin looked “like plastic.” She wasn’t wrong. I had been heavy-handing my healing tools, removing every shadow and texture under the eyes until the result looked more like a wax figure than a person. That was the moment I started paying close attention to how professional retouchers handle the under-eye area, which is one of the most unforgiving zones on a face to edit. Too little and the subject looks tired. Too much and they look synthetic.
In this KelbyOne tutorial on Retouching Tips in Lightroom 5, the instructor walks through a technique that I wish I had known years earlier. It centers on the upgraded Spot Removal tool and, more specifically, a slider inside it that most retouchers scroll right past. The fix is subtle, fast, and surprisingly powerful for a tool that most of us associate with cleaning up sensor dust. Watch the full tutorial on YouTube
What makes this approach worth writing about is that it does not require Photoshop, frequency separation, or any advanced compositing. It lives entirely inside Lightroom, which means it is non-destructive, fast to apply, and easy to revisit when a client requests revisions at 10pm the night before a deadline.
Step 1: Open the Develop Module and Select the Spot Removal Tool
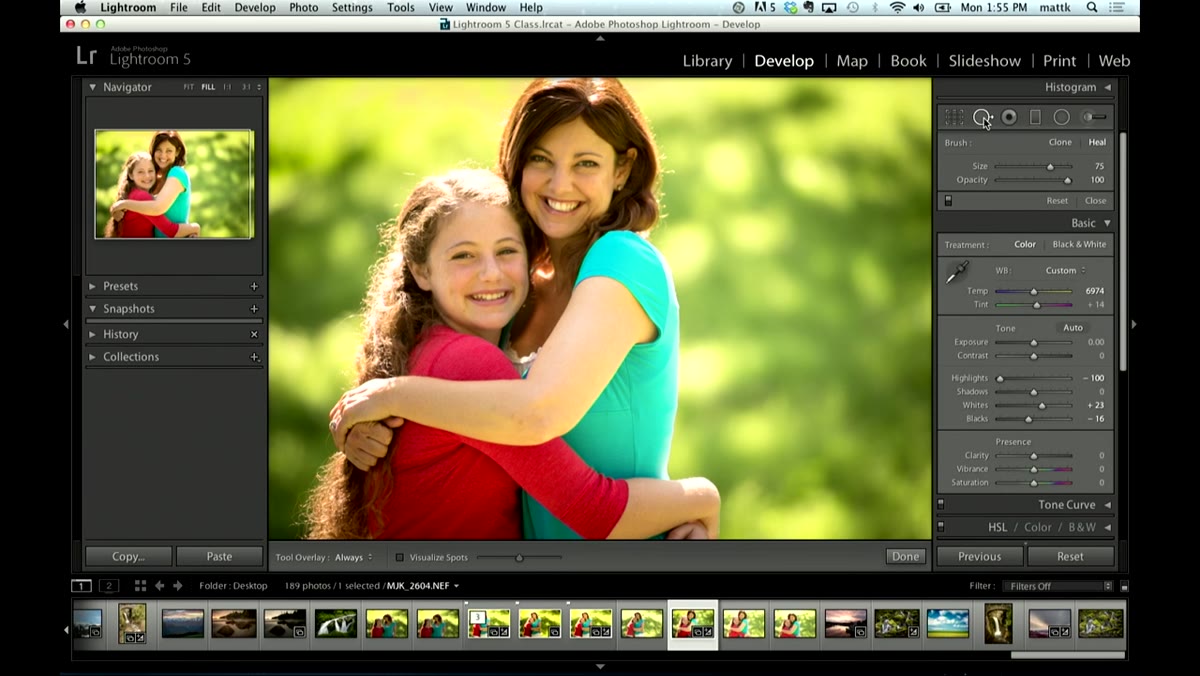 Spot Removal tool selected in Lightroom Develop module toolbox
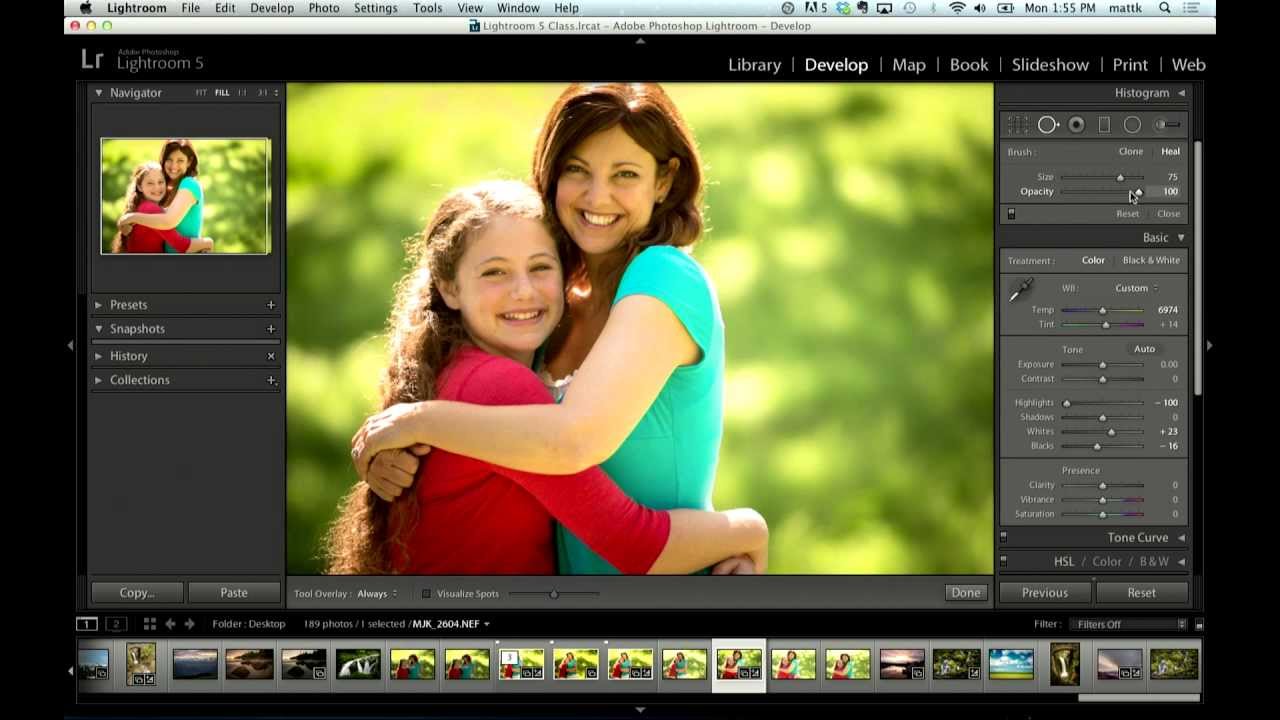
Navigate to the Develop module and locate the Spot Removal tool in the toolbar beneath the histogram. It looks like a small circle with an arrow. In Lightroom 5, the tool received a significant upgrade: instead of only working as a single click to remove circular spots, it now functions as a paintbrush. You will see three controls in the panel below the tool icon: a toggle between Clone and Heal, a Size slider, and an Opacity slider. Make sure you are set to Heal for portrait work, which blends texture from the source area rather than making a hard copy.
Spot Removal tool selected in Lightroom Develop module toolbox
Navigate to the Develop module and locate the Spot Removal tool in the toolbar beneath the histogram. It looks like a small circle with an arrow. In Lightroom 5, the tool received a significant upgrade: instead of only working as a single click to remove circular spots, it now functions as a paintbrush. You will see three controls in the panel below the tool icon: a toggle between Clone and Heal, a Size slider, and an Opacity slider. Make sure you are set to Heal for portrait work, which blends texture from the source area rather than making a hard copy.
Step 2: Zoom In and Prepare the Image
 Portrait zoomed in showing the under-eye area clearly
Before you start painting, zoom into the eye area so you can see exactly what you are working with. Use Command/Ctrl + (plus) to zoom, or click the Navigator panel to jump to a 1:1 or 2:1 view. If the shadows under the eyes are not immediately obvious at your current exposure, the instructor also suggests briefly lifting the Exposure slider and pulling down Highlights just to see the detail more clearly during editing. You do not have to keep those adjustments. This is just a diagnostic step to make the shadow area easier to identify before you paint.
Portrait zoomed in showing the under-eye area clearly
Before you start painting, zoom into the eye area so you can see exactly what you are working with. Use Command/Ctrl + (plus) to zoom, or click the Navigator panel to jump to a 1:1 or 2:1 view. If the shadows under the eyes are not immediately obvious at your current exposure, the instructor also suggests briefly lifting the Exposure slider and pulling down Highlights just to see the detail more clearly during editing. You do not have to keep those adjustments. This is just a diagnostic step to make the shadow area easier to identify before you paint.
Step 3: Paint Over the Under-Eye Shadow Area
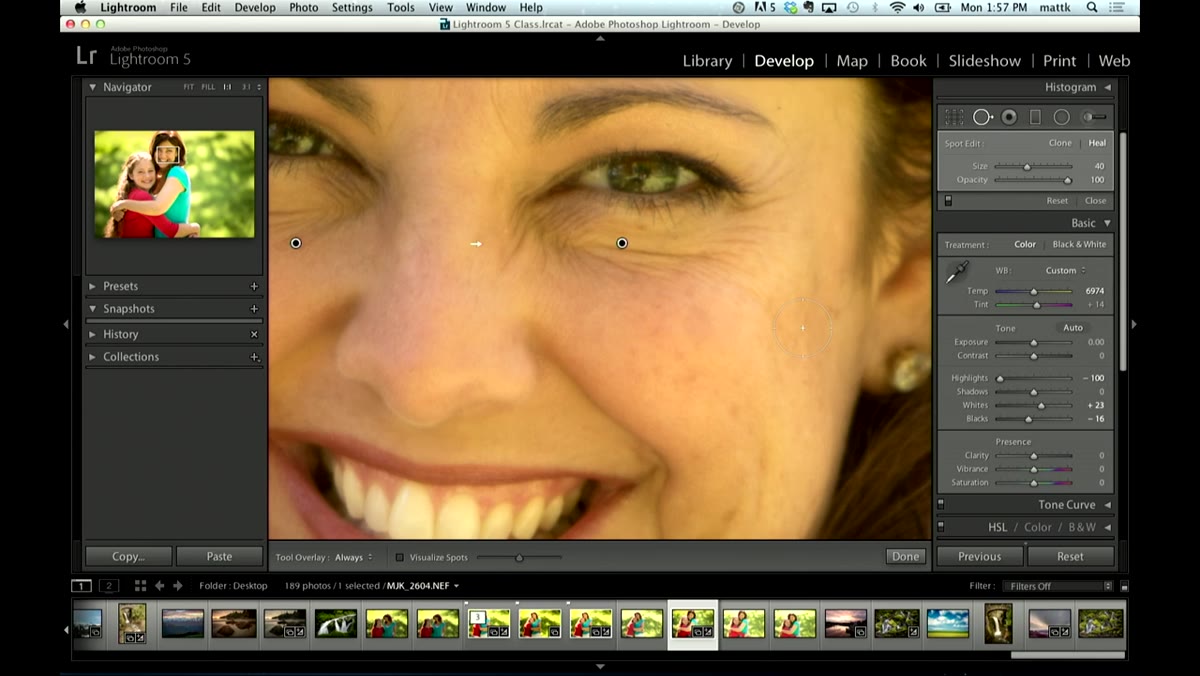 Painting the Spot Removal brush across the under-eye shadow
Click and drag the Spot Removal brush across the shadow area beneath the eye. Use a brush size that roughly matches the depth of the shadow zone, covering from the lash line down to the top of the cheekbone. Paint in one smooth stroke rather than dabbing repeatedly. When you release the mouse, Lightroom will automatically select a source region it thinks is a good match and draw a second circle connected by a line to show you where it is sampling from. Sometimes it makes a smart choice. Sometimes, as the tutorial demonstrates with a laugh, it samples from the exact area you are trying to fix.
Painting the Spot Removal brush across the under-eye shadow
Click and drag the Spot Removal brush across the shadow area beneath the eye. Use a brush size that roughly matches the depth of the shadow zone, covering from the lash line down to the top of the cheekbone. Paint in one smooth stroke rather than dabbing repeatedly. When you release the mouse, Lightroom will automatically select a source region it thinks is a good match and draw a second circle connected by a line to show you where it is sampling from. Sometimes it makes a smart choice. Sometimes, as the tutorial demonstrates with a laugh, it samples from the exact area you are trying to fix.
Step 4: Reposition the Source Point If Needed
 Dragging the source circle to a better sampling area
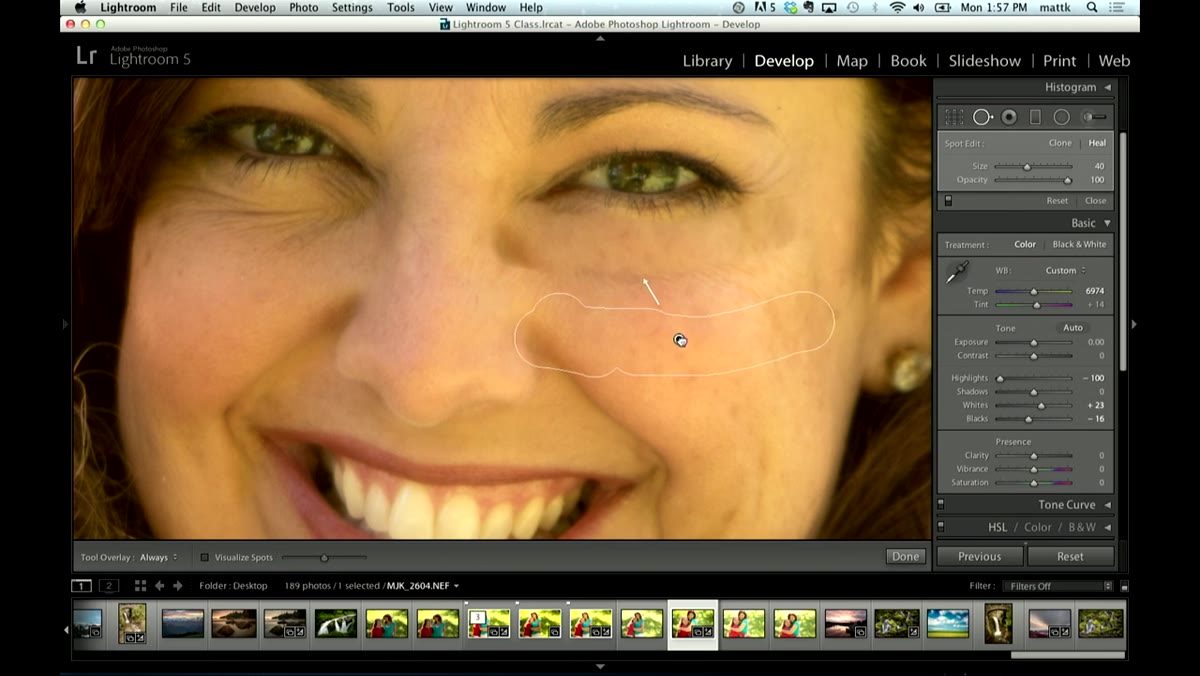
If Lightroom’s automatic source selection is not working, you can click inside the source circle (the second circle, connected by the line) and drag it to a better location. For under-eye work, a good source area is usually the upper cheek just outside the shadow zone, or smooth skin from a nearby area with similar tone and texture. The goal is to find skin that is close in color to what the under-eye area would look like without the shadow, not the brightest highlight on the face.
Dragging the source circle to a better sampling area
If Lightroom’s automatic source selection is not working, you can click inside the source circle (the second circle, connected by the line) and drag it to a better location. For under-eye work, a good source area is usually the upper cheek just outside the shadow zone, or smooth skin from a nearby area with similar tone and texture. The goal is to find skin that is close in color to what the under-eye area would look like without the shadow, not the brightest highlight on the face.
Step 5: Reduce the Opacity Slider to Blend Naturally
 Opacity slider being pulled down toward 40-50 percent
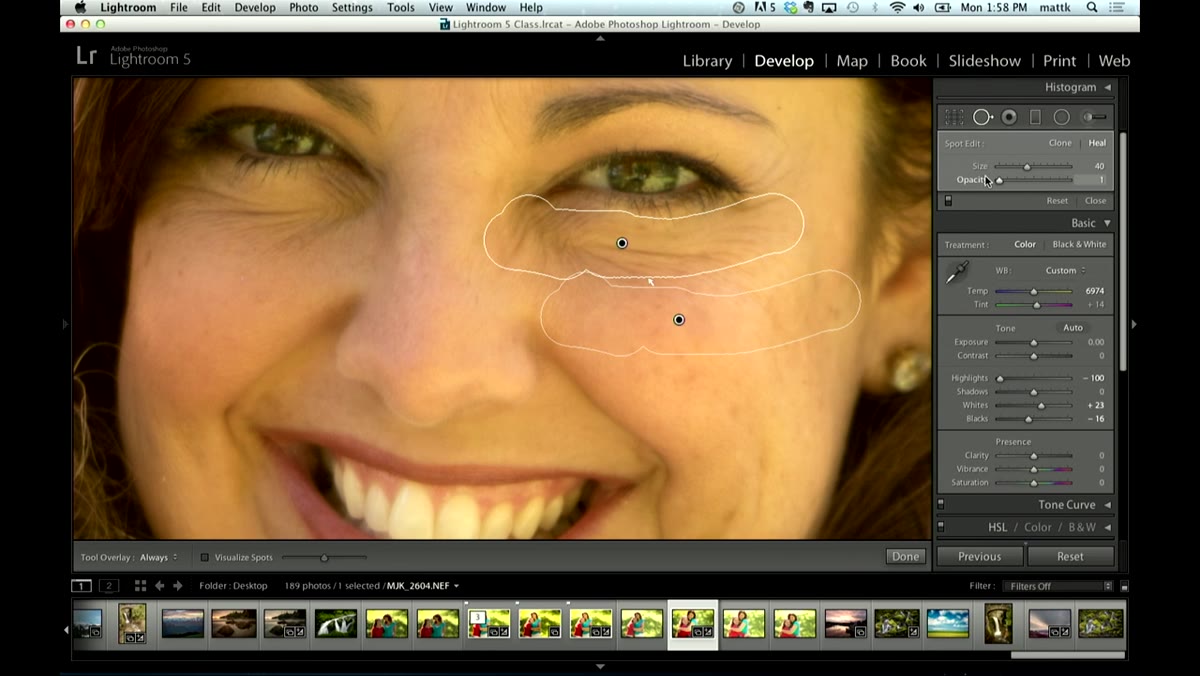
This is the step that changes everything, and it is the one the tutorial spends the most time emphasizing. With your healing stroke still active, look at the Opacity slider in the tool panel. Drag it all the way down to zero first. At zero, the effect disappears entirely and you are looking at the original image. Now slowly bring the Opacity back up. Watch what happens to the skin texture as you increase it. Around 40 to 50 percent is where the technique tends to live for most portraits, but the right number depends on the depth of the original shadow and your client’s skin tone.
Opacity slider being pulled down toward 40-50 percent
This is the step that changes everything, and it is the one the tutorial spends the most time emphasizing. With your healing stroke still active, look at the Opacity slider in the tool panel. Drag it all the way down to zero first. At zero, the effect disappears entirely and you are looking at the original image. Now slowly bring the Opacity back up. Watch what happens to the skin texture as you increase it. Around 40 to 50 percent is where the technique tends to live for most portraits, but the right number depends on the depth of the original shadow and your client’s skin tone.
The reason this slider matters so much is that at 100 percent opacity, the heal is doing the same thing it does when you remove a dust spot from a sky: it fully replaces the content. For inanimate surfaces, full replacement is exactly what you want. For skin, full replacement flattens the texture and creates that unmistakable plastic quality. Reducing the opacity lets the correction show through while keeping the original skin texture underneath. It reads as a reduction in fatigue rather than a removal of the person’s actual face.
What I Add to This Workflow in Practice
The technique as taught works well as a standalone fix. In my own retouching work, I take it one step further by applying this healing pass before I do any global skin work. Because the opacity is dialed back, it plays nicely with whatever luminosity masking or color grading comes after it. I also keep my healing strokes slightly conservative in size, staying just inside the actual shadow zone rather than painting edge to edge. Lightroom sometimes pulls in unwanted texture from the lash line if the brush overlaps it, so a tighter stroke with a second small pass if needed gives me more control.
One thing to be aware of: if you are exporting this image into Photoshop for additional work, make sure you have applied or noted your Lightroom spot corrections, because they will render into the file on export. That is usually fine, but it is worth knowing before you start frequency separation work and wonder why the base layer looks different from the raw file.
The single most important takeaway from this tutorial is not the brush technique itself. It is the mindset shift around the Opacity slider. Retouching is rarely about complete removal. It is usually about reduction, and having a slider that lets you dial in exactly how much correction you want is more powerful than any automated one-click tool. Next time the under-eye shadows on a portrait feel like they are fighting you, try painting at full opacity first to establish your correction, then walk the opacity back until it looks like the person just had a good night’s sleep.
Watch the full tutorial on YouTube to see the before-and-after comparison in real time, which makes the opacity difference even clearer than a written description can.
Comments (2)
I've watched a dozen tutorials on this and yours is the clearest by far.
Bookmarked. Coming back to this one for sure.
Leave a Comment