
For years, my go-to move when a background needed serious work was to drag the file into Photoshop, do my thing, save a layered PSD, and then hop back to Lightroom to finish the rest of the edit. It worked, but it was slow, and honestly, it broke my creative flow at exactly the wrong moment. Somewhere between the export and the round-trip, I’d lose momentum. I’d close the file and tell myself I’d finish it later. Later rarely came.
That’s why when I watched this Tony & Chelsea Northrup tutorial on Lightroom Classic’s updated masking system, I had one of those genuinely annoying moments where you realize you’ve been doing things the hard way for longer than you’d like to admit. Watch the full tutorial on YouTube - it’s worth your time even if you think you already know Lightroom well. The AI-powered subject and sky selection tools, combined with stackable masks, mean that a lot of what used to require Photoshop can now stay right inside your develop module. Faster, cleaner, and frankly more fun.
What follows is my own walkthrough of the techniques from that video, translated into the way I actually think about editing. The examples in the tutorial use a hummingbird and a California landscape, but every principle here maps directly to portrait and beauty work. I’ll flag those connections as we go.
Step 1: Open the Masking Panel in the Develop Module
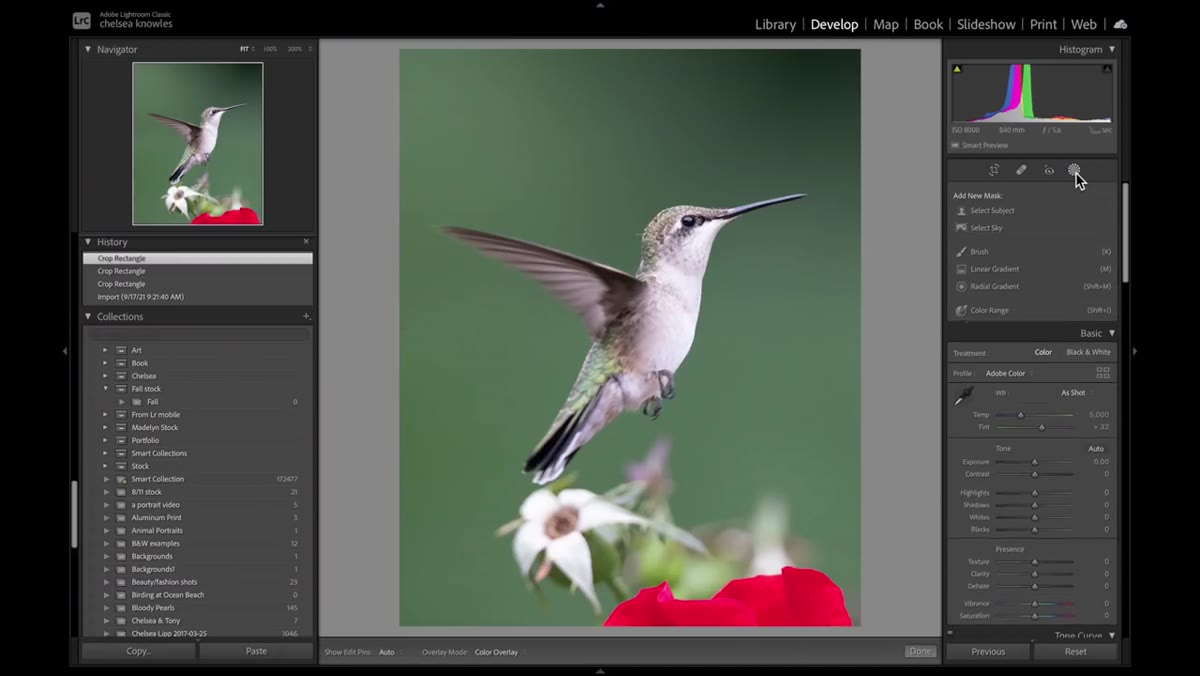 Clicking the masking circle icon in Develop module
In Lightroom Classic’s Develop module, look for the small circle icon in the toolbar just above your adjustment sliders - it sits between the histogram and the basic panel. Click it to open the Masking panel. This is your new control center. If you’ve used the old radial filter or adjustment brush, think of this as all of those tools unified and made significantly smarter. Everything we do from here happens inside this panel.
Clicking the masking circle icon in Develop module
In Lightroom Classic’s Develop module, look for the small circle icon in the toolbar just above your adjustment sliders - it sits between the histogram and the basic panel. Click it to open the Masking panel. This is your new control center. If you’ve used the old radial filter or adjustment brush, think of this as all of those tools unified and made significantly smarter. Everything we do from here happens inside this panel.
Step 2: Use “Select Subject” to Isolate Your Main Element
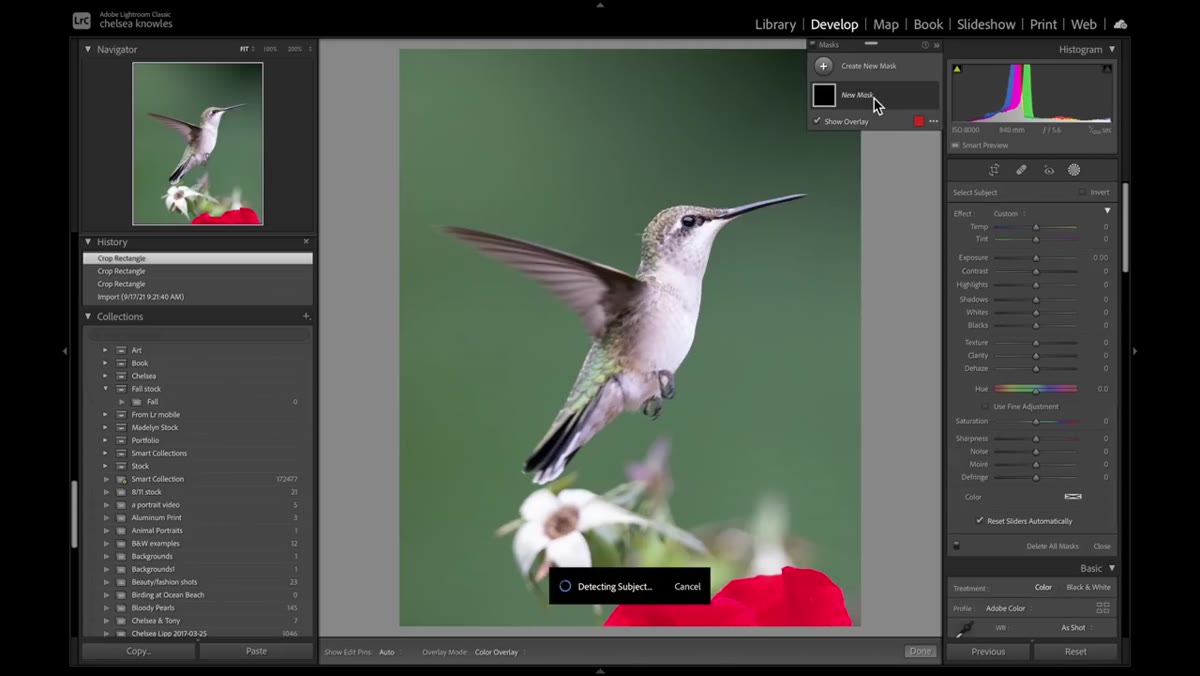 AI subject selection highlighting the hummingbird
Click “Select Subject” and let Lightroom’s AI do its first pass. In a few seconds, you’ll see an overlay - typically shown in red or green - indicating which pixels the algorithm has identified as your main subject. For portraits, this selection almost always captures the face, hair, and body with impressive accuracy, though you may need to refine edges around flyaway hair or sheer fabric. The selection doesn’t need to be pixel-perfect at this stage. We’ll build on it.
AI subject selection highlighting the hummingbird
Click “Select Subject” and let Lightroom’s AI do its first pass. In a few seconds, you’ll see an overlay - typically shown in red or green - indicating which pixels the algorithm has identified as your main subject. For portraits, this selection almost always captures the face, hair, and body with impressive accuracy, though you may need to refine edges around flyaway hair or sheer fabric. The selection doesn’t need to be pixel-perfect at this stage. We’ll build on it.
What you have now is a live mask connected to its own adjustment layer. Any slider you move will only affect the selected area. This is the fundamental shift in how Lightroom masking now works, and it’s genuinely powerful.
Step 3: Invert the Selection to Work on the Background First
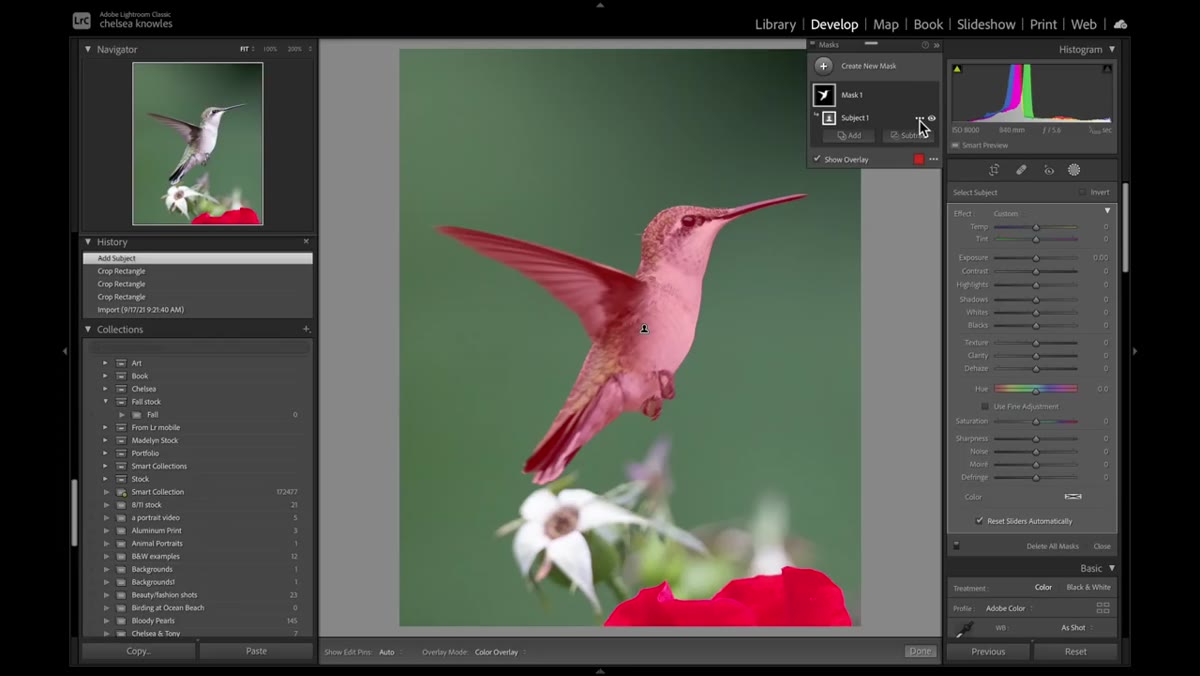 Inverting the subject mask via the ellipses menu
Click the three-dot ellipsis menu next to your new mask layer and choose “Invert.” Now everything outside your subject is selected. I like working on the background first because it frames the subject and informs every decision I make about skin and color afterward.
Inverting the subject mask via the ellipses menu
Click the three-dot ellipsis menu next to your new mask layer and choose “Invert.” Now everything outside your subject is selected. I like working on the background first because it frames the subject and informs every decision I make about skin and color afterward.
With the background selected, push the Noise Reduction slider up significantly - the tutorial demonstrates taking it close to maximum on a high-ISO shot, and the result is dramatic. For beauty work, this step is particularly useful when you’ve shot tethered in a studio at a higher ISO than you intended, or when a client’s background is getting noisy while the face is still clean. You can also pull down exposure slightly to push the subject forward visually, and adjust saturation or hue to shift the background color without touching the skin at all.
Step 4: Create a New Mask for the Subject
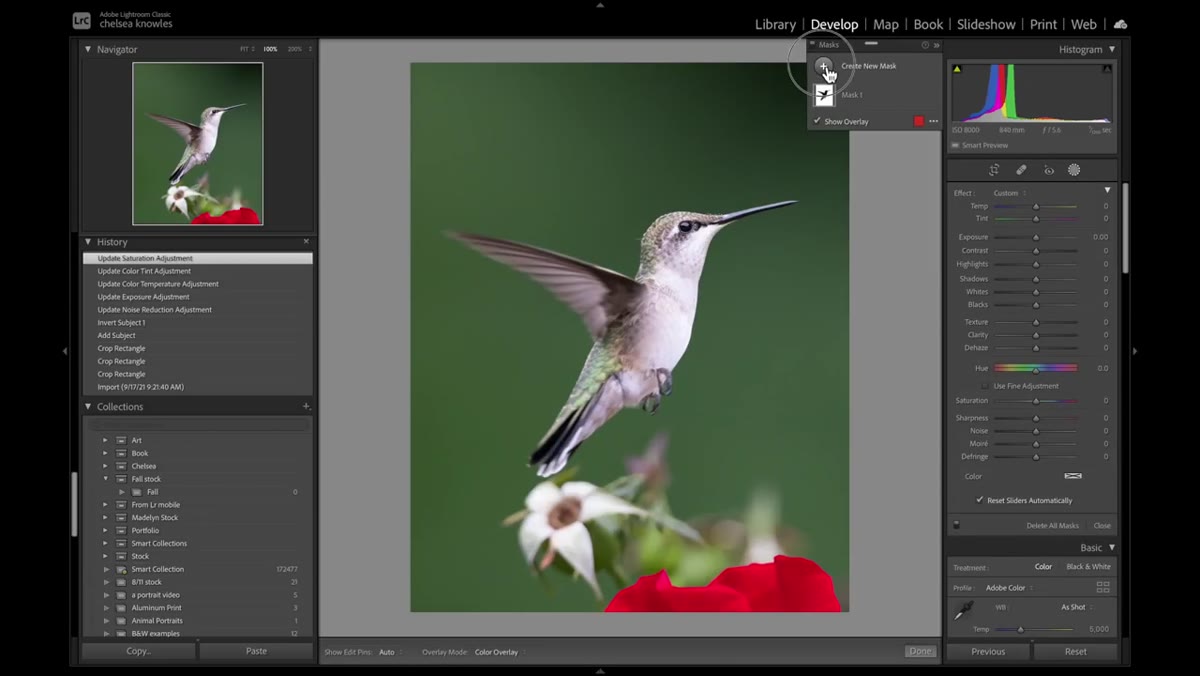 Creating a second subject mask for foreground adjustments
Back in the Masking panel, click “Add New Mask” and run “Select Subject” again. This gives you a completely separate adjustment layer dedicated to your subject - in our case, the actual person or, in the tutorial’s example, the bird. The key insight here is that you are not limited to one mask. You can stack as many as you need, each with its own set of sliders, and they don’t interfere with each other.
Creating a second subject mask for foreground adjustments
Back in the Masking panel, click “Add New Mask” and run “Select Subject” again. This gives you a completely separate adjustment layer dedicated to your subject - in our case, the actual person or, in the tutorial’s example, the bird. The key insight here is that you are not limited to one mask. You can stack as many as you need, each with its own set of sliders, and they don’t interfere with each other.
On the subject mask, the tutorial demonstrates raising sharpness modestly - the emphasis is on “modestly.” Over-sharpening is one of the most common mistakes in beauty retouching, and it usually shows up first around the eyes and lips. A gentle bump here, combined with the noise reduction you applied to the background, creates the impression of a much sharper image without making skin look textured or harsh. Bring down highlights to recover detail, then nudge whites up to restore luminosity. For skin, this translates to recovering texture in bright areas like foreheads and cheekbones without blowing them out.
Step 5: Add a Radial Gradient for Targeted Light Shaping
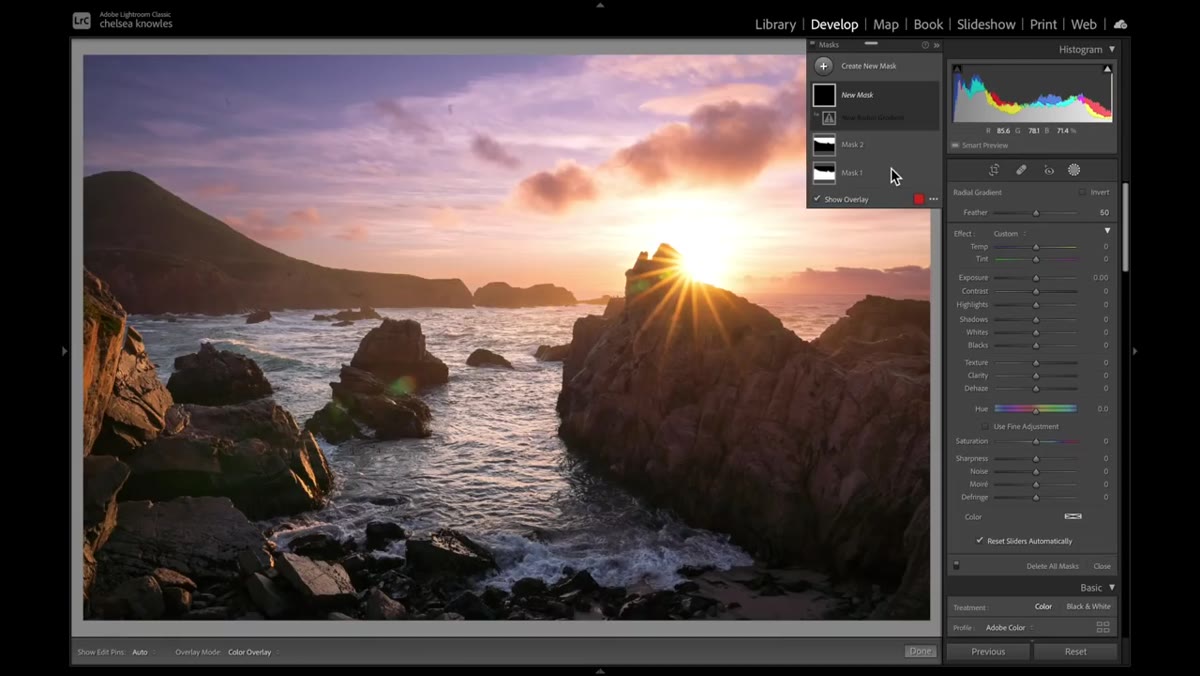 Placing a radial gradient mask over the sun flare area
Create another new mask, but this time choose “Radial Gradient” from the options. In the tutorial, this is used to enhance a sun flare in a landscape, but for portrait work, I use this exact technique constantly - to add a subtle light source, to brighten eyes, or to draw attention to a specific part of the frame. Draw the ellipse over the area you want to affect, then adjust contrast, exposure, or warmth within that contained zone.
Placing a radial gradient mask over the sun flare area
Create another new mask, but this time choose “Radial Gradient” from the options. In the tutorial, this is used to enhance a sun flare in a landscape, but for portrait work, I use this exact technique constantly - to add a subtle light source, to brighten eyes, or to draw attention to a specific part of the frame. Draw the ellipse over the area you want to affect, then adjust contrast, exposure, or warmth within that contained zone.
The beauty of the radial gradient inside this new masking system is that it can sit alongside your AI-generated subject mask without conflict. You can have a subject selection adjusting overall skin tone and a radial gradient independently brightening the eyes, all within the same file, no round-trips needed.
Step 6: Finish with the Brush for Detail Work
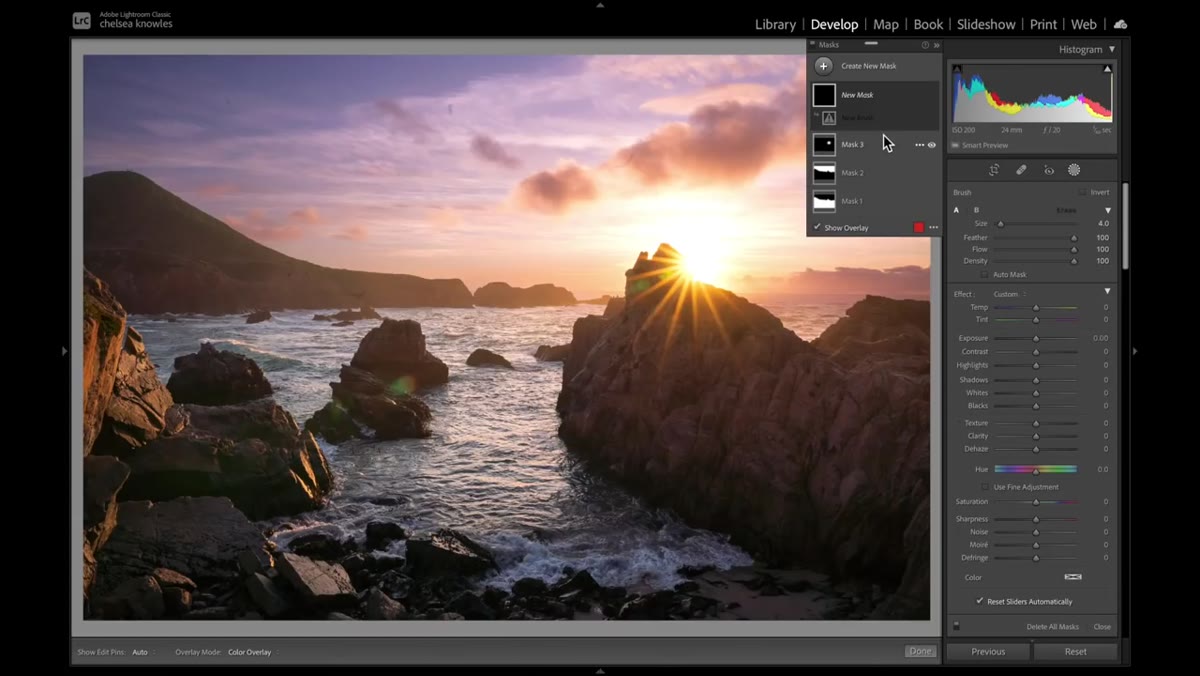 Using the adjustment brush to paint in specific foreground areas
The final tool in this workflow is the classic adjustment brush, now living inside the same masking panel as everything else. Add a new mask, select Brush, and paint over the specific details you want to refine - in the tutorial, this is a line of foamy water in the foreground. For portraits, I use this stage for things the AI doesn’t always catch cleanly: the catch light in an eye, a strand of hair catching a rim light, or a shadow that’s sitting just slightly too heavy on one side of the face.
Using the adjustment brush to paint in specific foreground areas
The final tool in this workflow is the classic adjustment brush, now living inside the same masking panel as everything else. Add a new mask, select Brush, and paint over the specific details you want to refine - in the tutorial, this is a line of foamy water in the foreground. For portraits, I use this stage for things the AI doesn’t always catch cleanly: the catch light in an eye, a strand of hair catching a rim light, or a shadow that’s sitting just slightly too heavy on one side of the face.
Paint loosely, then use the Erase function within the brush mask to clean up any overlap. Because this is its own independent mask layer, any mistakes here don’t touch your subject selection or your background adjustments.
How I Use This Differently in Beauty Retouching
The tutorial focuses on wildlife and landscape photography, but the workflow translates almost perfectly to beauty and portrait editing with one addition I’ve built into my own process. After the subject mask is in place, I create a secondary radial gradient centered on the face and pull saturation very slightly - usually no more than five or six points. It counteracts the slight oversaturation that AI subject selection can introduce when it bleeds slightly into warm skin tones. It’s a small move, but it’s the difference between skin that looks healthy and skin that looks like it’s been through an Instagram filter.
The other thing worth noting: these mask layers save with the file. Open the image next week, and every mask is still there, still editable, still non-destructive. That alone has changed how I handle client revisions.
The single most important thing this workflow gives you is specificity. You stop editing the whole image and start editing parts of it with intention - the background gets one treatment, the subject gets another, the light gets shaped on top of both. That level of control used to require Photoshop. Now it’s inside Lightroom, and it’s faster than I expected.
If you haven’t updated Lightroom Classic recently, do it before you open your next edit. Then watch the full Tony & Chelsea Northrup tutorial on YouTube to see every step demonstrated live. You’ll finish the video and immediately want to open a photo.
Comments
Leave a Comment