For a long time, my skin retouching had a particular problem. The edits looked fine at 100% zoom, but the moment a client zoomed out, the transitions between adjusted and unadjusted areas looked like I’d used a cookie cutter. Harsh edges. Obvious patches. The kind of thing that made one early client describe my work as “a little plastic-looking,” which is a sentence I still hear in my sleep. What I was missing wasn’t a better brush or a more careful hand. It was a smarter selection method, one that understood the tonal values in the image and used them to build the mask automatically.
That’s exactly what luminosity masking does, and it’s why I keep coming back to this technique whenever a beauty retouch needs to feel seamless. In this CreativeLive tutorial, the instructor walks through how luminosity masks are built from the ground up, connecting the theory of pixel luminance values to the practical channel-based workflow inside Photoshop. Watch the full tutorial on YouTube if you want to follow along with the video. Below, I’ve broken the technique into steps you can work through on your own image right now.
Step 1: Understand What a Luminosity Value Actually Is
 Diagram showing luminance scale from 0 to 255
Before we touch a single tool, we need to speak the same language as Photoshop. Every pixel in your image carries a luminance value on a scale from 0 to 255. Zero is pure black, 255 is pure white, and 128 lands right in the midtone range. Those values exist not just in grayscale but across every color channel. Your red, green, and blue channels each hold their own 0-to-255 range, and together they build every color in the image.
Diagram showing luminance scale from 0 to 255
Before we touch a single tool, we need to speak the same language as Photoshop. Every pixel in your image carries a luminance value on a scale from 0 to 255. Zero is pure black, 255 is pure white, and 128 lands right in the midtone range. Those values exist not just in grayscale but across every color channel. Your red, green, and blue channels each hold their own 0-to-255 range, and together they build every color in the image.
Why does this matter for retouching? Because any pixel that falls outside that 0-to-255 range is essentially lost data. That’s where you get highlight blowout warnings or completely crushed shadows. Luminosity masking works by reading the values that do exist in that range and using them to determine how strongly a selection should apply to any given area of the image.
Step 2: Recognize How a Luminosity Mask Differs from a Painted Mask
 Comparison of painted mask versus luminosity-driven mask
When we paint a mask manually in Photoshop, we’re making binary decisions. This area is on, that area is off. The edge between them is only as smooth as our brush hardness allows. Luminosity masks work on a gradient principle instead. Areas with higher luminance values are selected more strongly, areas with lower values are selected less strongly, and the transitions between them follow the actual tonal structure of the photograph.
Comparison of painted mask versus luminosity-driven mask
When we paint a mask manually in Photoshop, we’re making binary decisions. This area is on, that area is off. The edge between them is only as smooth as our brush hardness allows. Luminosity masks work on a gradient principle instead. Areas with higher luminance values are selected more strongly, areas with lower values are selected less strongly, and the transitions between them follow the actual tonal structure of the photograph.
The instructor draws a useful comparison here to the auto mask feature in Lightroom and Adobe Camera Raw, which senses pixel values and adjusts its behavior accordingly. Luminosity masking brings that intelligence into Photoshop, without any AI guesswork. The mask is built from the image’s own data, which means it responds naturally to every highlight, shadow, and midtone in the frame. For skin retouching, that means adjustments that follow the natural contours of a face rather than a circle you drew with a brush.
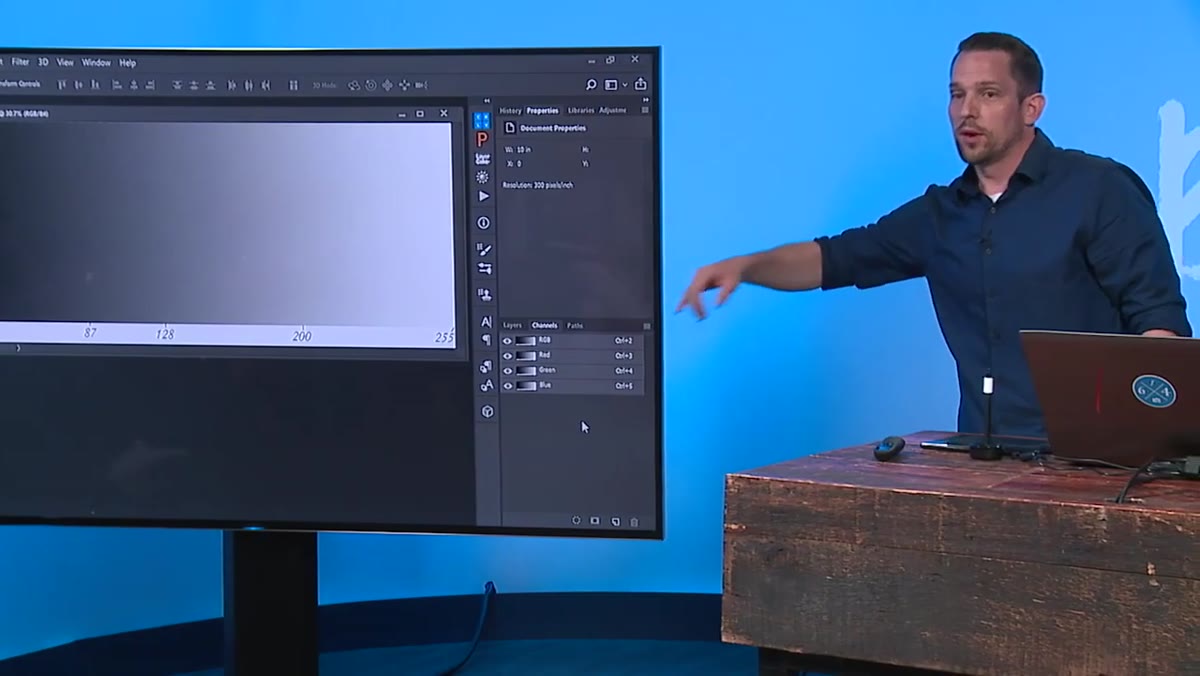
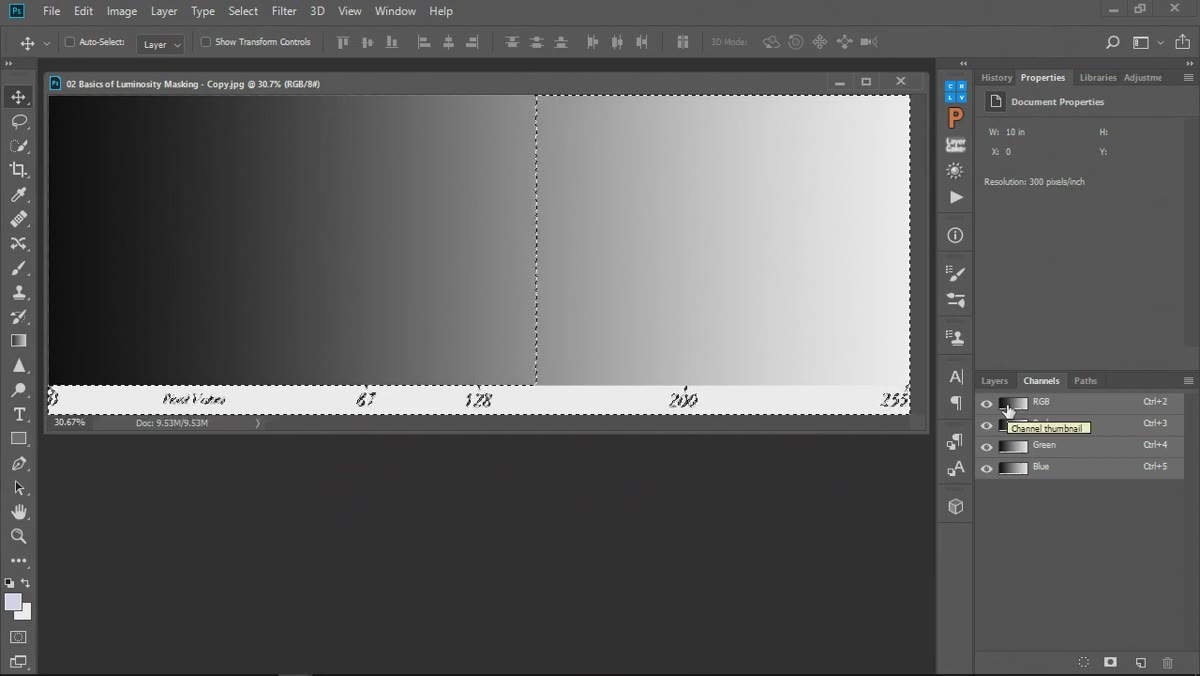
Step 3: Navigate to the Channels Panel
 Photoshop Channels panel showing RGB, Red, Green, Blue channels
Open your Channels panel. If you haven’t spent much time here, don’t worry. You’ll see your composite RGB channel at the top, followed by the individual Red, Green, and Blue channels below it. Each of those individual channels displays as a grayscale image showing how strongly that color is present across the frame.
Photoshop Channels panel showing RGB, Red, Green, Blue channels
Open your Channels panel. If you haven’t spent much time here, don’t worry. You’ll see your composite RGB channel at the top, followed by the individual Red, Green, and Blue channels below it. Each of those individual channels displays as a grayscale image showing how strongly that color is present across the frame.
Here’s the key insight: that composite RGB channel is essentially a luminance map of your image. The brightness values you see when you look at it represent the overall luminosity at every point in the photo. This is the raw material for our mask.
Step 4: Load the Luminance Selection with Ctrl+Alt+2
 Marching ants selection loaded from RGB channel in Photoshop
This is the step that feels like a magic trick the first time you do it. With your image open and the Channels panel visible, press Ctrl+Alt+2 (or Command+Option+2 on Mac). Photoshop will immediately load a selection based on the luminance values of the entire image. You’ll see the marching ants appear, and they’ll look unusual at first because this isn’t a hard geometric selection. It’s contoured to the tonal information in the photo.
Marching ants selection loaded from RGB channel in Photoshop
This is the step that feels like a magic trick the first time you do it. With your image open and the Channels panel visible, press Ctrl+Alt+2 (or Command+Option+2 on Mac). Photoshop will immediately load a selection based on the luminance values of the entire image. You’ll see the marching ants appear, and they’ll look unusual at first because this isn’t a hard geometric selection. It’s contoured to the tonal information in the photo.
Alternatively, you can Ctrl+click (Command+click on Mac) directly on the RGB channel thumbnail to achieve the same result. Both methods pull from exactly the same data. The keyboard shortcut is worth memorizing if you’re doing this regularly on client work. I have it built into an action I named “The Prestige” because, honestly, it always gets a reaction when I demo it in workshops.
Step 5: Use the Selection as the Basis for a Mask or Adjustment
 Active luminosity selection being applied to adjustment layer mask
Once that luminance selection is active, you can immediately apply it as a mask to any adjustment layer. Create a Curves layer, a Hue/Saturation layer, or whatever correction fits your retouch, and Photoshop will automatically use the active selection as the mask for that layer. The result is an adjustment that affects bright areas more strongly than dark areas, or vice versa depending on how you refine the selection beforehand.
Active luminosity selection being applied to adjustment layer mask
Once that luminance selection is active, you can immediately apply it as a mask to any adjustment layer. Create a Curves layer, a Hue/Saturation layer, or whatever correction fits your retouch, and Photoshop will automatically use the active selection as the mask for that layer. The result is an adjustment that affects bright areas more strongly than dark areas, or vice versa depending on how you refine the selection beforehand.
For portrait work, this is especially powerful when you’re targeting highlight rolloff on skin or trying to even out tonal inconsistencies without flattening the natural three-dimensionality of the face. The mask does the heavy lifting of preserving those transitions so your adjustment feels like it belongs to the image rather than sitting on top of it.
A Note on Inverting and Intersecting Selections
Once you’re comfortable with the basic luminance selection, the real control comes from modifying it before you use it. Pressing Ctrl+Shift+Alt+2 (Command+Shift+Option+2) loads the luminance selection and intersects it with whatever selection you already have active. This lets you target a specific tonal range, like midtones only, by starting with a painted or geometric selection and then narrowing it with the luminance data.
In my beauty retouching workflow, I often do this when I need to brighten the high points on skin without affecting the shadows. I’ll make a loose selection of the highlight zones I want to work with, then intersect that with the luminance selection to get a mask that responds to the actual tonal structure underneath. It takes the plastic-looking edge out of almost any skin correction.
Luminosity masking is one of those techniques that feels complicated right up until the moment it clicks, and then you wonder how you ever worked without it. The single most useful thing to take away from this tutorial is that keyboard shortcut: Ctrl+Alt+2 loads a selection from luminance data at any point in your workflow, giving you a mask that’s already shaped by the tonal reality of your image. Build from there.
Watch the full tutorial on YouTube to see the full CreativeLive demonstration, including how the instructor walks through the Channels panel in real time.
Comments
Leave a Comment