There was a period early in my retouching career when I was convinced that sharp meant better. Sharp everything, everywhere, always. Then a client looked at a beauty edit I’d delivered and said the skin looked “like sandpaper.” She wasn’t wrong. I’d applied aggressive sharpening globally and the result was texture that read as gritty instead of detailed, harsh instead of refined. That one comment sent me down a rabbit hole of learning how sharpening actually works for skin, and more specifically, how to apply it selectively so your edges and details pop without making a person’s complexion look like it was rendered in a video game from 2003.
This is exactly the problem that Scott Kelby addresses in a focused KelbyOne tutorial on sharpening in Lightroom. Watch the full tutorial on YouTube - it’s short, punchy, and one of those tips that immediately changes how you think about the Detail panel. Kelby’s solution lives inside a slider that most people scroll right past, and once you understand what it’s actually doing, you’ll wonder how you worked without it.
The technique works in both Lightroom Classic and Adobe Camera Raw, so regardless of which you use in your workflow, this applies to you.
Step 1: Open the Detail Panel
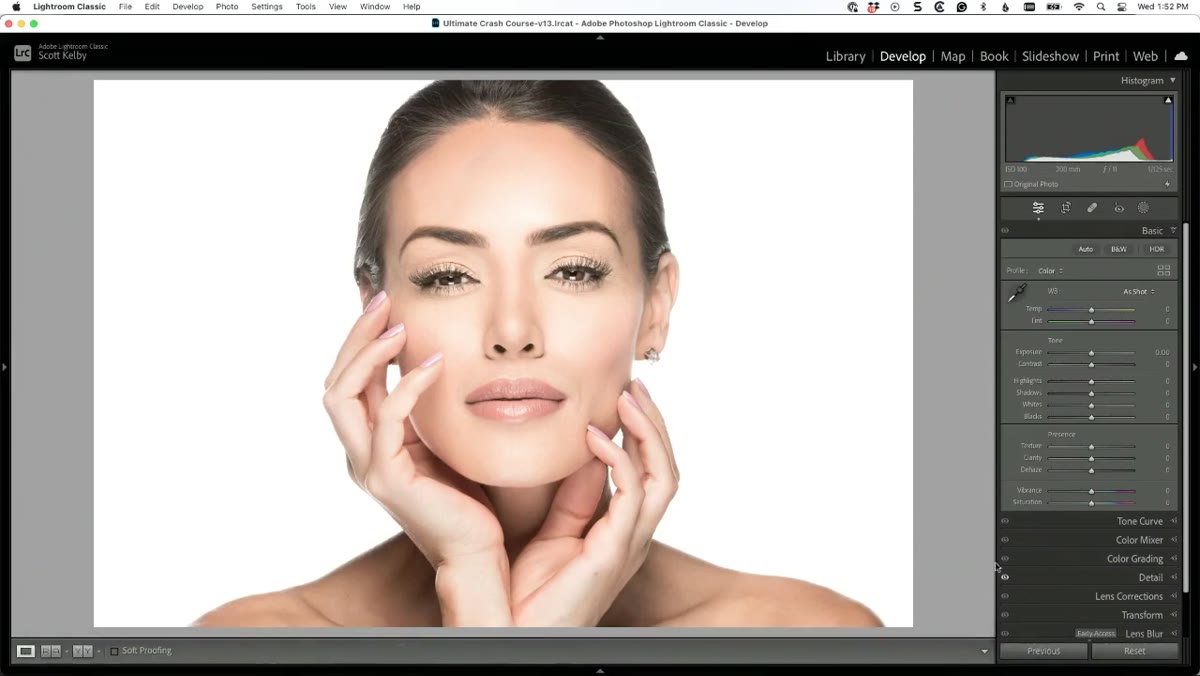 Detail panel open with sharpening sliders visible
Head to Lightroom’s Detail panel, which you’ll find in the Develop module on the right side panel stack. This is where both sharpening and noise reduction live together, which admittedly makes the panel name feel a little vague. Don’t let the noise reduction section distract you here. We’re focused entirely on the Sharpening section at the top, which includes four sliders: Amount, Radius, Detail, and Masking.
Detail panel open with sharpening sliders visible
Head to Lightroom’s Detail panel, which you’ll find in the Develop module on the right side panel stack. This is where both sharpening and noise reduction live together, which admittedly makes the panel name feel a little vague. Don’t let the noise reduction section distract you here. We’re focused entirely on the Sharpening section at the top, which includes four sliders: Amount, Radius, Detail, and Masking.
For portrait work, I typically start with a 1:1 zoom on the face before touching anything. You need to actually see what the sharpening is doing to skin as you adjust it, not guess from a thumbnail.
Step 2: Zoom In and Push the Amount Slider to Exaggerate the Effect
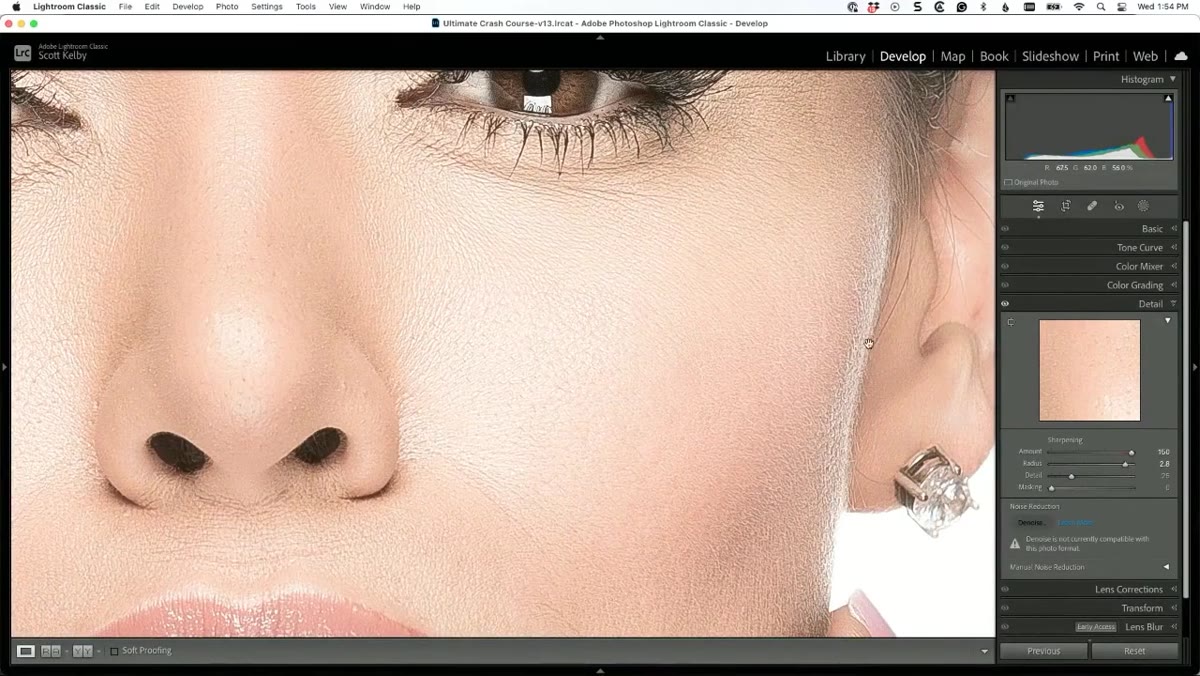
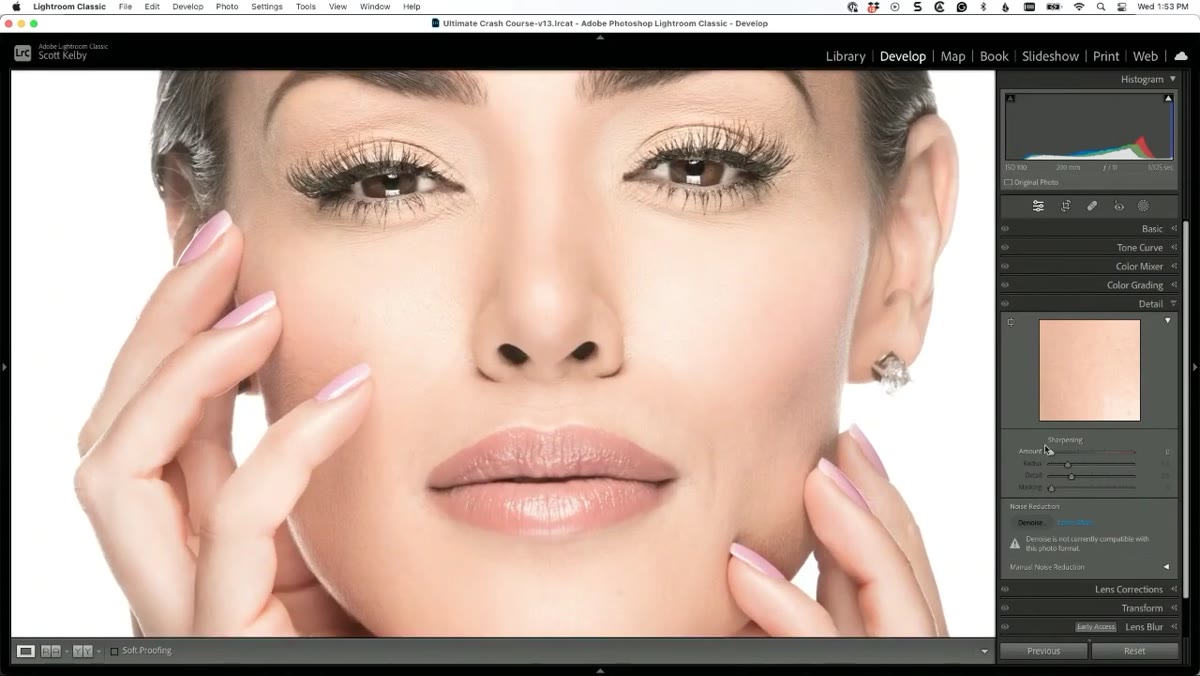 Sharpening Amount cranked high, skin texture visibly gritty
Kelby’s teaching method here is clever. He cranks the Amount slider way up - far higher than you’d ever use in a real edit - specifically so the problem becomes impossible to miss. When sharpening is applied globally at a high value, skin texture turns coarse and unflattering. You can see it almost immediately in areas like the cheeks, forehead, and nose. The pores get amplified, any fine surface variation gets emphasized, and the overall result looks rough rather than refined.
Sharpening Amount cranked high, skin texture visibly gritty
Kelby’s teaching method here is clever. He cranks the Amount slider way up - far higher than you’d ever use in a real edit - specifically so the problem becomes impossible to miss. When sharpening is applied globally at a high value, skin texture turns coarse and unflattering. You can see it almost immediately in areas like the cheeks, forehead, and nose. The pores get amplified, any fine surface variation gets emphasized, and the overall result looks rough rather than refined.
For this demonstration, pushing Amount to somewhere between 100 and 150 makes the effect obvious. In a real portrait edit, you’d likely land between 40 and 80 depending on the image, but exaggerating it here is purely for learning purposes - it makes the before and after of the next step undeniable.
Step 3: Locate the Masking Slider
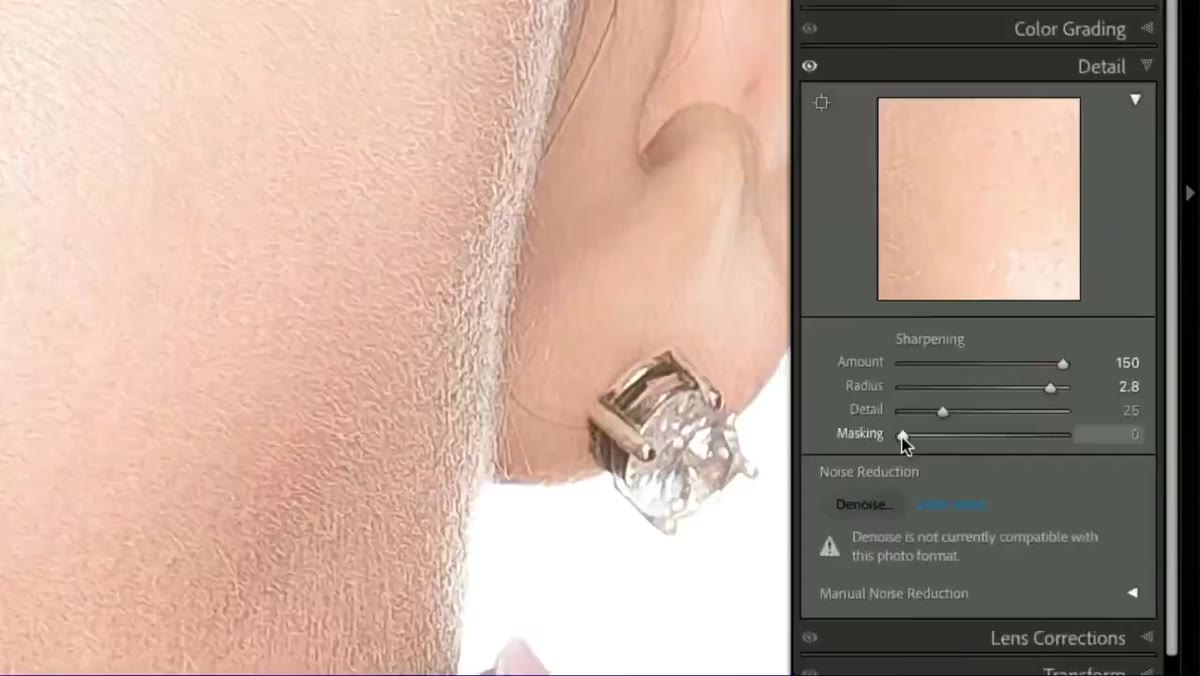 Masking slider highlighted in the Detail panel
The Masking slider sits at the bottom of the Sharpening section, and it is chronically underused. By default it sits at zero, which means sharpening is applied uniformly to every pixel in the photo - skin, eyes, hair, background, all of it equally. Most people never touch it. That’s a problem for portrait and beauty work, because skin and fine detail like eyelashes actually benefit from very different sharpening treatment.
Masking slider highlighted in the Detail panel
The Masking slider sits at the bottom of the Sharpening section, and it is chronically underused. By default it sits at zero, which means sharpening is applied uniformly to every pixel in the photo - skin, eyes, hair, background, all of it equally. Most people never touch it. That’s a problem for portrait and beauty work, because skin and fine detail like eyelashes actually benefit from very different sharpening treatment.
Think of Masking as a way to tell Lightroom which parts of the image actually need sharpening and which parts should be left alone. At zero, everything gets sharpened. As you drag right, Lightroom progressively restricts sharpening to only the areas with the strongest edges and highest contrast transitions.
Step 4: Hold Option (Mac) or Alt (Windows) While Dragging the Masking Slider
 Screen turned white showing full sharpening mask at zero
This is the key move. Hold down the Option key on Mac or Alt on Windows, then click and drag the Masking slider to the right. When you hold that modifier key, Lightroom gives you a visual overlay that shows exactly where sharpening is being applied. White areas are being sharpened. Black areas are not.
Screen turned white showing full sharpening mask at zero
This is the key move. Hold down the Option key on Mac or Alt on Windows, then click and drag the Masking slider to the right. When you hold that modifier key, Lightroom gives you a visual overlay that shows exactly where sharpening is being applied. White areas are being sharpened. Black areas are not.
At zero, the entire screen shows white - sharpening is hitting everything. As you drag right, sections of the image start to go black. Skin tones, which are relatively smooth and even, drop out first. They turn black because they lack strong edge contrast, and Lightroom’s masking algorithm correctly identifies them as areas that don’t need sharpening. What stays white are the high-contrast edges: hair strands, eyebrows, eyelashes, the rim of the eyes, nostrils, and the defined edge of the lips.
Step 5: Drag to the Point Where Skin Turns Black but Detail Edges Stay White
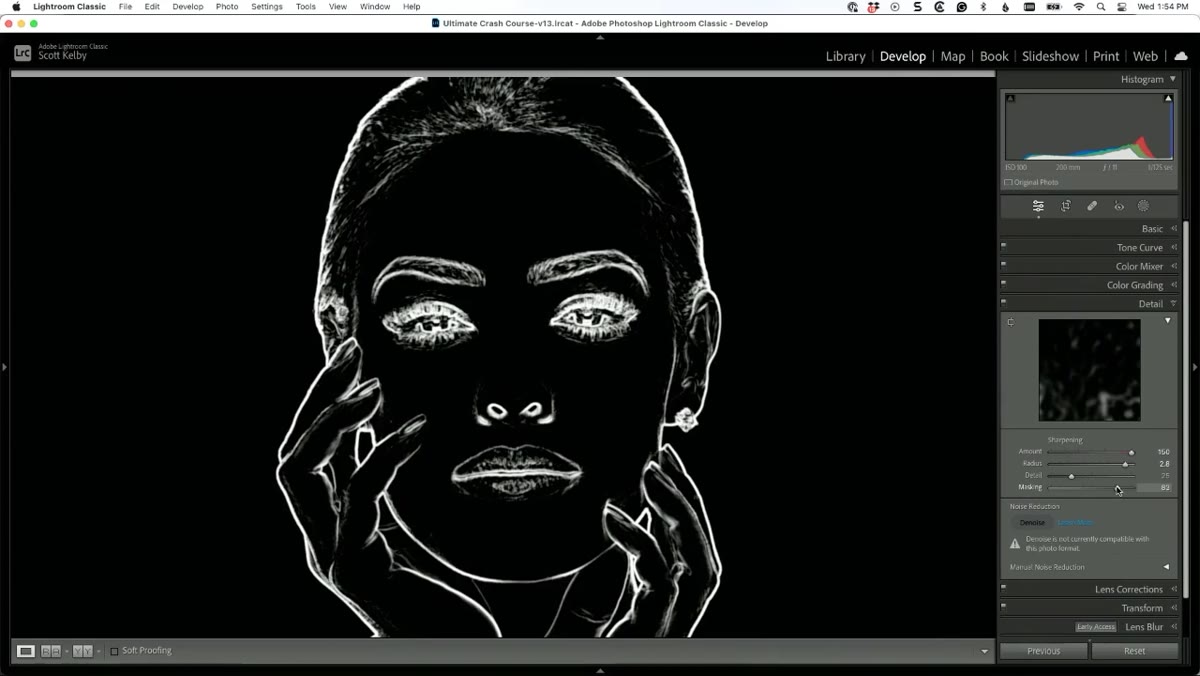 Masking view showing black skin, white hair and eye edges
The goal is to push the slider far enough that the broad smooth planes of the face go dark while the structural detail areas remain bright. For most portrait images, this lands somewhere between 70 and 90 on the Masking scale, though that number will vary with the image. Textured subjects like curly hair or very defined features might let you go a bit lower. Softer, more even complexions might need you to push further right.
Masking view showing black skin, white hair and eye edges
The goal is to push the slider far enough that the broad smooth planes of the face go dark while the structural detail areas remain bright. For most portrait images, this lands somewhere between 70 and 90 on the Masking scale, though that number will vary with the image. Textured subjects like curly hair or very defined features might let you go a bit lower. Softer, more even complexions might need you to push further right.
Release the Option or Alt key once you’re happy with the mask. The visual overlay disappears and you’re back to your normal image view. What you’ve done is essentially rebuilt in one slider what used to require going into Photoshop, duplicating a layer, applying sharpening, and then hand-painting a mask to protect every inch of skin. That process took real time. This takes about three seconds.
Step 6: Zoom In to Verify the Result
 Close-up of eye, sharp lashes and soft skin side by side
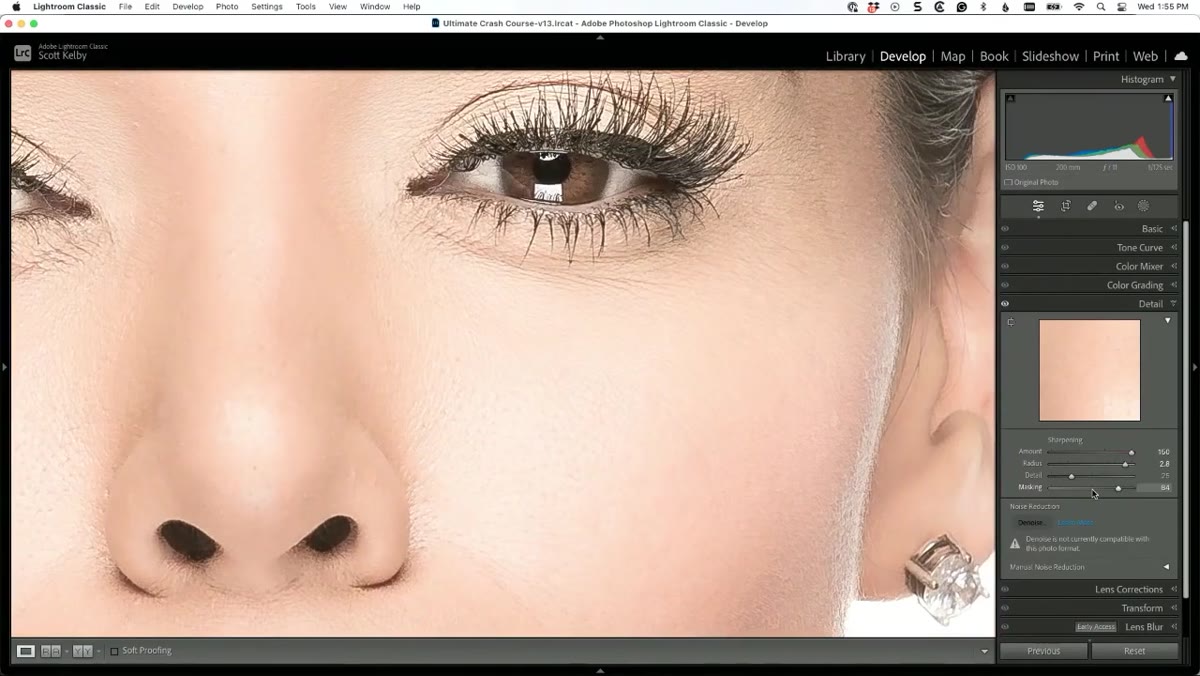
With Masking set and the exaggerated Amount still applied, zoom into the eye area and the cheek. The difference should be immediately visible. Lashes will look sharp and defined. The iris will have edge contrast. Meanwhile the skin right next to the eye should look smooth and clean, with no amplified texture. That contrast - crisp detail sitting next to soft skin - is exactly what separates a polished beauty retouch from an over-processed one.
Close-up of eye, sharp lashes and soft skin side by side
With Masking set and the exaggerated Amount still applied, zoom into the eye area and the cheek. The difference should be immediately visible. Lashes will look sharp and defined. The iris will have edge contrast. Meanwhile the skin right next to the eye should look smooth and clean, with no amplified texture. That contrast - crisp detail sitting next to soft skin - is exactly what separates a polished beauty retouch from an over-processed one.
Now bring your Amount slider back to a realistic working value for your image. The skin protection from the Masking slider carries forward regardless of how high or low Amount is set.
A Note From My Own Practice
I use this technique on almost every portrait I deliver, but I want to add one thing Kelby doesn’t cover here: the Masking slider works best when your skin cleanup is already done. If there are blemishes or uneven tones, the sharpening mask can sometimes catch those irregularities as “edges” and sharpen them slightly. My workflow always runs healing and frequency separation work before I touch the Detail panel. That way the mask reads clean, even skin as smooth and leaves it alone the way it should.
I’d also suggest checking the mask at 1:1 zoom before committing. At fit-to-screen view it can look fine, and then you zoom in and realize the mask is catching a little more texture than you intended. A small adjustment usually fixes it.
The single most important idea to take away here is that sharpening in portrait retouching is not supposed to be uniform. Eyes and skin are fundamentally different surfaces and they deserve different treatment. Lightroom’s Masking slider, used with the Option or Alt overlay, gives you that control without any extra tools, plugins, or trips to Photoshop. It’s built in, it’s fast, and it works.
Watch the full tutorial on YouTube to see Scott Kelby walk through this live - seeing the mask overlay in motion makes the concept click even faster than reading about it.
Comments (4)
Printing this out and pinning it next to my monitor. That good.
Been doing this wrong for years apparently. Thanks for the wake-up call.
This is fantastic. I've been recommending this approach to my readers too.
I've watched a dozen tutorials on this and yours is the clearest by far.
Leave a Comment