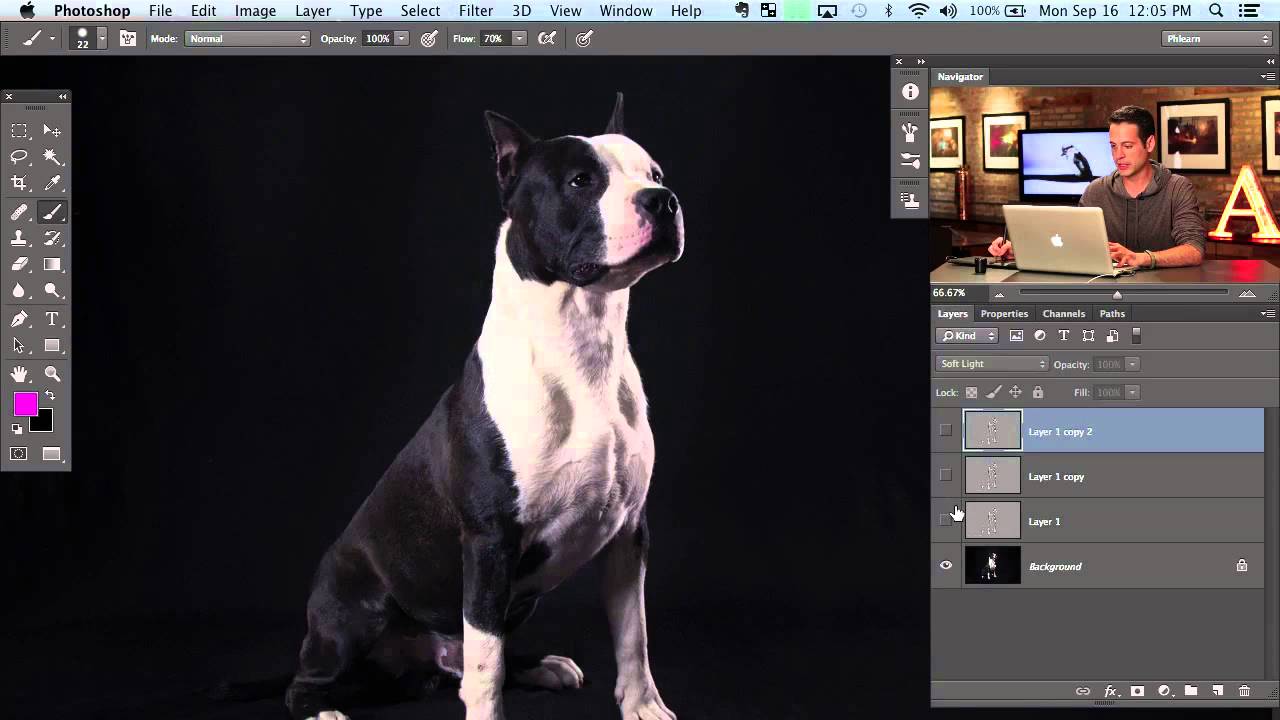
There’s a version of dodge and burn that I used early in my retouching career that I am not proud of. I was painting directly on the image, guessing at opacity, undoing constantly, and somehow still ending up with skin that looked like it had been buffed with a floor polisher. The technique works if you know what you’re doing, but the margin for error is brutal, and when you’re charging a beauty client for clean, natural results, “I’ll just undo it” is not a workflow. That’s why when I came across Watch the full tutorial on YouTube from Aaron Nace over at PHLEARN, I stopped whatever I was doing and took notes.
What Aaron teaches here is a High Pass-based approach to dodging and burning that sidesteps most of the common mistakes. Instead of painting light and shadow freehand onto the image, you’re essentially building a contrast-enhancing layer structure and then revealing it selectively with a mask. The result is sculpted highlights and shadows that feel baked into the original light rather than applied on top. For anyone retouching portraits, headshots, or beauty work, this is a technique worth adding to your toolkit today.
The method works especially well on images with existing contrast to build on. Skin with clear highlight and shadow separation, fur with directional light, or any subject where the natural luminosity already has some dimension. A flat, evenly lit image won’t give you much to work with. But give this technique a photo with interesting light, and it will reward you.
Step 1: Duplicate the Background Layer
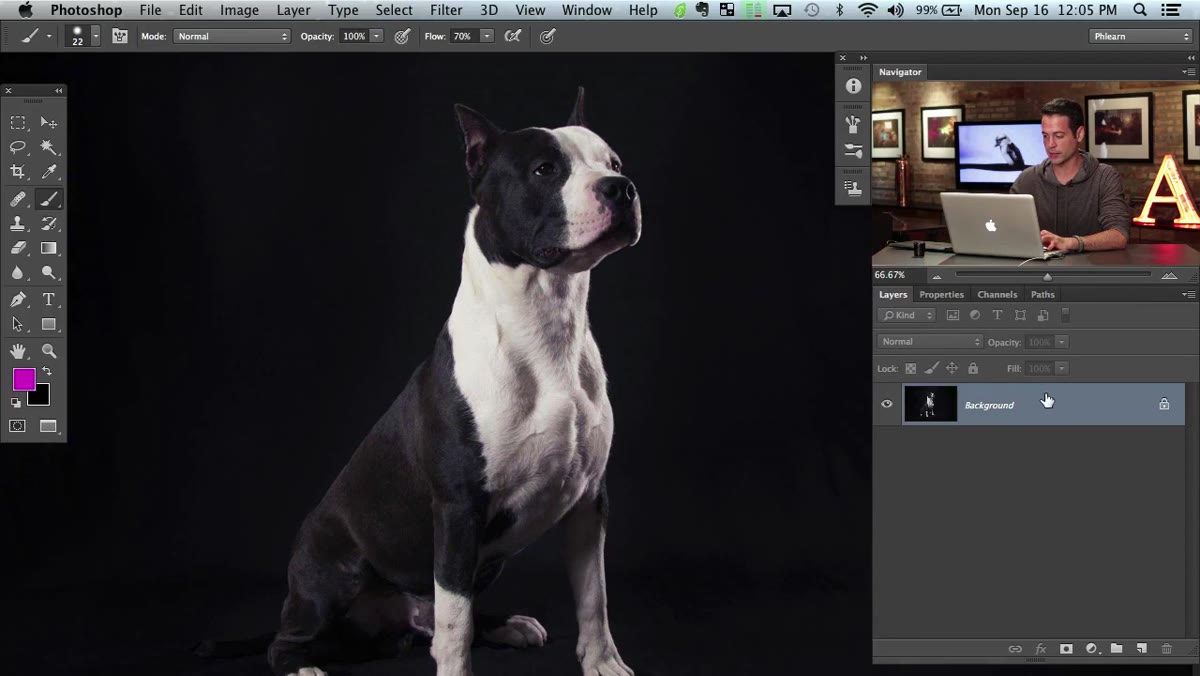 Duplicating the background layer in the Layers panel
Start with your image open in Photoshop and your background layer selected. Hit Command+J (or Ctrl+J on Windows) to duplicate it. This new copy is where all the High Pass work happens, so your original image stays completely untouched underneath. Non-destructive habits from the first step are what separate a clean, revisable file from a nightmare you can’t hand off to a client.
Duplicating the background layer in the Layers panel
Start with your image open in Photoshop and your background layer selected. Hit Command+J (or Ctrl+J on Windows) to duplicate it. This new copy is where all the High Pass work happens, so your original image stays completely untouched underneath. Non-destructive habits from the first step are what separate a clean, revisable file from a nightmare you can’t hand off to a client.
Step 2: Set the Layer Blend Mode to Soft Light
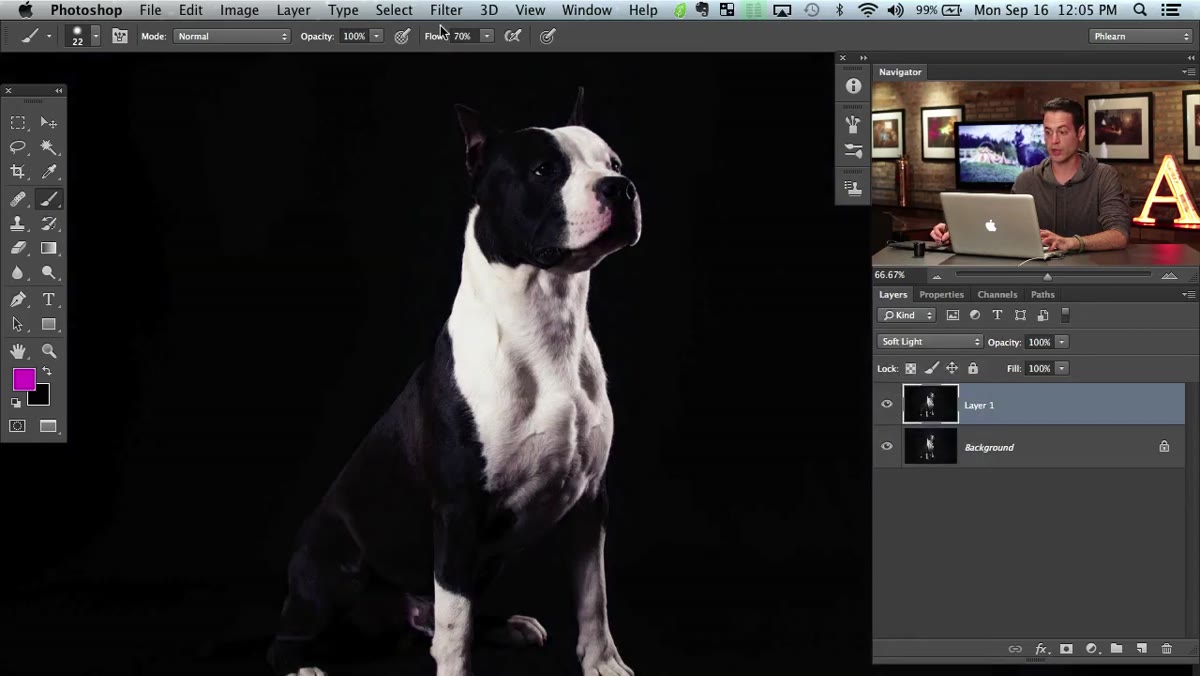 Changing layer blend mode dropdown from Normal to Soft Light
With your duplicated layer selected, go to the blend mode dropdown in the Layers panel (it defaults to “Normal”) and switch it to Soft Light. This blend mode is the engine of the whole technique. Soft Light interprets tones above 50% gray as highlights and below 50% gray as shadows, so when we apply the High Pass filter in the next step, those tones will push contrast into the image in a controlled, photographic way.
Changing layer blend mode dropdown from Normal to Soft Light
With your duplicated layer selected, go to the blend mode dropdown in the Layers panel (it defaults to “Normal”) and switch it to Soft Light. This blend mode is the engine of the whole technique. Soft Light interprets tones above 50% gray as highlights and below 50% gray as shadows, so when we apply the High Pass filter in the next step, those tones will push contrast into the image in a controlled, photographic way.
Step 3: Apply the High Pass Filter
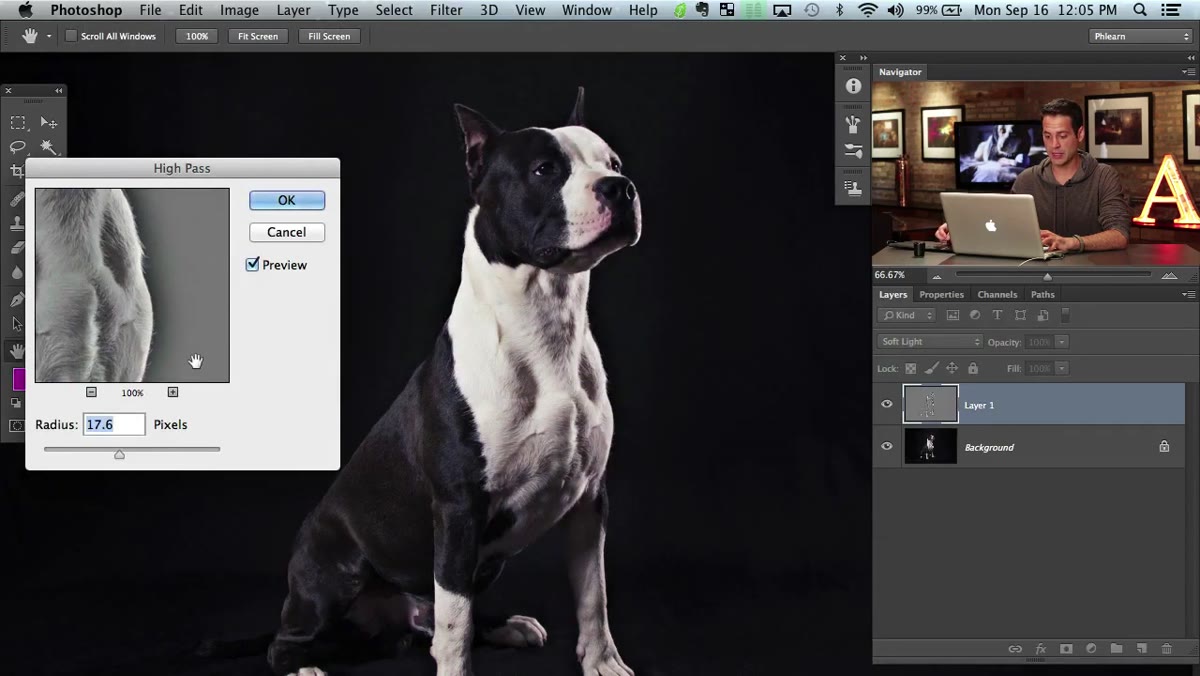 High Pass filter dialog with radius slider in Filter menu
With your Soft Light layer active, go to Filter, then Other, then High Pass. A dialog box will appear with a radius slider. Here’s where it diverges from standard sharpening technique. For sharpening, you’d keep the radius small, somewhere between 1 and 5 pixels. For dodge and burn, you want to push it higher, into the range of 15 to 20 pixels, roughly where the effect starts working on broader tonal areas rather than just crisp edges. Aaron lands around 17 pixels in the tutorial, and that’s a solid starting point. You’ll see the preview update live, so dial it until the highlights and shadows on your subject start to pop without looking crunchy or overworked. Hit OK.
High Pass filter dialog with radius slider in Filter menu
With your Soft Light layer active, go to Filter, then Other, then High Pass. A dialog box will appear with a radius slider. Here’s where it diverges from standard sharpening technique. For sharpening, you’d keep the radius small, somewhere between 1 and 5 pixels. For dodge and burn, you want to push it higher, into the range of 15 to 20 pixels, roughly where the effect starts working on broader tonal areas rather than just crisp edges. Aaron lands around 17 pixels in the tutorial, and that’s a solid starting point. You’ll see the preview update live, so dial it until the highlights and shadows on your subject start to pop without looking crunchy or overworked. Hit OK.
Step 4: Duplicate the High Pass Layer Multiple Times
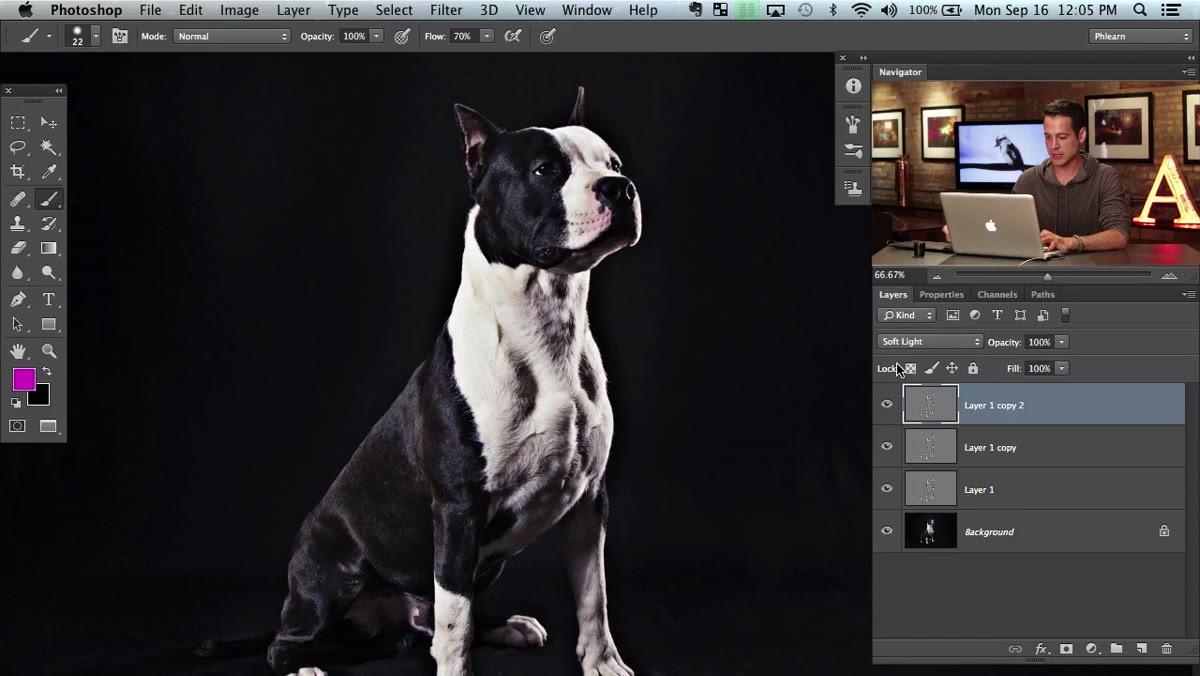 Three duplicate High Pass layers stacked in Layers panel
One High Pass layer on Soft Light gives you a subtle effect. To build real dimension, hit Command+J two more times so you have three copies of the High Pass layer stacked on top of each other. Yes, it looks intense at this point. The image will appear heavily processed and strange. Don’t worry about that yet. You’re building up the raw material before you decide where it shows.
Three duplicate High Pass layers stacked in Layers panel
One High Pass layer on Soft Light gives you a subtle effect. To build real dimension, hit Command+J two more times so you have three copies of the High Pass layer stacked on top of each other. Yes, it looks intense at this point. The image will appear heavily processed and strange. Don’t worry about that yet. You’re building up the raw material before you decide where it shows.
Step 5: Group the Layers and Add a Black Layer Mask
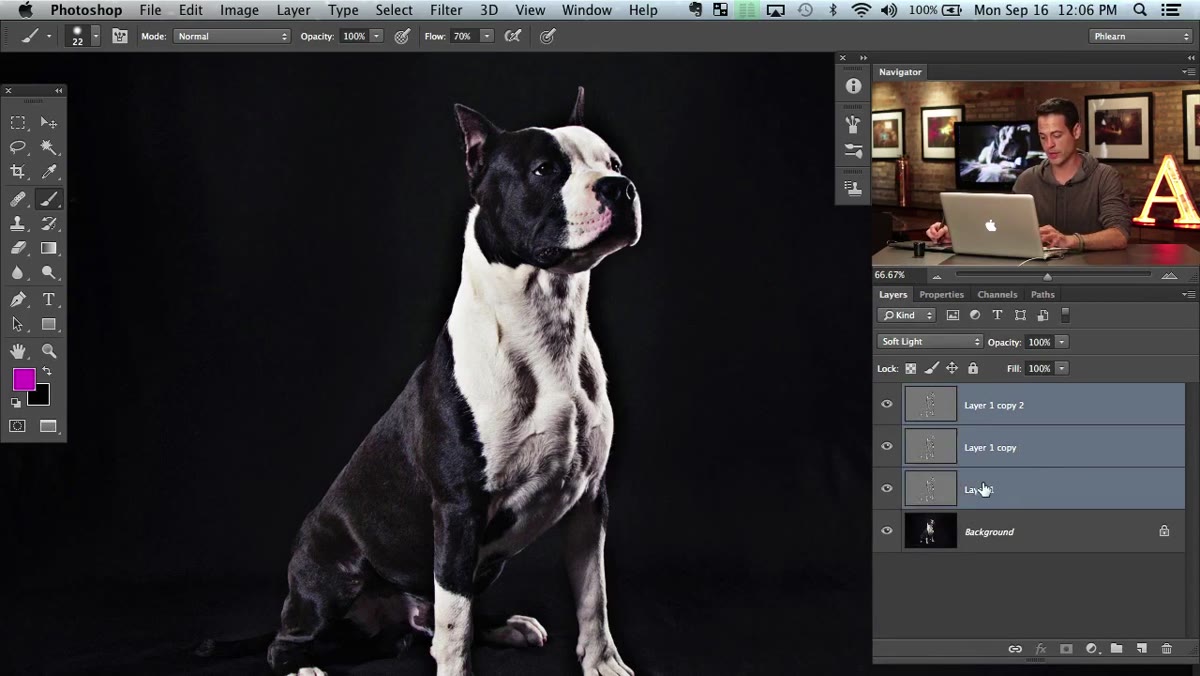 Grouped layers with black layer mask applied in panel
Select all three High Pass layers by clicking the top one, then Shift-clicking the bottom one, and group them with Command+G. Now, instead of clicking the layer mask button normally (which would add a white mask, revealing everything), hold Alt/Option and click the layer mask button. This creates a black mask, which hides the entire group by default. At this point your image looks completely normal again. That’s exactly what you want. The entire effect is invisible until you choose where to bring it in.
Grouped layers with black layer mask applied in panel
Select all three High Pass layers by clicking the top one, then Shift-clicking the bottom one, and group them with Command+G. Now, instead of clicking the layer mask button normally (which would add a white mask, revealing everything), hold Alt/Option and click the layer mask button. This creates a black mask, which hides the entire group by default. At this point your image looks completely normal again. That’s exactly what you want. The entire effect is invisible until you choose where to bring it in.
Step 6: Paint White to Reveal the Effect Selectively
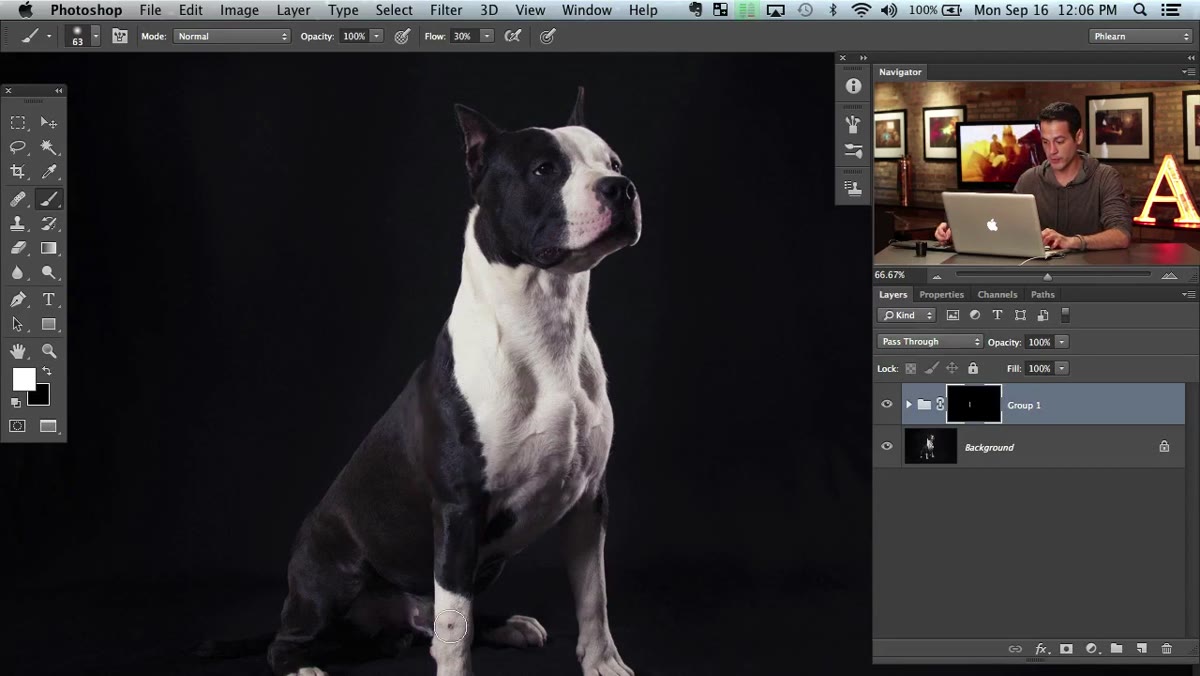 Painting white on black layer mask over highlight areas
Grab your brush tool, set it to white, and lower the opacity to something comfortable, around 30 to 50 percent. Make sure your layer mask thumbnail is selected in the Layers panel, not the layer itself. Now paint over the areas where you want the dodge and burn to come through. On portraits, that typically means the high points of the face: cheekbones, the bridge of the nose, brow bones, and chin. On the dog image Aaron uses in the tutorial, he focuses on the natural highlight areas in the fur. Paint in gradual passes rather than one heavy stroke. You’re building the effect slowly, which gives you far more control than any freehand dodge and burn approach.
Painting white on black layer mask over highlight areas
Grab your brush tool, set it to white, and lower the opacity to something comfortable, around 30 to 50 percent. Make sure your layer mask thumbnail is selected in the Layers panel, not the layer itself. Now paint over the areas where you want the dodge and burn to come through. On portraits, that typically means the high points of the face: cheekbones, the bridge of the nose, brow bones, and chin. On the dog image Aaron uses in the tutorial, he focuses on the natural highlight areas in the fur. Paint in gradual passes rather than one heavy stroke. You’re building the effect slowly, which gives you far more control than any freehand dodge and burn approach.
Step 7: Toggle the Mask to Check Your Work
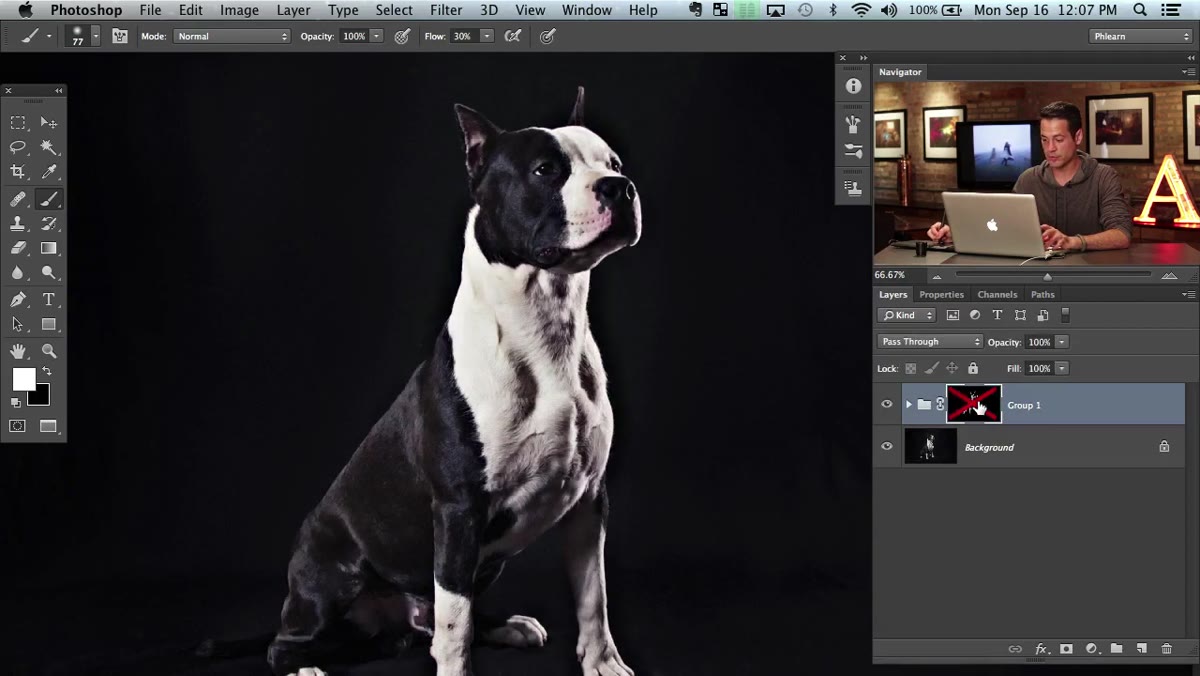 Before and after comparison with layer mask toggled on and off
Hold Shift and click on the layer mask thumbnail to temporarily disable it. This shows you the full effect applied everywhere, which helps you see whether your radius setting and layer count are giving you the depth you want. Click it again to re-enable the mask and compare. Toggling back and forth quickly trains your eye to see whether the effect is enhancing the natural light or fighting it. If it looks like a filter rather than light, either reduce your layer count or repaint the mask with a softer brush and lower opacity.
Before and after comparison with layer mask toggled on and off
Hold Shift and click on the layer mask thumbnail to temporarily disable it. This shows you the full effect applied everywhere, which helps you see whether your radius setting and layer count are giving you the depth you want. Click it again to re-enable the mask and compare. Toggling back and forth quickly trains your eye to see whether the effect is enhancing the natural light or fighting it. If it looks like a filter rather than light, either reduce your layer count or repaint the mask with a softer brush and lower opacity.
My Own Extension: Name the Group and Save It as an Action
I always group this entire layer structure and label it clearly, something like “Dodge Burn - High Pass” so anyone opening the file later (including future me at 11pm before a deadline) knows exactly what they’re looking at. I also keep a saved Photoshop action that builds steps 1 through 5 automatically, so I’m starting from the masking step within seconds. The time savings across a full beauty retouch adds up fast.
One thing I’ve learned through working on actual client files is that this technique can flatten the appearance of pores if you’re not careful. On high-resolution beauty images, I often reduce the opacity of the group itself to 70 or 80 percent after I’m done painting, which lets the underlying texture breathe while still keeping the sculpted contrast intact.
The single most important thing to take away from this technique is the masking step. Dodge and burn fails when it’s applied globally, because no face or subject is uniformly lit. The black mask forces you to be intentional about every brushstroke, which is ultimately what makes the result look like it belongs to the photograph rather than sitting on top of it.
Watch the full tutorial on YouTube to see Aaron walk through the before and after in real time. Watching the toggle comparison he does at the end is worth it on its own.
Comments (9)
My workflow just got 10x faster. Not even kidding.
Just subscribed. If the rest of your content is this good, I'm in.
Shared this with my photography group. Everyone loved it.
Would love to see a follow-up going deeper into this topic.
Love how you break down complex stuff into manageable steps.
Printing this out and pinning it next to my monitor. That good.
I tried this on a client project yesterday and the results were way better than expected.
Never thought of approaching it this way. Really creative.
Simple but effective. Sometimes that's all you need.
Leave a Comment