I’ve been thinking a lot lately about light. Not just the kind I sculpt in Photoshop after a shoot, but the kind that gets built from scratch, before a single pixel exists. A beauty client came to me last spring asking for campaign imagery that felt “cinematic but grounded,” and I realized I didn’t have a strong enough mental model for how cinematic light actually gets constructed. I knew how to retouch it. I didn’t fully understand how to think in it.
That gap sent me down a rabbit hole, and I ended up spending a weekend with this Serge Ramalli tutorial on Unreal Engine 5. I want to be upfront: this is a 3D environment tutorial, not a retouching tutorial. But the principles of how light behaves, how it wraps a subject, how post processing shapes mood, those things are directly transferable. And watching someone build a scene from nothing is one of the fastest ways I’ve found to sharpen your eye for what makes an image feel alive.
Building the World Before You Touch the Subject
The tutorial opens with installation and project setup, which Serge walks through efficiently in the first six minutes. If you’re on a Mac, check compatibility first. UE5 is resource-heavy, and Serge is upfront about that.
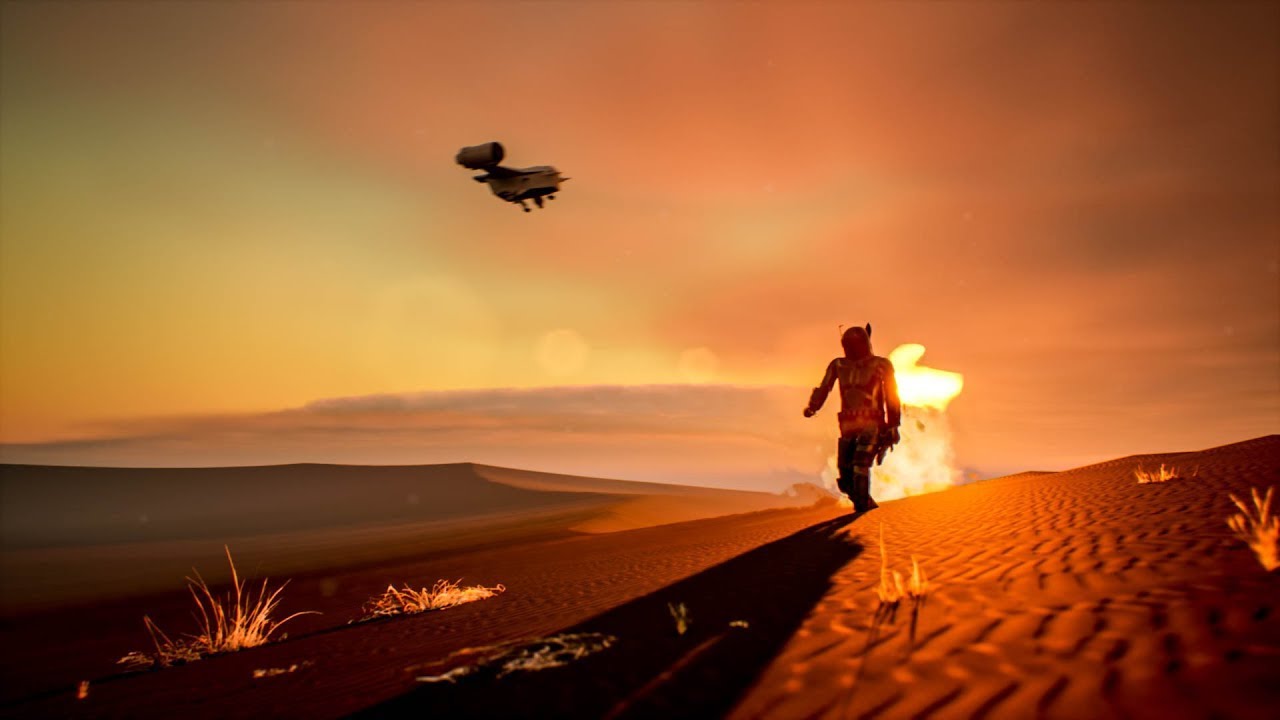
Once the engine is running, he creates a new level using the “Basic” template and immediately sets up lighting using a Sky Atmosphere and Directional Light combo. This is the foundation. The directional light acts as the sun, and here’s the detail worth writing down: Serge sets the light intensity around 10 lux and adjusts the angle to create a late-day, golden-hour quality. He’s not guessing. He’s making deliberate choices about where the sun sits in the sky before he places a single asset.
The landscape gets created next using UE5’s built-in Landscape tool. He uses default settings for a beginner scene, roughly 8x8 sections, which gives enough terrain to feel expansive without killing your machine. The sculpting tools work like a soft brush, and Serge keeps the strokes loose and organic to avoid that telltale “lumpy” computer-generated look.
Bringing in Real-World Surface Textures via Quixel Bridge
This is where things get genuinely useful for anyone thinking about texture and surface. Serge imports ground and rock surfaces directly from Quixel Bridge, which is free and integrated into UE5. He selects a desert surface material, downloads it at high resolution, and drags it directly onto the landscape layer.
The reason this matters beyond 3D work: Quixel’s texture library is built from real-world photogrammetry scans. Studying how those surfaces catch and diffuse light, how a rough rock face holds shadow differently than a smooth stone, feeds directly back into how I read and retouch skin. Texture is texture. The physics don’t change.
Serge also covers navigation here, and it’s worth a pause if you’re new to 3D. WASD moves you through the scene like a first-person game. Right-click and drag to look around. Holding Shift speeds up movement. Getting comfortable with this navigation is the unglamorous work that lets everything else flow faster.
Moving the Sun and Building an Animation
Around the 18-minute mark, Serge rotates the directional light in real time to show how the sun’s position transforms the entire mood of the scene. Moving from high noon to a lower angle changes the shadows from flat and harsh to long and dramatic. He doesn’t just say “move the sun.” He shows three or four specific positions and talks through what each one does emotionally. That’s the teaching.
The animation section, starting around 23 minutes, uses UE5’s Sequencer. Serge creates a camera track and sets keyframes by hitting S at each position along the timeline. The default keyframes use an easing curve, which creates slow-in and slow-out movement. For sections where he wants consistent speed, he right-clicks the keyframe and switches the interpolation to Linear. That single detail changes whether an animation feels polished or slightly nauseous to watch.
He also adds a spotlight specifically to brighten the Mandalorian character model, placing it slightly above and in front of the figure, angled down at roughly 45 degrees. This is a beauty light. It’s the same logic as a clamshell setup in studio photography. Even in a dramatic outdoor scene, the subject needs its own dedicated light source, or it disappears into the environment.
Post Processing and the Finishing Pass
The Post Process Volume section, around the 41-minute mark, is the part that made me sit up straight. Serge adds a Post Process Volume to the entire scene and starts adjusting settings that will feel immediately familiar: exposure, contrast, color grading, bloom, and a subtle vignette. He pulls down the highlights and lifts the shadows slightly, which compresses the dynamic range and gives the scene that processed, cinematic look.
He also adds dust particles and fire using UE5’s Niagara particle system, which handles atmospheric layering in a way that’s directly analogous to adding texture and grain in a photo edit. The principle is the same: controlled imperfection makes things feel real.
Where I’d Push Back (Slightly)
The tutorial moves fast through the color grading section, which is fine for beginners but leaves some nuance on the table. Serge uses the global color grading sliders inside the Post Process Volume, but for anyone coming from Lightroom or Capture One, those sliders map only loosely to what you already know. I’d recommend pausing that section and cross-referencing with UE5’s documentation on the Tone Mapper specifically. The default ACES tone mapping in UE5 compresses highlights aggressively, and if you don’t account for that, your grade will fight the engine rather than work with it.
The One Thing I’m Carrying Back to My Retouching Work
The single insight I’m keeping from this tutorial is how deliberately Serge layers light: environmental first, then subject-specific, then atmospheric, then grade. That sequence is exactly how a strong retouch should be structured too, and watching it built from scratch in 3D made the logic feel obvious in a way it never quite had before.
Watch the full tutorial from Serge Ramalli on YouTube to see every technique demonstrated visually, especially the Sequencer animation workflow, which is genuinely hard to follow without seeing the timeline in action.
Comments (2)
The before and after really sells it. Incredible difference.
Finally someone explains this in a way that actually makes sense.
Leave a Comment