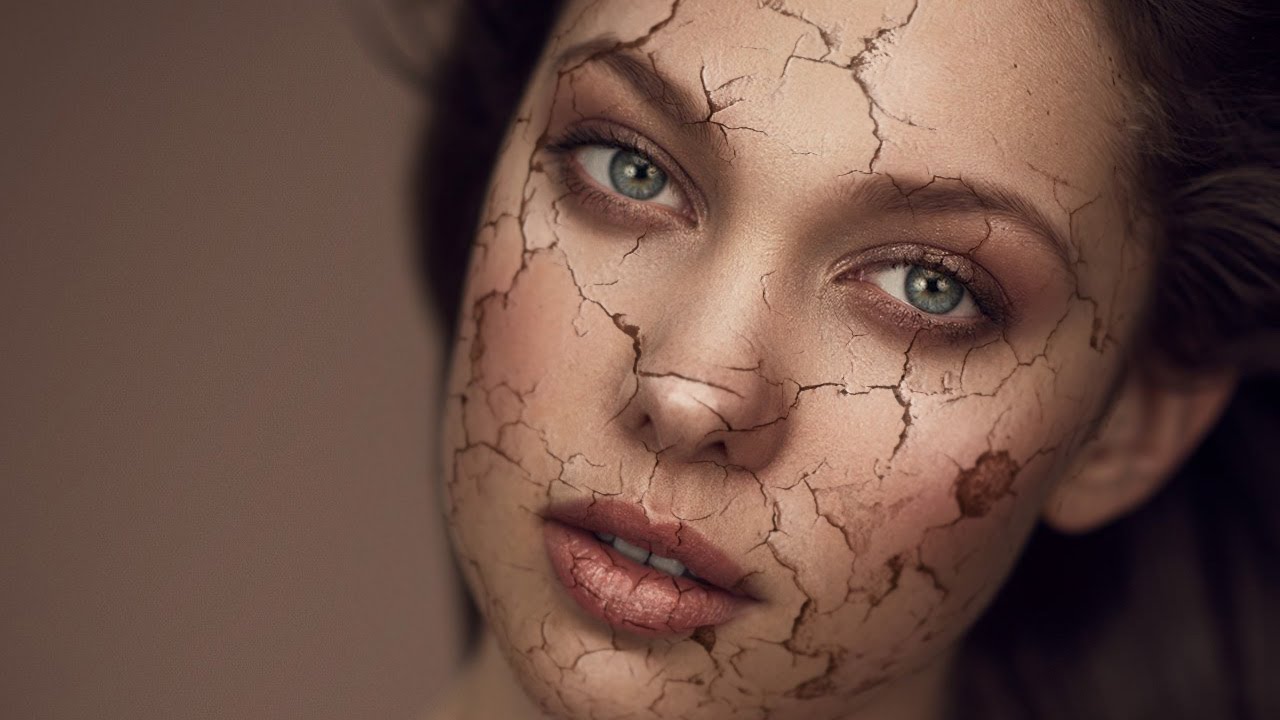
Special effects work isn’t something I thought I’d ever be doing when I first picked up a camera to shoot wedding receptions in the rain. But beauty retouching has a way of pulling you into corners of Photoshop you never expected to visit, and the cracked skin composite is one of those techniques that shows up more often than you’d think, whether it’s an editorial beauty shoot, a Halloween campaign, or a concept piece for a brand that wants something dramatic. The problem I kept running into was that the crack texture always looked pasted on. Flat. Like a sticker someone slapped on a face and called it a day.
In this Aaron Nace (PHLEARN) tutorial, Watch the full tutorial on YouTube, the focus is Part 2 of a two-part series on building a cracked skin effect from scratch. If Part 1 was about getting the texture onto the face, Part 2 is where the real craft lives. We’re talking about blend mode tricks that isolate only the darkest cracks, layer masks that clean up muddy areas, and a clever inversion technique that lets you paint in highlights and shadows on opposite sides of each crack to fake real three-dimensional depth. This is the part that separates a convincing composite from one that looks like a skin condition.
Step 1: Use Blend If to Isolate the Dark Cracks
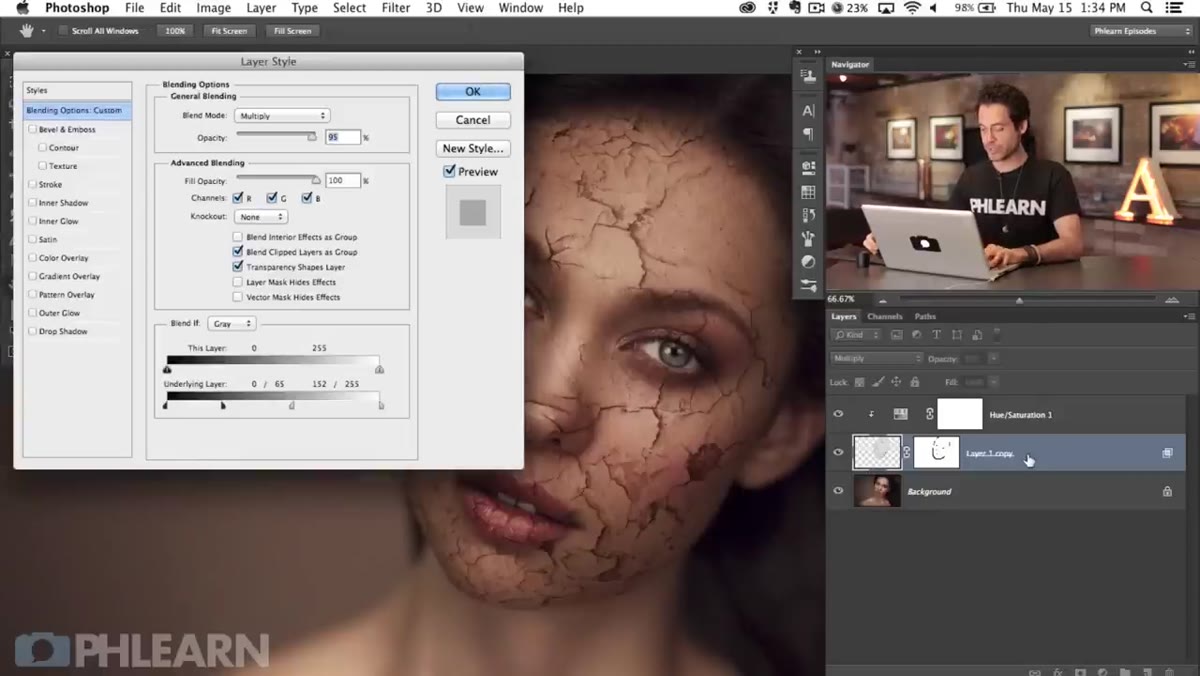 Blend If sliders on the layer style dialog box
The crack texture layer is set to Multiply blend mode, which means anything light on that layer disappears and anything dark burns through. But even with Multiply doing its job, lighter parts of the texture can still muddy the skin and make the subject look more sickly than sculptural. To fix this, double-click the texture layer to open the Layer Style dialog, find the “Blend If” section at the bottom, and hold Alt (Option on Mac) while clicking the white slider on the “This Layer” gradient. Splitting that slider creates a smooth transition, telling Photoshop to fade out the lighter portions of the texture while keeping the dark cracks fully visible. Drag the left half of that split slider inward until the texture feels integrated rather than applied.
Blend If sliders on the layer style dialog box
The crack texture layer is set to Multiply blend mode, which means anything light on that layer disappears and anything dark burns through. But even with Multiply doing its job, lighter parts of the texture can still muddy the skin and make the subject look more sickly than sculptural. To fix this, double-click the texture layer to open the Layer Style dialog, find the “Blend If” section at the bottom, and hold Alt (Option on Mac) while clicking the white slider on the “This Layer” gradient. Splitting that slider creates a smooth transition, telling Photoshop to fade out the lighter portions of the texture while keeping the dark cracks fully visible. Drag the left half of that split slider inward until the texture feels integrated rather than applied.
This one move does an enormous amount of heavy lifting. You’re not painting anything out manually yet. You’re just teaching the layer which parts of itself should be invisible, and the result is cracks that feel like they belong to the skin rather than sitting on top of it.
Step 2: Refine with a Layer Mask
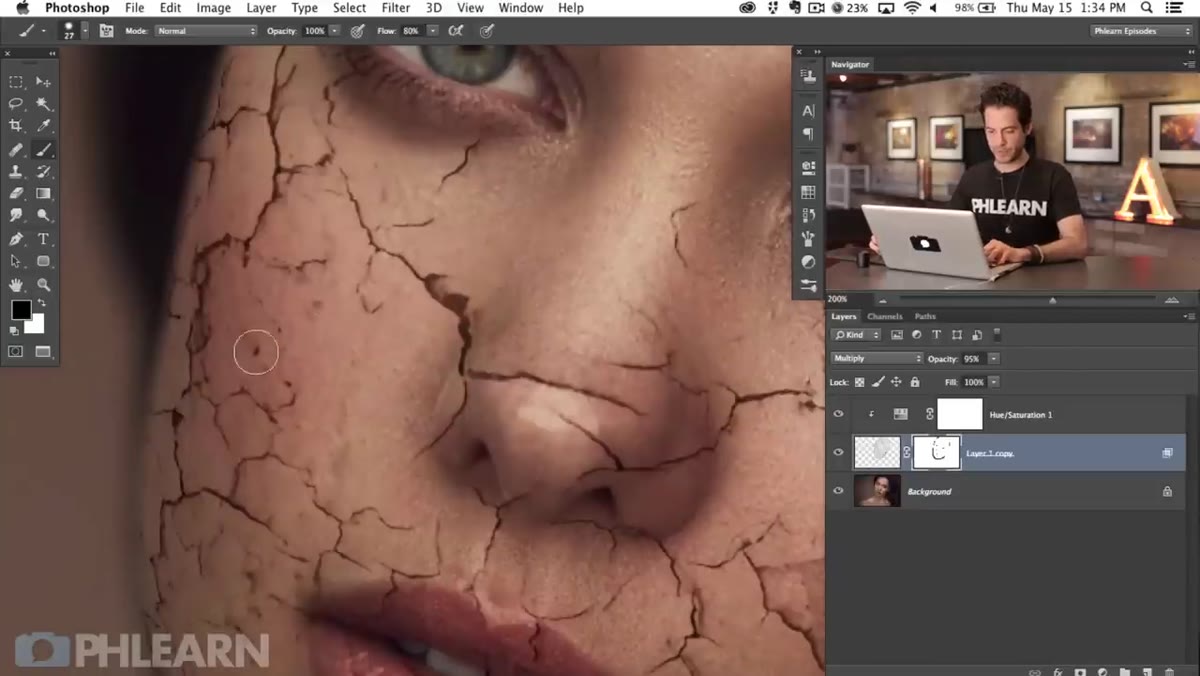 Painting black on a layer mask to remove texture from skin
Blend If gets you most of the way there, but there are always stray bits of texture in places you don’t want them, near the eyebrows, around the lips, at the hairline. Add a layer mask to the texture layer and paint with a soft black brush at a low opacity to gently erase those problem areas. Think of it as editing, not erasing. You want cracks, not dirt. If an area looks more like grime than geology, it needs to go.
Painting black on a layer mask to remove texture from skin
Blend If gets you most of the way there, but there are always stray bits of texture in places you don’t want them, near the eyebrows, around the lips, at the hairline. Add a layer mask to the texture layer and paint with a soft black brush at a low opacity to gently erase those problem areas. Think of it as editing, not erasing. You want cracks, not dirt. If an area looks more like grime than geology, it needs to go.
Keep your brush pressure light and work in passes rather than one heavy stroke. Zoom in to check the edges of each crack. The goal is a reading that feels like the skin is actually breaking open, not like someone applied a texture filter and called it done.
Step 3: Duplicate the Texture Layer for Depth Work
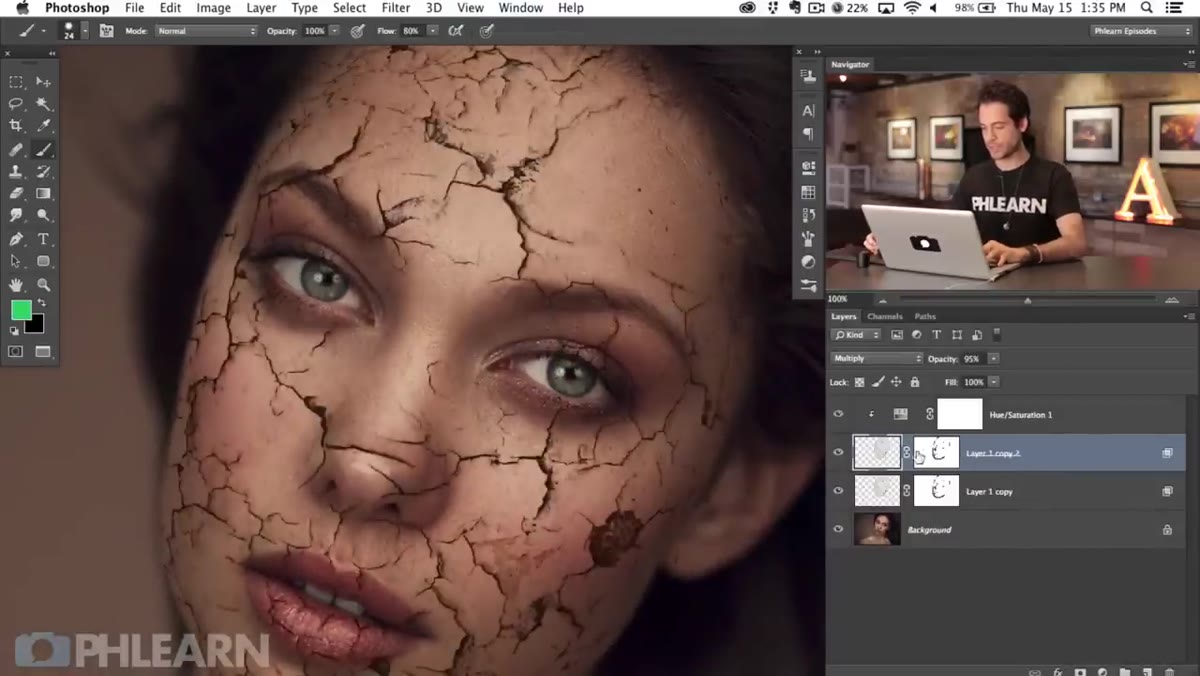 Duplicating the texture layer and moving it to the top of the stack
Here’s where the technique gets genuinely clever. Duplicate your texture layer with Command J (Ctrl J on PC), drag the copy to the top of your layer stack, and clip it to the same group. Then open the Layer Style dialog for this new copy and remove all the Blend If settings you just applied. Change the blend mode back to Normal. We’re starting fresh with this copy because we’re going to use it for something completely different: painting light and shadow along the edges of the cracks to make them look three-dimensional.
Duplicating the texture layer and moving it to the top of the stack
Here’s where the technique gets genuinely clever. Duplicate your texture layer with Command J (Ctrl J on PC), drag the copy to the top of your layer stack, and clip it to the same group. Then open the Layer Style dialog for this new copy and remove all the Blend If settings you just applied. Change the blend mode back to Normal. We’re starting fresh with this copy because we’re going to use it for something completely different: painting light and shadow along the edges of the cracks to make them look three-dimensional.
Having the duplicate as a separate, clean layer means we can treat it independently from the texture that’s already working below. Non-destructive and flexible, which is exactly how I like to work.
Step 4: Invert and Desaturate the Duplicate Layer
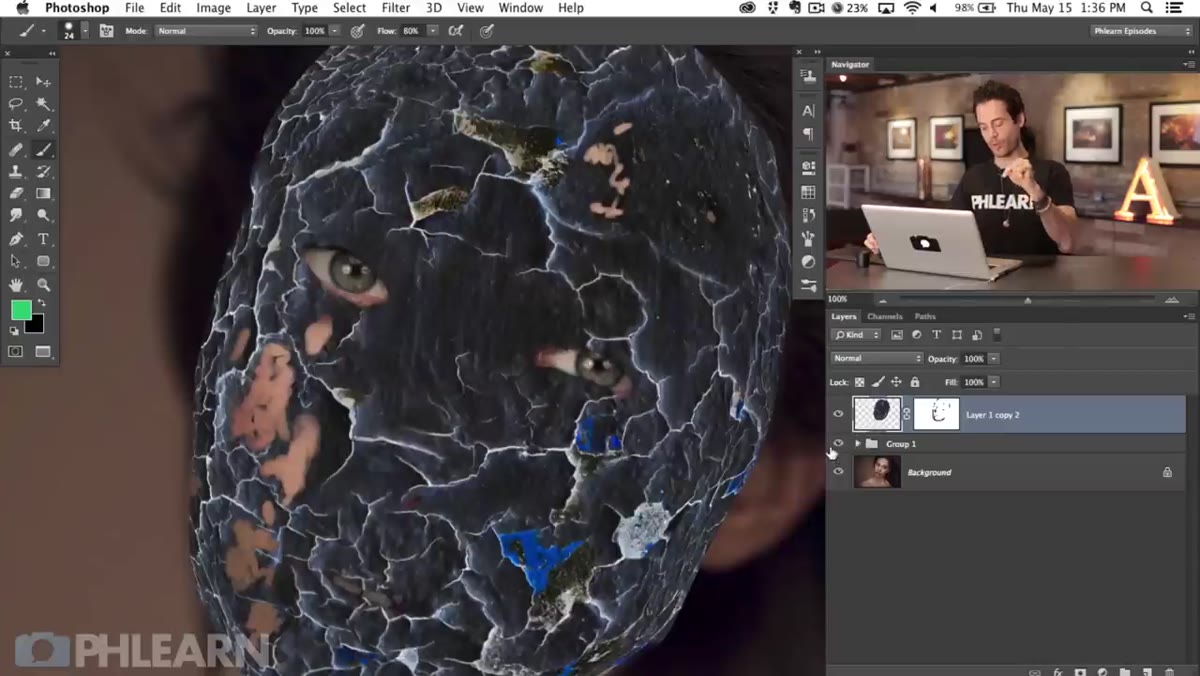 Inverted layer showing white cracks on black background
With the duplicated layer selected, press Command I (Ctrl I) to invert it. What was black cracks on white becomes white cracks on black. Then press Shift Command U (Shift Ctrl U) to desaturate and strip any color from the texture. We need pure grayscale information here so that when we change the blend mode in the next step, the color from the original portrait isn’t contaminated by any leftover texture tones.
Inverted layer showing white cracks on black background
With the duplicated layer selected, press Command I (Ctrl I) to invert it. What was black cracks on white becomes white cracks on black. Then press Shift Command U (Shift Ctrl U) to desaturate and strip any color from the texture. We need pure grayscale information here so that when we change the blend mode in the next step, the color from the original portrait isn’t contaminated by any leftover texture tones.
This two-keystroke combo, invert then desaturate, is one of those small moves that takes two seconds and makes everything that follows much cleaner.
Step 5: Set the Blend Mode to Create Highlights
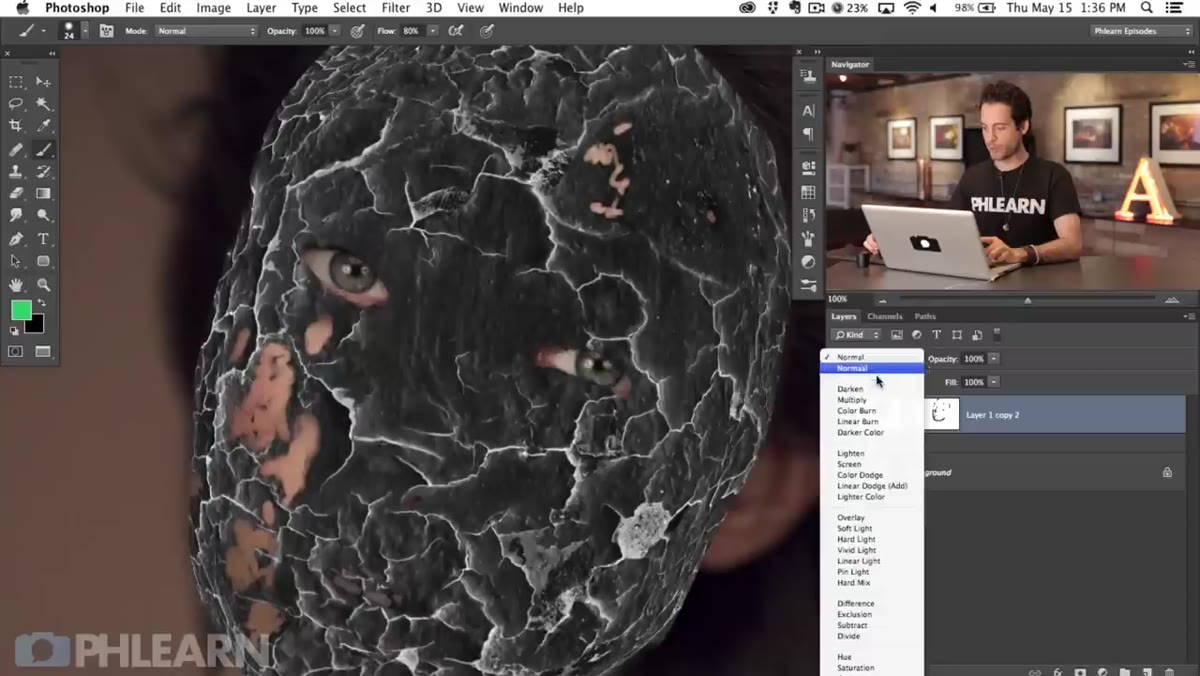 Blend mode dropdown showing new blend mode selection on inverted layer
Change the blend mode on this inverted, desaturated layer to Screen. Now only the white areas (the cracks, since we inverted them) show through. You effectively have a layer that paints bright highlights exactly where the dark cracks are. Adjust the layer opacity to taste. The highlights should feel like light catching the raised edge of broken skin, not like someone painted white lines on a face.
Blend mode dropdown showing new blend mode selection on inverted layer
Change the blend mode on this inverted, desaturated layer to Screen. Now only the white areas (the cracks, since we inverted them) show through. You effectively have a layer that paints bright highlights exactly where the dark cracks are. Adjust the layer opacity to taste. The highlights should feel like light catching the raised edge of broken skin, not like someone painted white lines on a face.
From here, you can mask this layer and use a soft brush to limit those highlights to the side of the face where light is coming from. Cracks catch light on one edge and fall into shadow on the other. That asymmetry is what makes them read as three-dimensional.
A Note from My Own Workflow
The depth step is where I’ve seen beginners stop too early. Getting the texture on the face feels like the finish line, and it isn’t. I now treat the highlight and shadow pass as mandatory, not optional. In my own work I’ll often create a separate Curves adjustment layer clipped to the crack group, then use a gradient mask to push shadows onto one side and pull them back on the other. It takes an extra three minutes and adds about 40 percent more realism to the final image. Aaron’s inversion trick is a faster path to the same idea, and I’ve started folding it into a Photoshop action I named after “The Matrix” because it genuinely feels like you’re bending the rules of how layers are supposed to behave.
The single biggest lesson from this tutorial is that a texture effect lives or dies by its lighting. Getting a crack on a face is easy. Making it look like it belongs there, like physics and light and gravity have all agreed to treat it as real, requires this extra layer of shadows and highlights that most tutorials skip entirely. Do not skip it.
Watch the full tutorial on YouTube and follow along with Part 1 first if you haven’t already. Aaron walks through everything at a pace that’s easy to follow, and seeing his before-and-after comparisons in motion will make the blend mode logic click in a way that screenshots alone can’t quite replicate.
Comments (2)
Never thought of approaching it this way. Really creative.
This is exactly what I needed today. Been struggling with this for weeks.
Leave a Comment