A client came to me last spring asking for something I’d never delivered before. She wanted composite backgrounds for a skincare campaign, something that felt filmic and atmospheric rather than the usual clean-studio look. I’d been hearing about Unreal Engine for a while, mostly from video game artists and cinematographers, but I’d written it off as overkill for beauty work. Then I sat down with this Serge Ramelli tutorial and realized I’d been sleeping on one of the most useful lighting sandboxes available to creatives right now.
What struck me immediately is that everything Serge demonstrates about building a scene in Unreal Engine 5 is fundamentally a conversation about light. And light is a language I’ve been studying for years, just from a different angle.
Why a Real-Time 3D Engine Belongs in a Retoucher’s Toolkit
Unreal Engine 5 is free. That’s the first thing worth saying. Serge walks you through the installation from the Epic Games Launcher, which takes about ten minutes and costs nothing. For someone used to paying for compositing software, that still catches me off guard.
Once you’re inside, the workflow starts with creating a new level using a template that already includes a sky atmosphere and a directional light acting as the sun. Serge uses the “Basic” level template rather than starting from a blank slate, which means you have a working sky system before you’ve done anything. This is important because the sky and sun in Unreal are physically simulated, not painted. When you move the sun, shadows rotate in real time. For someone who spends hours in Photoshop manually painting shadow corrections on skin, watching this happen automatically is genuinely exciting.
Building the Scene from the Ground Up
The landscape creation process in Unreal Engine 5 takes about two minutes. Serge goes to the Landscape mode, uses the default settings, and hits Create. What you get is a flat terrain that you can sculpt, but for this tutorial the flat version works fine because the drama comes from what you place on top of it and how you light it.
The surface textures come from Quixel Bridge, which is a massive library of photorealistic materials that comes bundled with Unreal Engine. Serge imports a rocky desert surface and applies it to the landscape. The material tiles across the terrain automatically and responds to the directional light you already have in the scene. The whole texture import process, from clicking inside Quixel Bridge to seeing the material on the terrain, takes roughly four minutes.
Navigation inside the viewport is worth spending time on. Serge covers this around the 14-minute mark. Holding the right mouse button and using WASD moves the camera like a first-person video game. Scrolling the mouse wheel adjusts movement speed. It feels disorienting for the first five minutes and then becomes second nature. I’d recommend just flying around an empty scene for a bit before you start placing assets, because fumbling with navigation while you’re also trying to key-frame an animation is frustrating.
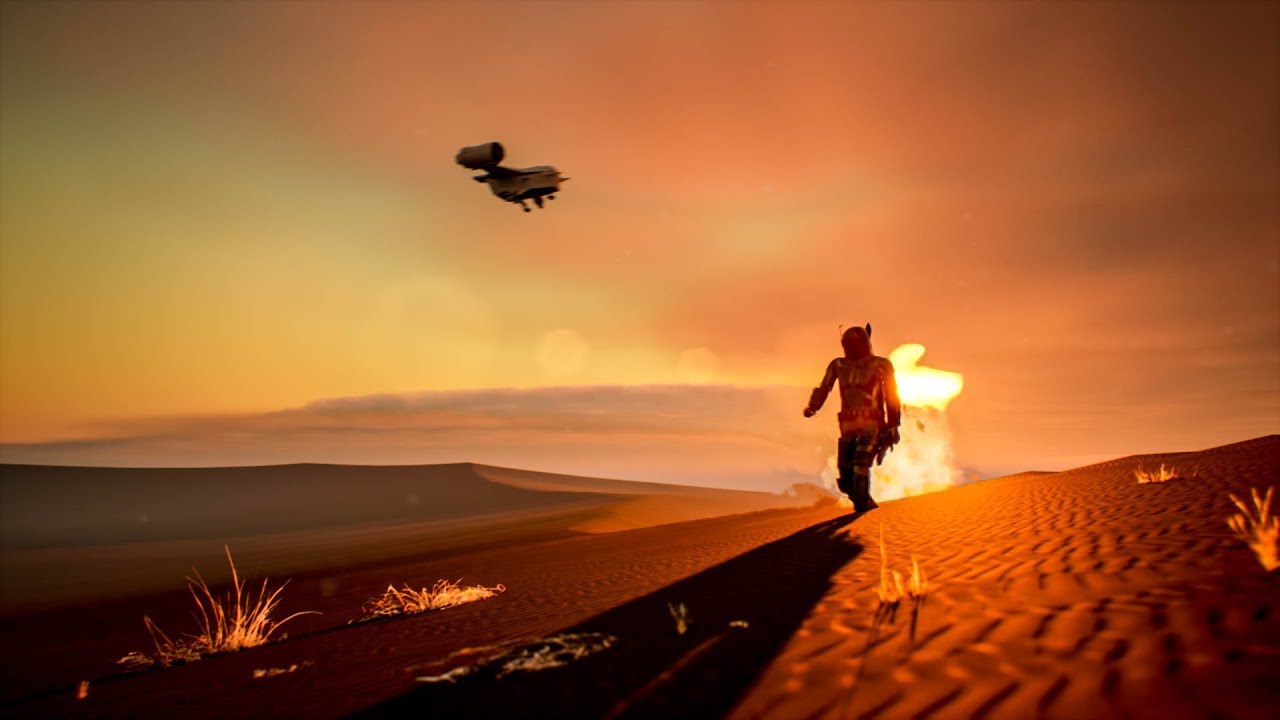
Sun Positioning and What It Taught Me About Rim Light
This is where the tutorial clicked for me in a personal way. Serge selects the directional light (the sun) and rotates it in the scene to find the most dramatic angle for his Mandalorian character. He’s not working from a formula. He’s looking at the render preview and chasing the quality of light that feels right.
He lands on a position where the sun creates a strong rim light across the character’s armor while leaving the face slightly in shadow. Then, around the 29-minute mark, he adds a spotlight specifically to lift the face. He places it in front of and slightly above the character, adjusts the intensity, and uses the attenuation radius to control how far the light spills.
This is a two-light portrait setup. Key light from the front, rim from behind. Beauty photographers build entire careers around this structure. Seeing it constructed in a 3D engine, where you can physically move a light source in three-dimensional space and watch the result update in real time, reframes how you think about the same relationship when you’re retouching a photo. Where did the original light come from? What is the rim doing? Is there a fill source I need to paint in? Unreal Engine makes those questions visible.
Animating the Scene and Rendering It Out
The animation section, starting around the 23-minute mark, uses Unreal’s Sequencer tool. Serge creates keyframes for the sun position, moving it across the sky over a set number of frames to simulate the passage of time. He also keyframes the spotlight to maintain its relationship to the character as the scene evolves.
One detail worth noting: Serge makes the keyframes linear rather than the default spline interpolation. The reason is that spline curves can cause easing at the start and end of movements that looks unnatural for something like sun movement. Linear keeps the motion consistent. You find this option by right-clicking on a keyframe in the Sequencer timeline.
Rendering uses the Movie Render Queue plugin, which Serge installs directly from the Plugins menu inside the engine. Once added, it allows you to export the animation as an image sequence at high resolution. He then takes that sequence into DaVinci Resolve for final color grading.
The One Thing I’d Do Differently
The Post Process Volume that Serge adds near the end of the tutorial (around the 41-minute mark) includes options for bloom, chromatic aberration, and vignette. He pushes the chromatic aberration to add a cinematic feel. For beauty work, I’d leave chromatic aberration off entirely, or keep it at near zero. It softens edge detail in ways that work for action scenes but fight against the precision you want when a client needs to see skin texture and product clarity. The rest of the post-process settings, the exposure, the color grading controls, the bloom, are genuinely useful and worth experimenting with.
The single most important thing I took from this tutorial is that light is always buildable. Whether you’re inside a 3D engine or correcting a flat beauty photo, you can add, move, and shape light to tell a more intentional story. Watch the full video to see Serge demonstrate every step visually, because some of the navigation and timeline work is much easier to follow in motion than on a page.
Comments
Leave a Comment