The Hidden Frequency Separation Secret That Saves Flat-Looking Skin

The Hidden Frequency Separation Secret That Saves Flat-Looking Skin

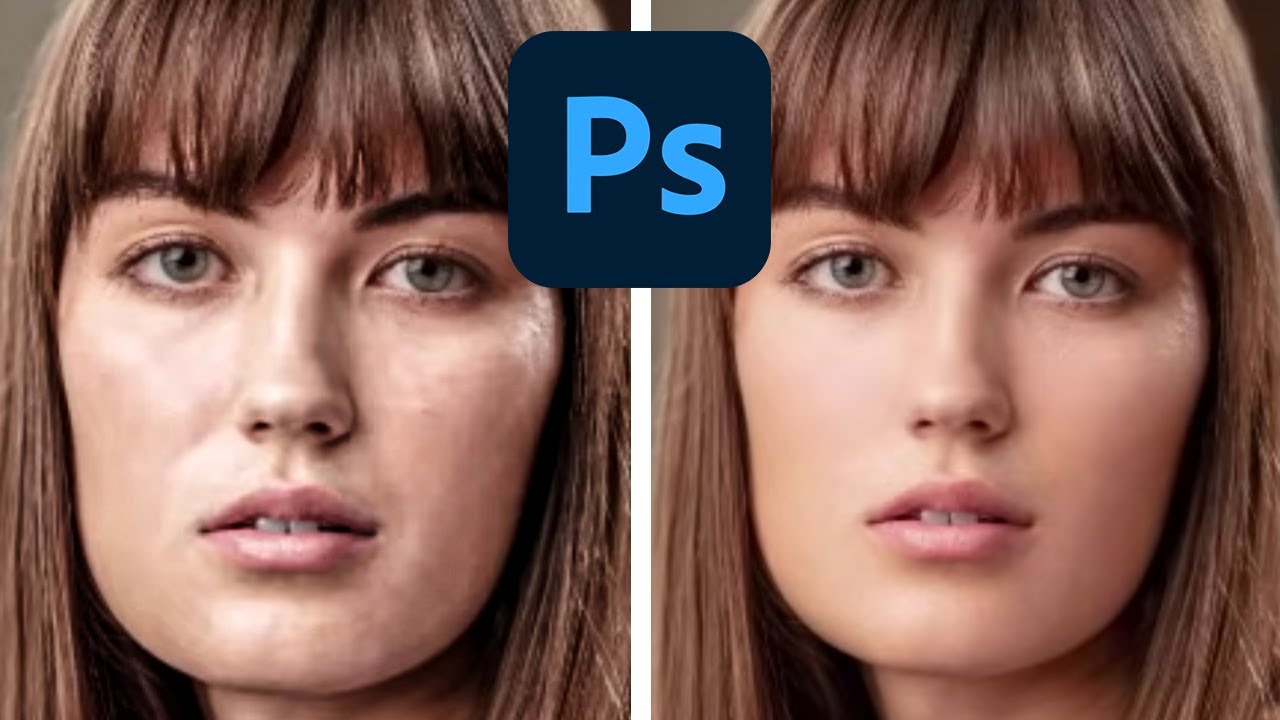
The Hidden Frequency Separation Secret That Saves Flat-Looking Skin I’ve noticed something fascinating happening in portrait retouching conversations lately. Editors everywhere are discovering that their beautifully smoothed skin often loses something critical the moment a client zooms out. The detailed, dimensional quality vanishes, leaving behind a plastic-looking result that feels disconnected from reality. Here’s what I’ve found: there’s a specific step within the frequency separation workflow that most of us gloss over—and it’s actually the key to maintaining that natural, three-dimensional quality we’re all chasing.

Why Your Makeup Retouching Looks Fake (And the Layer Order That Fixes It)

Why Your Makeup Retouching Looks Fake (And the Layer Order That Fixes It)

A client emailed me once, midway through a campaign project, to say my lip color looked “like a crayon drawing on a face.” She wasn’t wrong. I had painted the color directly onto a merged layer, ignored the skin texture entirely, and wondered why it looked like a sticker someone had slapped onto a photograph. That was about seven years ago, right when I was transitioning out of wedding photography and into beauty work full-time.

Why Your Headshot Edits Look Overdone (And the Exact Workflow That Fixed Mine)

Why Your Headshot Edits Look Overdone (And the Exact Workflow That Fixed Mine)

A client once told me my retouching looked “like a wax museum.” She wasn’t wrong. I still have that file saved in a folder called “Humbling Moments,” and I open it maybe once a year to remind myself what over-processing actually looks like when you’re too close to the screen to see it. Headshots are the trickiest category in portrait retouching, not because the techniques are complicated, but because the margin for error is almost zero.

Frequency Separation Actually Explained: Why Your Skin Retouching Looks Fake (And How to Fix It)

Frequency Separation Actually Explained: Why Your Skin Retouching Looks Fake (And How to Fix It)

The first time a client told me my retouching looked “plastic,” I had no idea what she meant. I thought I’d done a beautiful job. The skin was smooth, the blemishes were gone, the whole image had this polished magazine quality I’d been chasing. She pulled up a reference image on her phone, slid it across the table, and said, “I want to look like that. Yours looks like a wax figure.

Frequency Separation: The Game-Changing Technique for Flawless Skin

Frequency Separation: The Game-Changing Technique for Flawless Skin

Frequency Separation: The Game-Changing Technique for Flawless Skin When I first discovered frequency separation, it transformed how I approach portrait retouching. This technique gives us something that traditional healing brushes simply can’t: the ability to edit skin texture and color independently. If you’ve ever struggled to smooth skin without making it look plastic, or found yourself fighting with color corrections that affect sharpness, this method is about to become your best friend.

Frequency Separation: The Game-Changing Technique That Transformed My Portrait Editing

Frequency Separation: The Game-Changing Technique That Transformed My Portrait Editing

Frequency Separation: The Game-Changing Technique That Transformed My Portrait Editing When I first learned about frequency separation, I’ll be honest—it felt intimidating. The name alone made me hesitant. But once I understood what was actually happening, it became the foundation of how I approach every single portrait that comes across my desk. Today, I want to walk you through this technique because I genuinely believe it will change the way you retouch.

Frequency Separation: The Game-Changing Technique Every Portrait Retoucher Needs to Master

Frequency Separation: The Game-Changing Technique Every Portrait Retoucher Needs to Master

Frequency Separation: The Game-Changing Technique Every Portrait Retoucher Needs to Master When I first discovered frequency separation, I felt like I’d unlocked a secret level in portrait retouching. This technique changed everything about how I approach skin editing—and I’m excited to share it with you because it genuinely transforms your results. Frequency separation works by splitting an image into two layers: one containing color and tone information, and another containing texture and detail.

Frequency Separation Mastery: The Game-Changing Technique for Flawless Skin Retouching

Frequency Separation Mastery: The Game-Changing Technique for Flawless Skin Retouching

Frequency Separation Mastery: The Game-Changing Technique for Flawless Skin Retouching When I first discovered frequency separation, I felt like I’d unlocked a secret level in portrait retouching. This technique changed everything about how I approach skin editing—and I’m excited to share it with you today. If you’ve ever struggled with over-smoothed skin that looks plastic, or spent hours trying to remove a blemish without destroying texture, frequency separation is your answer.

How to Smooth Skin in Photoshop Without Losing Texture

How to Smooth Skin in Photoshop Without Losing Texture

Every portrait retoucher faces the same challenge: how do you smooth skin without making it look like plastic? The answer is frequency separation — a technique that separates your image into texture and color layers, letting you work on each independently. The Basic Setup Duplicate your background layer twice Name the top layer “Texture” and the bottom “Color” On the Color layer, apply Gaussian Blur (radius 6-10 pixels depending on resolution) On the Texture layer, go to Image > Apply Image, select the Color layer, set blending to Subtract, Scale 2, Offset 128 Set the Texture layer blend mode to Linear Light Working the Color Layer Select the Color layer and use a soft brush with the Mixer Brush tool (or just a regular brush at low opacity).

Frequency Separation: The Game-Changing Technique for Flawless Portrait Skin

Frequency Separation: The Game-Changing Technique for Flawless Portrait Skin

Frequency Separation: The Game-Changing Technique for Flawless Portrait Skin When I first learned about frequency separation, it transformed how I approach portrait retouching. Instead of struggling to smooth skin without losing texture, or fix color issues without creating a plastic appearance, I suddenly had a technique that lets me work on these problems independently. If you’ve felt frustrated trying to retouch skin naturally, I’m excited to walk you through this method.

Frequency Separation: The Game-Changing Technique for Flawless Portrait Retouching

Frequency Separation: The Game-Changing Technique for Flawless Portrait Retouching

Frequency Separation: The Game-Changing Technique for Flawless Portrait Retouching When I first discovered frequency separation, I felt like I’d unlocked a secret level in portrait retouching. This technique transformed how I approach skin editing, giving me surgical precision over texture and color independently. If you’re ready to elevate your portrait work beyond basic blemish removal, I’m excited to walk you through this powerful method. What Is Frequency Separation? Frequency separation splits your image into two layers: one containing color and tone information (low frequency), and another capturing texture and detail (high frequency).

Frequency Separation Mastery: The Game-Changing Technique for Flawless Skin

Frequency Separation Mastery: The Game-Changing Technique for Flawless Skin

Frequency Separation Mastery: The Game-Changing Technique for Flawless Skin When I first discovered frequency separation, it completely transformed how I approach portrait retouching. This technique lets us separate texture from color and tone, giving us unprecedented control over skin refinement. Instead of fighting between smooth skin and natural detail, we get both. Let me walk you through exactly how to master this game-changing method. What Is Frequency Separation (And Why It Matters) Frequency separation splits an image into two layers: high-frequency (texture and fine details) and low-frequency (color, tone, and larger shapes).